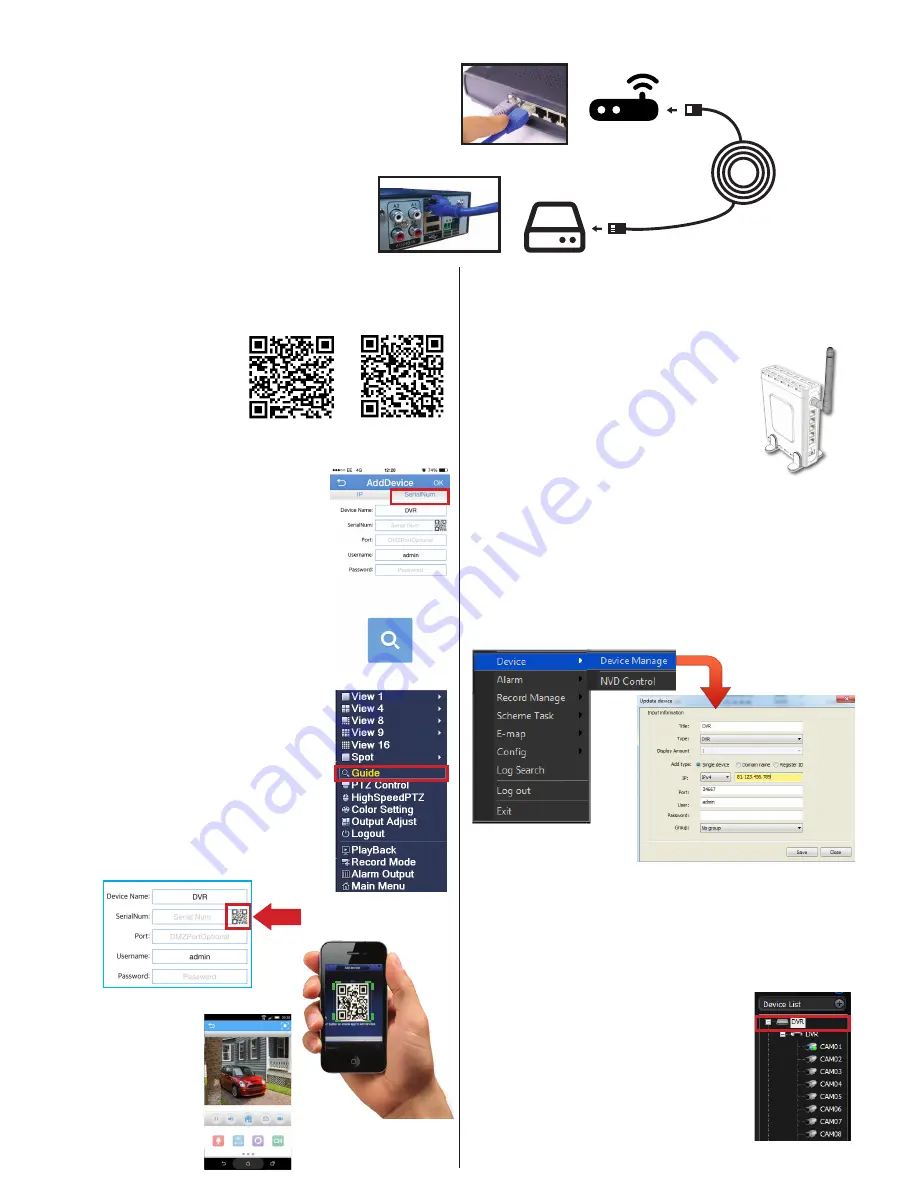
REMOTE CONNECTION SETUP: CONTROL YOUR NVR OVER A NETWORK
Success! You should now be fully setup.
3.
1.
PLEASE MAKE SURE THAT YOUR NVR DEVICE IS SETUP AS SHOWN ON THE REVERSE SIDE OF THIS PAGE BEFORE CONTINUING.
IMPORTANT: Please connect NVR to router/
modem to access the Internet.
Ethernet connector
to NVR ‘NET’ port
Ethernet
connector
to spare router
port
Ethernet
cable
Modem - Router
2.
4.
ANDROID APP
iOS (APPLE) APP
BASIC SETUP
ADVANCED SETUP
Connect the Ethernet cable into
the ‘Net’ port on the rear of the
device, then connect the other end
into one of the spare ports on your
modem-router, as shown here:
Remote connection to view your NVR via a mobile smart device.
Remote connection to view & control your NVR
via PSS on a PC workstation
Download ‘Explorer’ app
to your smartphone
Scan QR codes here to
download the app from
either iTunes or Google
Play stores depending on
your phone’s operating
system.
Launch app
Select ‘Local Login’ to add device. To
add device select the ‘+’ symbol.
Select ‘
SerialNum
’ tab to view P2P
setup. See image to the right.
Give you device a identifying name.
Open ‘Guide’ setup on NVR
Right click mouse button on live view
screen. Select ‘
Guide
’ option from the
list (highlighted by the red box in the
image to the right)
Follow guide until it displays the unique
SN (serial number) for the NVR.
Use smart device to scan SN QR code
Select this to bring up
QR scanner
After successful scan the
details of the device will
be filled in, select ‘OK’.
A device list will appear
and show the added
device. Select device and
wait for login to finish.
Select Camera you wish
to view.
Setup is now
complete.
1.
Port forward Modem-Router
Access your network router via its IP
address using a PC or Laptop.
Select ‘
Port Forwarding
’
Open/Forward ports:
34667
and
80
for
the Local IP address of your NVR. Please
refer to your router’s manual for details
on how to ‘Port Forward’.
2.
install PSS software for Windows
Download PSS Software For Windows v4.06 from:
www.adata.co.uk/support/info/software.
Install PSS Software For Windows v4.06 on your PC or Laptop,
and launch.
3.
Add device to PSS software
To add device select ‘
Setting Manage
’ and ‘
Device manage
’
(shown below). Fill in details in the ‘
Update device
’ setup.
Title
=
Identifying name of device.
Type
=
NVR
IP
=
External IP of your network or DDNS (You can
find this by searching whats my IP on the Internet)
Port
=
34667
User
=
Admin
Password
=
password of Device
Click save to complete setup.
4.
Open device and view device’s cameras
Open device list in top right corner of the
client software.
Right click on the device’s name
(highlighted by the red box to the right)
and login.
Once device is logged in drag and drop
each camera into the empty GUI.


