®
© Copyright Qvis® All documentation rights reserved.
OPTION 3:
WEB CLIENT
STEP 1
STEP 2
STEP 3
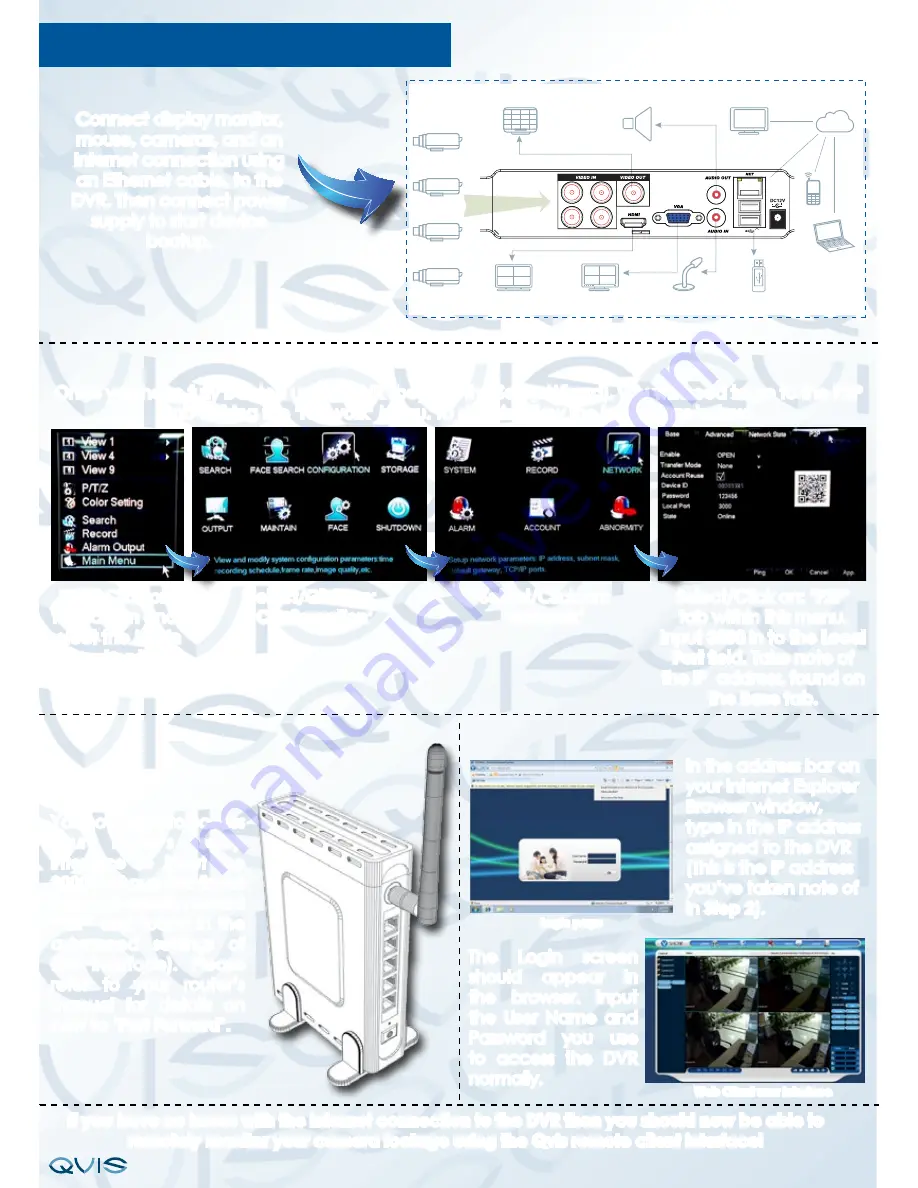
Connect display monitor,
mouse, cameras, and an
Internet connection using
an Ethernet cable, to the
DVR. Then connect power
supply to start device
bootup.
Once you have fully booted up the DVR (beyond the Setup Wizard), you will need to go to the P2P
tab withing the ‘Network’ Menu. To do this follow the instructions below:
You now need to access
your router’s setup
interface to input the
3000
port number (input
fields are usually named
‘
TCP
’ and found in the
advanced settings of
the interface). Please
refer to your router’s
manual for details on
how to ‘
Port Forward
’.
If you have no issues with the internet connection to the DVR then you should now be able to
remotely monitor your camera footage using the Qvis remote client interface!
WEB
M
USB
VGA
HDMI
TV
V/I
A/O
CMS
Camera
Camera
Camera
Camera
A
I
1
2
3
4
STEP 4
Right Click on
the screen and
select the ‘
Main
Menu
’ option.
Select/Click on:
‘
Configuration
’
Select/Click on:
‘
Network
’
Select/Click on: ‘
P2P
’
tab within this menu.
Input
3000
in to the
Local
Port
field. Take note of
the IP address, found on
the
Base
tab.
In the address bar on
your Internet Explorer
Browser window,
type in the IP address
assigned to the DVR
(This is the IP address
you’ve taken note of
in
Step 2
).
The Login screen
should appear in
the browser. Input
the User Name and
Password you use
to access the DVR
normally.
Login page
Web Client user interface


