


K10-STANDARD-OP-EN
- 25 -
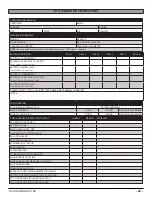
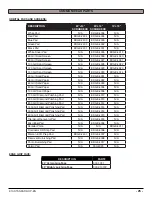
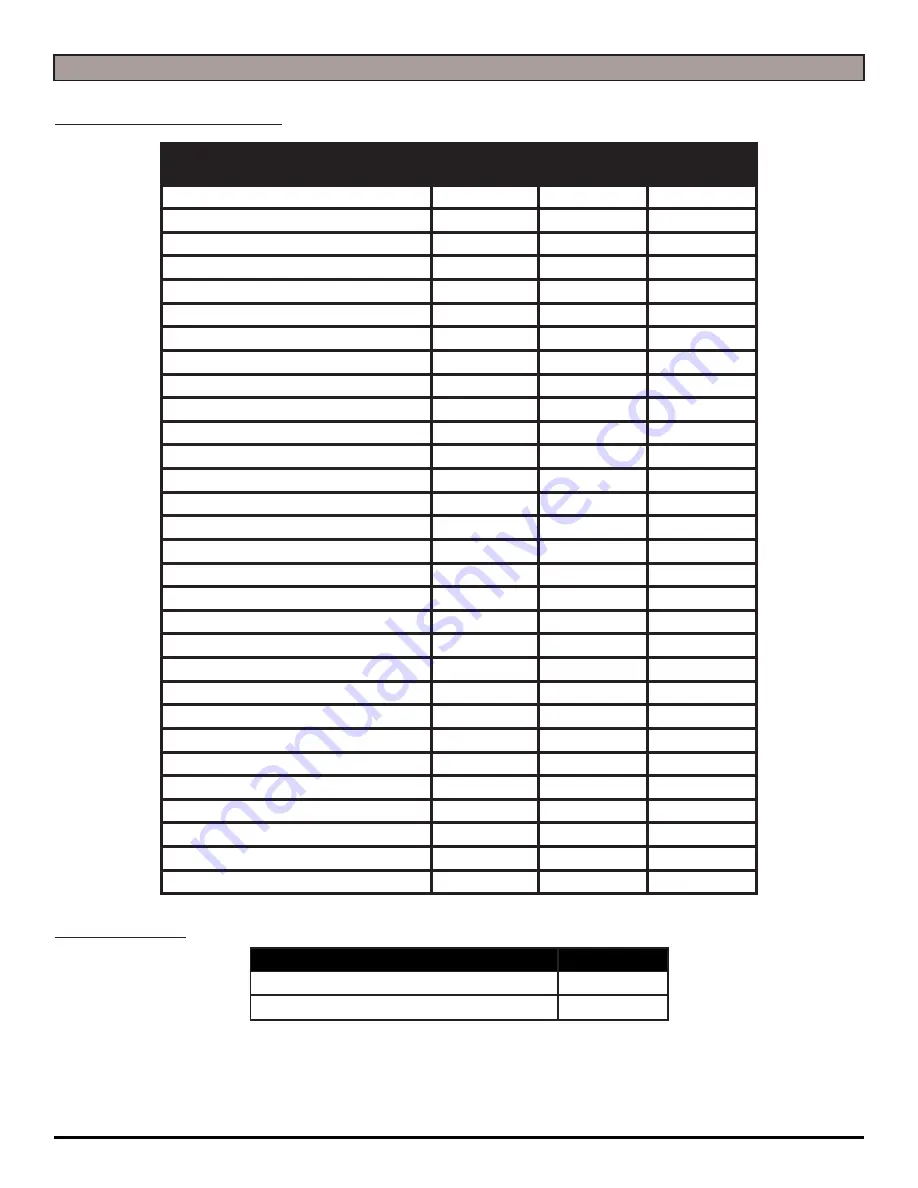
COMMON WEAR PARTS
ORBITAL PADS AND SCREENS:
DESCRIPTION
24''×14''
SCRUBDECK
20''×14''
SCRUBDECK
13''×19''
White Pad
N/A
EDGE-4005
N/A
Red Pad
EDGE-2404
EDGE-4004
N/A
Blue Pad
EDGE-2403
EDGE-4003
N/A
Green Pad
EDGE-2402
EDGE-4002
N/A
Black Pad
EDGE-2401
EDGE-4001
N/A
White Driver Pad
N/A
EDGE-4025
EDGE-4019
60 Grit Sand Screen
N/A
EDGE-4026
EDGE-4020
80 Grit Sand Screen
N/A
EDGE-4027
EDGE-4021
100 Grit Sand Screen
N/A
EDGE-4028
EDGE-4022
120 Grit Sand Screen
N/A
EDGE-4029
EDGE-4023
150 Grit Sand Screen
N/A
EDGE-4030
EDGE-4024
20 Grit Sand Paper
N/A
EDGE-4031
N/A
36 Grit Sand Paper
N/A
EDGE-4032
N/A
60 Grit Sand Paper
N/A
EDGE-4033
N/A
80 Grit Sand Paper
N/A
EDGE-4034
N/A
100 Grit Sand Paper
N/A
EDGE-4035
N/A
100 Grit Diamond Polishing Pad
N/A
EDGE-4012
N/A
400 Grit Diamond Polishing Pad
N/A
EDGE-4013
N/A
800 Grit Diamond Polishing Pad
N/A
EDGE-4014
N/A
1500 Grit Diamond Polishing Pad
N/A
EDGE-4015
N/A
3000 Grit Diamond Polishing Pad
N/A
EDGE-4016
N/A
6000 Grit Diamond Polishing Pad
N/A
EDGE-4070
N/A
Tile/Grout Renovator Pad
N/A
EDGE-4018
N/A
Microfiber Pad
N/A
EDGE-4036
N/A
Abrader Plate
N/A
N/A
EDGE-4011
Dominator HD Strip Pad
N/A
EDGE-4006
N/A
Maroon ECO Prep Pad
EDGE-2407
EDGE-4007
N/A
Remover Burnishing Pad
N/A
EDGE-4008
N/A
Porko Burnishing Pad
N/A
EDGE-4017
N/A
Velcro Pad
N/A
300-4023
N/A
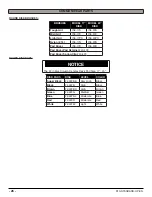
EDGE GRIP FACE:
DESCRIPTION
PART#
20'' Velcro Grip Face
300-1037
20'' Mighty Lok Grip Face
300-01037Z


