background image

20

21

• Insert the matching pedals and switching unit as a complete set into the corresponding 
interfaces of the steering wheel; connect the original PS4TM controller to the steering wheel 

with the USB cable. (17) (The PS4TM controller must be turned off during the guiding steps). 

• Turn on your PS4TM and then plug the main cable of the steering wheel into the USB port of 
the PS4™. 
• Once plugged in, the steering wheel‘s LED indicator will light up. Press the HOME button. 
After successful setup, the LED indicator of the PS4™ controller will light up. Now you can 

start the game or make the appropriate configurations. 

• You can press the Home button once to open the menu when you are playing a game, or you 

can press and hold the Home button for 1 second to open the shutdown configuration.

Xbox One & Xbox Series X/S

• Only when the steering wheel is connected to the switching unit, and thus it is in the 
„Steering wheel“ mode. 
• The mode does not support vibration and headset functions.
• Plug the matching pedals and the switching unit as a complete set into the corresponding 
interfaces of the steering wheel; connect the original XBOX ONE™ - or XBOX Series X/S 
controller with the USB cable and plug the cable into the steering wheel (17) (the XBOX ONE™ 
- or XBOX Series X/S controller must be switched off). 
• Turn on your XBOX ONE™ or XBOX Series X/S and then plug the main cable of the steering 
wheel into the USB port of the XBOX ONE™ or XBOX Series X/S. 
• After successful setup, the LED indicator of the steering wheel will light up. The LED 
indicator of the XBOX ONE™ or XBOX Series X/S controller will also light up due to the corre-
sponding channel. You can now start the game or enter the corresponding configurations.   
• You can press the Home button (equivalent to the Guide button on the original controller) 
once to enter the menu when playing a game, or you can press and hold the Home button for 
1 second to enter the shutdown configuration. 
• In the menu, you can press the Y key to enter the quick search page of the Internet.

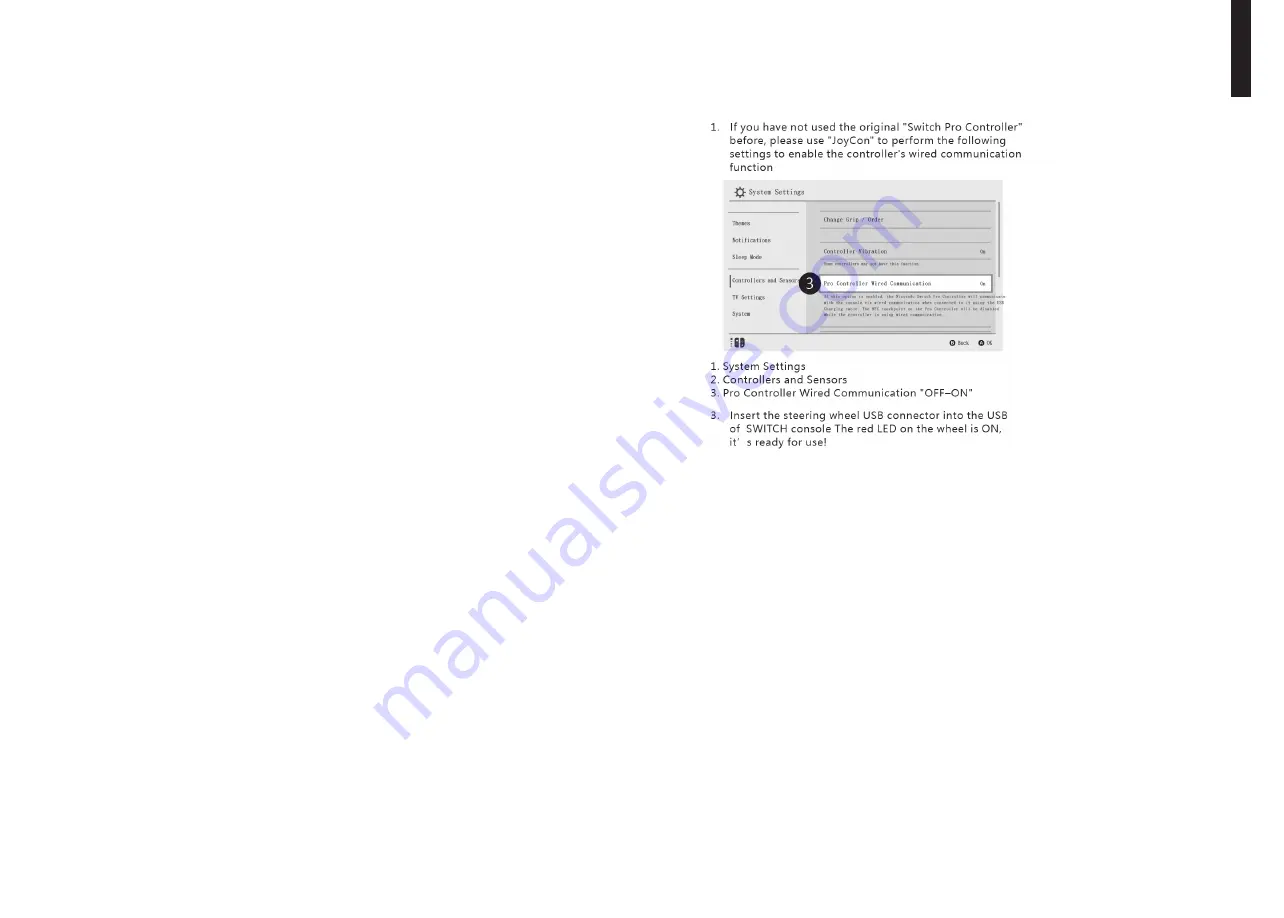
Switch

TM

• Turn on the SWITCH™, plug the pedal cable as a complete set into the corresponding 
interfaces of the steering wheel; connect the steering wheel and the SWITCH™ via the USB 
interface. 
• Or connect the main USB cable of the steering wheel to the SWITCH™ via the Type-C cable.
• When the connection is successful, the steering wheel‘s LED indicator will light up, and you 
can now start the game or enter the corresponding configurations.
• Press the „SHARE/9/VIEW/-“ and „OPTIONS/10/MENU/+ (depending on the system) “ keys to 
take a screenshot.

Switch Settings

Troubleshooting

• If the LED indicator does not light up, reconnect the steering wheel or check if the console 
controller works normally for initial setup.
• If the steering wheel does not respond or the screen does not respond, the device may have 
crashed; please restart the device and reconnect the steering wheel. 
• If the steering wheel does not respond properly, please reconnect the steering wheel.
• The console controller for initial setup must be turned off when connecting so that the 
connection between the controller and the device does not break. 
• Since the programming design is equipped with a memory function, please follow the „Clear 
Programming“ or „Clear All Settings“ steps to clear the programming should any of the button 
configurations be incorrect. 
• If a direction button or pedal has no function or is set incorrectly, please correct as follows 
(Calibration: Please set the steering wheel to 270 degrees using the rotation switch for 900 
and 270 degrees):
 

1.  

Press the „L1+L2+R1+R2“ buttons at the same time, and the LED indicator  


will blink once per second. 


2.  

Turn the wheel slightly to the left until the maximum position is reached,  


and the LED indicator will flash twice per second. 


3.  

Turn the wheel slightly to the right until the maximum position is reached  


and the LED indicator flashes three times per second.  


En

gl

is

h

Summary of Contents for Racing Wheel Pro

Page 1: ...221801 BEDIENUNGSANLEITUNG USER MANUAL ISTRUZIONI PER L USO MODE D EMPLOI Racing Wheel pro MULTI SYSTEM...

Page 2: ...Inhaltsverzeichnis Table of contents Tabella dei contenuti Table des mati res Deutsch 04 13 English 14 23 Italiano 24 33 Fran ais 34 43...

Page 3: ...nzipiert und mit deren Spiele kompatibel Die eingebauten Motoren k nnen entsprechend der Situation im Spiel verschiedene Vibrationsmodi ausf hren Die Spieletitel m ssen die Vibration unterst tzen Die...

Page 4: ...Sekunden gedr ckt bis die rote LED leuchtet Alle definierten Tastenfunktionen werden gel scht und die Empfindlichkeit wird auf die hohe Stufe zur ckgesetzt Programmierung verlassen Dr cken Sie einmal...

Page 5: ...iese Einheit ist nur f r Spiele zu verwenden die diese Funktion auch unterst tzen Der MODE Schalter kann in die Sechsgang Schaltposition gedreht werden wenn der Schalter auf OFF steht sind die Sechsga...

Page 6: ...einmal dr cken um das Men aufzurufen wenn Sie ein Spiel spielen oder Sie k nnen die Home Taste 1 Sekunde lang gedr ckt halten um die Abschaltkonfiguration aufzurufen Im Men k nnen Sie die Y Taste dr...

Page 7: ...t GmbH Alle Rechte vorbehalten PlayStation ist ein eingetragenes Warenzeichen von Sony Interactive Entertainment LLC Microsoft Corporation und Nintendo Co Ltd Alle anderen Marken sind Eigentum der jew...

Page 8: ...heir games The built in motors can perform different vibration modes according to the situation in the game The game titles must support vibration The shape is ergonomic and is designed like a racing...

Page 9: ...NU depending on the system keys for 4 seconds until the red LED lights up All defined key functions are deleted and the sensitivity is reset to the high level Exit programming Press the PROG key once...

Page 10: ...es that also support this function The MODE switch can be turned to the six speed shift position when the switch is OFF the six speed shift positions are set to 1 2 3 4 5 6 and R When the switch is ON...

Page 11: ...an press and hold the Home button for 1 second to enter the shutdown configuration In the menu you can press the Y key to enter the quick search page of the Internet SwitchTM Turn on the SWITCH plug t...

Page 12: ...PlayStation is a registered trademark of Sony Interactive Entertainment LLC Microsoft Corporation and Nintendo Co Ltd All other trademarks are the property of their respective owners All rights reser...

Page 13: ...otori incorporati possono eseguire diverse modalit di vibrazione in base alla situazione del gioco i titoli di gioco devono supportare la vibrazione La forma ergonomica ed progettata come un volante d...

Page 14: ...nte Tenere premuti i pulsanti OPTIONS 10 MENU a seconda del sistema per 4 secondi finch il LED rosso si accende Tutte le funzioni dei pulsanti definite vengono cancellate e la sensibilit viene riporta...

Page 15: ...2 2 Unit di commutazione Questa unit deve essere usata solo per i giochi che supportano anche questa funzione L interruttore MODE pu essere ruotato sulla posizione del cambio a sei velocit quando l i...

Page 16: ...tenere premuto il pulsante Home per 1 secondo per entrare nella configurazione di spegnimento Nel menu potete premere il tasto Y per richiamare la pagina di ricerca rapida di Internet SwitchTM Accende...

Page 17: ...riservati PlayStation un marchio registrato di Sony Interactive Entertainment LLC Microsoft Corporation e Nintendo Co Ltd Tutti gli altri marchi sono di propriet dei rispettivi proprietari Tutti i dir...

Page 18: ...et est compatible avec leurs jeux Les moteurs int gr s peuvent ex cuter diff rents modes de vibration en fonction de la situation dans le jeu les titres de jeu doivent prendre en charge la vibration...

Page 19: ...nt Appuyez et maintenez les boutons OPTIONS 10 MENU selon de syst me pendant 4 secondes jusqu ce que la LED rouge s allume Toutes les fonctions d finies des boutons sont effac es et la sensibilit est...

Page 20: ...e que pour les jeux qui prennent en charge cette fonction Le commutateur MODE peut tre tourn vers la position de changement de vitesse six rapports lorsque le commutateur est teint les positions de c...

Page 21: ...origine pour acc der au menu lorsque vous jouez un jeu ou maintenir la touche Home enfonc e pendant 1 seconde pour acc der la configuration d arr t Dans le menu vous pouvez appuyer sur la touche Y pou...

Page 22: ...cette p riode un d faut survient en raison d un vice de mat riau ou de fabrication le d taillant aupr s duquel vous avez achet le produit remplacera votre produit par un mod le identique ou quivalent...

Page 23: ...arantee and is subject to change at any time without prior notification Le informazioni e i dati inclusi in questa documentazione sono forniti senza garanzia e sono soggetti a modifiche in qualsiasi m...

Reviews: