无锡人人行拍网络科技有限公司
1
1. Easy way to start the device
1.1 Operating steps and instructions
1.1.1 Transmitter
Ø
Install the antenna.
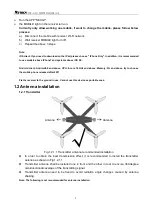
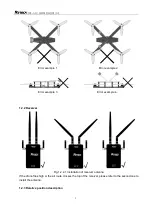
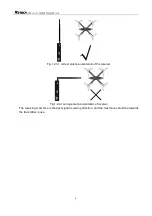
In order to guarantee the wireless signal omnidirectional coverage, it is recommended to install the
antenna in front and behind. Please refer to section 1.2 for details.
Ø
Install the camera.
Note that one side of the camera cable with label connect to the transmitter and
the other side connect to the camera.
Ø
Connect transmitter to the power.
There should be below instructions:
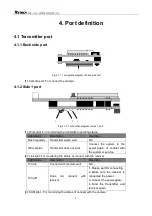
a) After 15 seconds of power on, the WORK light will display the breathing effect, and the WORK
light will loop from on to off on display.
b) CAM light turn-on.
c) LINK light turn-on if the transmitter connect to receiver.
1.1.2 Receiver
Ø
Install the antenna.
Ø
Install the monitor by HDMI cable. (optional)
Ø
Turn off the receiver power button, then connect to the power (12V-DC power).
Ø
Turn on the power.
There should be below instructions:
a) WORK light flash regularly
b) HDMI light turn-on (if installed the HDMI monitor).
c) LINK light turn-on if the receiver connect to transmitter.
d) HDMI monitor displays (if installed the HDMI monitor).
e) The monitor shows logo " NEXG1" after receiver connect to the power.
After that, the monitor shows progress bar: Start-up / Selfcheck / Link.
f) Monitor real-time display the camera video when the transmitter connect to the receiver.
Note: While you start fly test with your drone, please connect the VTX module to
power battery directly.
If you connect it to fly controller's BEC, it will cause problem!
The VTX is wide voltage input design, support 3s-6s.
1.1.3 Mobile
Please install APP on your phone first. In App store, search “r2teck” and download on iOS device.
Android APP: Refer to
www.gor2teck.com
, download->NEXG1 android mobile client.
Ø
The mobile connects to the Wi-Fi network which name is the same as the device number,
Wi-Fi
password is "
12345688
"
.


