background image

Factory- Fanchang Economic Development Zone, Wuhu City, 

Anhui Province, China

Tel: +86 574-88037579   E-mail: sales@r3dtechnology.com

Wuhu R3D Technology Co., Ltd.

Model Number

Build Size

Machine Size

Manfacture Date

150*150*220mm

325*303*428mm

2020-08

Rated Power

Material Supported

Net Weight

MINI

Input Voltage

100V-120V

PLA 1.75mm

150W

11kg

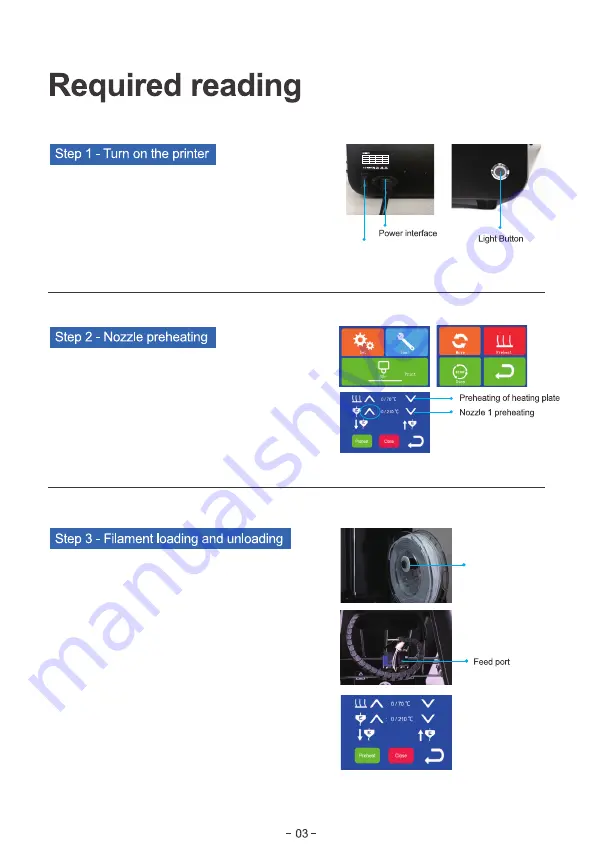
Plug the power cord into the power connector on the back of 
the machine and then into the socket. Press the power switch 
and the light button on the front of the machine. The startup 
interface is displayed normally, indicating that the 3D printer 
has started normally. 

Power switch

This operation is required when the nozzle is preheated to 210 ° 
C. In the tools submenu, click the Preheat icon enter the submenu 
for loading and unloading filament. Click the down arrow marked 
with E1 to perform pre-extrusion of the filament. If it is observed 
that filaments are normally extruded from the nozzle, the extruder 
test steps are completed. Click the back icon to go to the home 
page.

Filament holder

Put the filament on the filament holder, pull the filament out, and
insert them from the feed port.

Note: unless the filament run out of or need to print another color, 
there is no need to repeat the above three steps for each 
subsequent printing, just start the machine and choose the file to 
print.

Click the Tool menu on the home page. In the preheating menu, 
click the up arrow or “Preheat” icon to preheat the nozzle. The 
specified temperature can be adjusted by clicking the up arrow or 
down arrow for many times. In addition, click the “Close” icon to 
stop preheating.

Summary of Contents for MINI

Page 1: ...Please read the Quick Operation Guide carefully before using the product and keep it in a safe place Run to a better 3D world ...

Page 2: ...After unpacking the product please make sure that the 3D printer is intact and confirm whether the accessories are complete according to below list Soft and magnetic bedx1 ...

Page 3: ...Door panel Door buckle Wrench Door buckle 8 Fix the door panel on the left and right sides of the machine with door buckle Place the smallest piece on top of the machine ...

Page 4: ...s submenu click the Preheat icon enter the submenu for loading and unloading filament Click the down arrow marked with E1 to perform pre extrusion of the filament If it is observed that filaments are normally extruded from the nozzle the extruder test steps are completed Click the back icon to go to the home page Filament holder Put the filament on the filament holder pull the filament out and ins...

Page 5: ...latform and then fasten the buckle Click the leveling button place a piece of A4 paper between the platform and the print head adjust the screws below the platform about 45 each time when the A4 paper can be pulled out and there is some resistance When adjusting the middle point you need to turn 4 screws at the same time for adjustment Click the language function in the set menu in the language fu...

Page 6: ...Click on the red marker Select the file in STL format and click open Click on the model and the red box icon appears ...

Page 7: ...Click the rotate button click and drag the arc around the model and rotate it to the position you want ...

Page 8: ... slicing effect of the model You can observe from the long box that the model is piled up by 290 Layers By dragging a small white square you can observe the slicing effect of each layer Click the Normal icon to return to the Normal effect ...

Page 9: ...Find the USB Serial Port in Devices and Printers And check its port in the properties interface ...

Page 10: ...After adjusting all the parameters please click Print with USB and then start the Print ...

Page 11: ......

Page 12: ...printers was launched in July 2012 through cooperating with scientific research teams in excellent universities of science and technology at home and abroad the company focuses on product development and international advanced 3D printing technology currently has 3 invention patents more than 20 utility model patents more than 20 appearance patents 6 new and high technology products Happy Printing...

Reviews: