INSTRUCTIONS
GUS INSTALLATION
RAB Lighting is committed to creating high-quality, aff ordable, well-designed and energy-effi cient LED lighting and controls that make it easy for electricians to install
and end users to save energy. We’d love to hear your comments. Please call the Marketing Department at 888-RAB-1000 or email: marketing@rablighting.com
The fi xture is suitable for indoor applications for ceiling or wall
mounting. Mount to a recessed junction box as follows:
1.
Secure
Housing
to junction box or mount
Housing
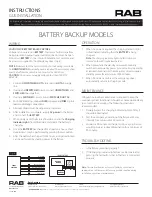
directly to sturdy surface by using the
Drill Locations
(
6 holes for 4ft fi xture, 4 holes for 2ft fi xture
) Fig. 3.
Use
the appropriate mounting hardware for the mounting
surface.
2.
Follow steps 5 and 6 in Ceiling Mounting section.
End Cap
(2)
Locknut
Center Access Hole
VHOOKGUSJR
Drill Locations
The fi xture is suitable for pendant mounting indoor
applications.
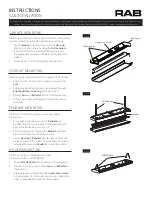
1. For pendant mounting, secure 1/2”
Pendant
(not
provided)
into the two respective holes located on the
back of the fi xture as shown in Fig. 4.
2.
Pass the Supply wires through the
Pendant
and make
electrical connections according to code.
3. Secure
Housing
to
Pendant
with the locknut from the
inside as shown in Fig 4. Use the appropriate mounting
hardware for mounting
Pendan
t to mounting surface.
The fi xture can be mounted using V-Hooks.
(
ordered separately as VHOOKGUSJR
)
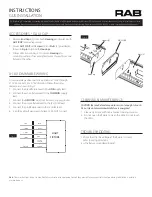
1.
Mount
VHOOKGUSJR
to the housing as shown in Fig. 5.
2.
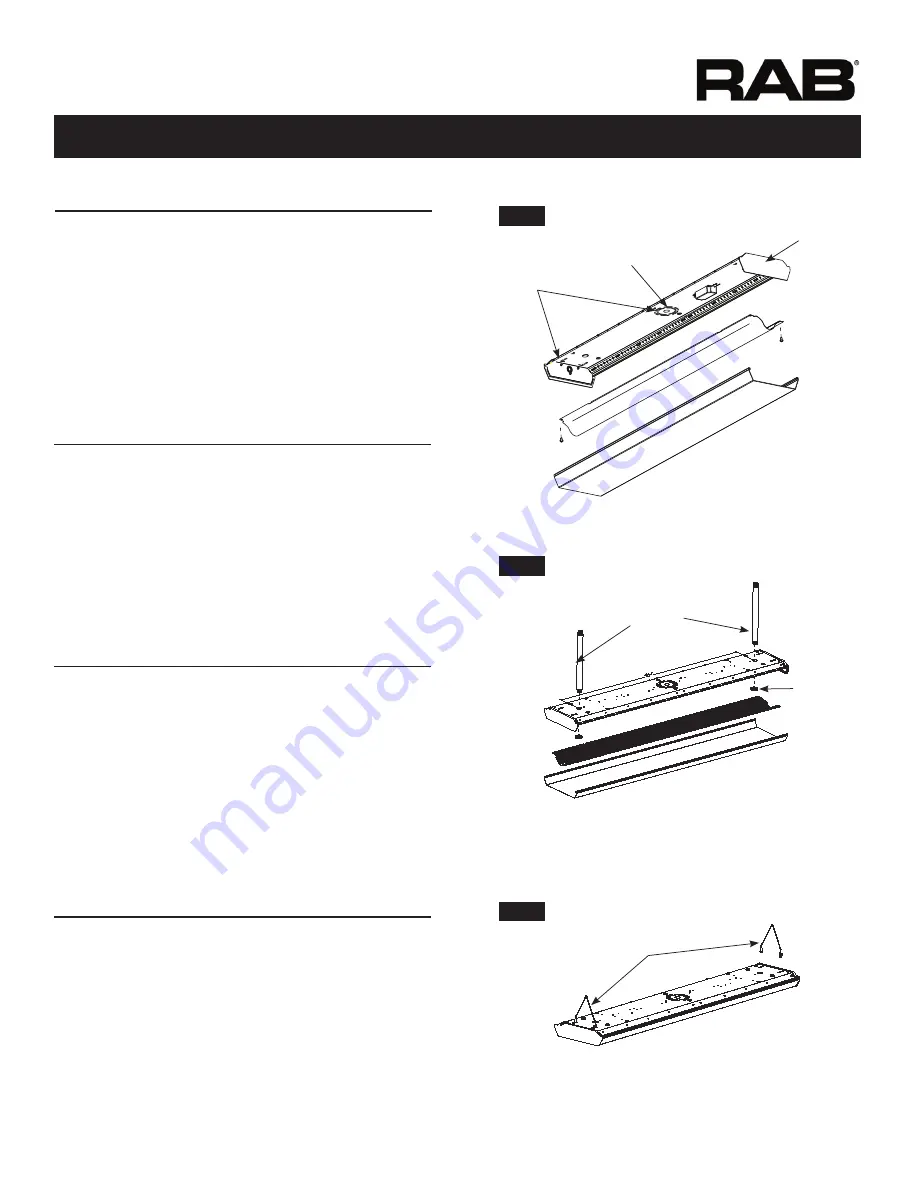
For electrical wiring, snap out the
Lens
and
Refl ector
as
shown in Fig.1.
3.
Pull supply wires in fi xture through
Center Access Hole
.
Use appropriate UL rated wire connectors as required by
code to make electrical splices to fi xture leads.
1/2” Pendant
Housing can be mounted with 1/2” conduit on the End cap.
1. Knock out the conduit location before removing the
Lens
.
2.
Pull supply wires from Conduit
(not supplied)
through
Knock out Hole
of
Housing
as shown in Fig. 1.
3. Remove
Lens
and
Refl ector
to access the fi xture wire.
4.
Follow appropriate mounting and wiring instructions
per code.
SURFACE MOUNTING
CONDUIT MOUNTING
PENDANT MOUNTING
V-HOOK MOUNTING
Fig: 3
Fig: 4
Fig: 5


