background image

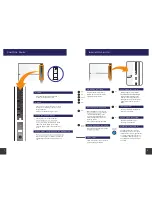
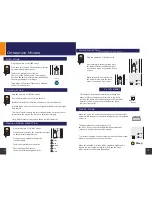
1. Open the particle sensor cover on  

    the right side of the unit (when       

    facing the unit). 

2. Use a damp cotton swab to clean  

    and dry the lens, dust inlet and dust  

    outlet.

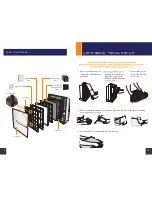
1. Remove the front panel from the unit and use

    a dry cloth, soft brush, or cotton swab to dust

    off the mood light lens on the back of the panel.

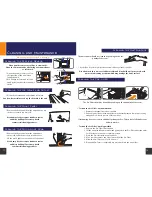
Cleaning and Maintenance

Always unplug the unit before cleaning.

Cleaning the Particle Sensor

outlet

air inlet

Cleaning the Air Intake and Outlet

Cleaning the Front Panel

Cleaning the Mood Light Lens 

Cleaning the Unit Surface

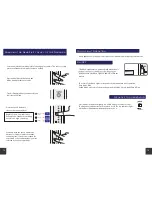
Cleaning the Pre-filter

1. Remove the front panel from the unit and use a dry  

    cloth or soft brush to dust it off.

1. Clean the air intake and outlet with a soft brush.

•  To clean the Pre-Filter - vacuum method:


1. Remove front panel from the air purifier


2. Run a vacuum cleaner with a nozzle or brush attachment on low power setting  


    along the Pre-Filter to remove visible particles.

If vacuuming does not seem to sufficiently clean your Pre-Filter, please follow the steps 

below to wash it.

•  To clean the Pre-Filter - washing method:


1.  Remove the Pre-Filter from the unit.


2.  Fill the sink with lukewarm water and gently wash the Pre-Filter under the water  


     for 2-3 minutes or until it is completely clean.


3.  Rinse the Pre-Filter with clean tap water.


4.  Use a towel to remove any excess water from the Pre-Filter.


5.  Allow the Pre-Filter to dry for 12-24 hours.


6.  When the Pre-Filter is completely dry, place back into the air purifier.

1.  Use a clean, dry cloth to wipe the external surfaces of the air purifier.

Clean particle sensor every three to six months.

Clean the air intake and outlet using a vacuum cleaner 

or soft brush.

Caution: Be careful not to drop the brush into the unit.

Use a damp cloth to remove stubborn stains 

and dirty buildup if necessary. Avoid 

commercial cleaning products. 

Use a damp cloth to remove stubborn stains 

and dirty buildup if necessary. Avoid 

commercial cleaning products.

The unit surface should be cleaned depending on the air 

quality of the room.

Use a damp cloth to remove stubborn stains and dirty buildup if necessary. Avoid 

commercial cleaning products which may damage the unit's surface.

The Pre-Filter should be cleaned depending on the air quality of the room.

dust outlet

dust inlet

17

18

Summary of Contents for MinusA2 SPA-780A

Page 1: ...card now for Product Protection By registering your product and purchase information we can confirm the date of purchase to secure your warranty This confirmation serves as security in the event that...

Page 2: ...plug which means it will fit into a polarized outlet only one way If the plug does not fit into the outlet reverse the plug If it still does not fit contact qualified personnel to install the proper o...

Page 3: ...washable Pre filter When transporting the MinusA2 Air Purifier always hold the handle on the back of the unit Inverter lighting equipment or electronic light fixtures may interfere with remote control...

Page 4: ...anel Mood Light Light Sensor Particle Sensor Air Quality Indicator Battery AAA size Power Mood Light Speed Mode Power Cord Unit Hanger Air Outlet Handle Meet your MinusA2 Front view Back view Remote c...

Page 5: ...ollen Mode is selected the r changes automatically depending on the readings of the air quality sensors The mood light shifts color in the following pattern blue purple light purple pink When this ind...

Page 6: ...pulling 3 Pull the tabs on the front of the Pre Filter to remove it 4 Remove the white Medium Filter from the black frame to discard the plastic wrapping 5 Remove HEPA Filter and discard plastic wrap...

Page 7: ...ver Customized Filter Front color Purple Back color Black Front color Purple Orange Back color Orange Front color Purple Yellow Back color Yellow Front color Black thicker fabric like material Back co...

Page 8: ...nsor detects the brightness of the room If the room is dark the MinusA2 automatically switches to Sleep Mode after three minutes To activate Sleep Mode the unit must be in Auto Mode All other modes of...

Page 9: ...h the Speed and Mode button for three seconds The Air Quality Indicator and Auto Mode Indicator will blink Press the Speed button to choose the sensitivity level Replace Filters Low sensitivity Pollen...

Page 10: ...the Pre Filter washing method 1 Remove the Pre Filter from the unit 2 Fill the sink with lukewarm water and gently wash the Pre Filter under the water for 2 3 minutes or until it is completely clean...

Page 11: ...d place in the black frame 3 Make sure the front of the Customized Filter is facing up See Customized Filter chart page 11 to identify the front of your specific filter Do NOT discard the filter holde...

Page 12: ...and falls outside the scope of responsibil ity of Rabbit Air Please consult a qualified contractor and or specialist supplier to install the mounting bracket Maximum weight of air purifier SPA 780A S...

Page 13: ...tched on the hinges of the main unit Battery could be dead or depleted Remote might not be pointed directly at the unit Make sure the battery is correctly installed Filters may be heavily soiled and d...

Page 14: ...y please contact Rabbit Air at 1 888 866 8862 or by e mail at products rabbitair com 25 26 Limited Warranty Limits and Exclusions First Name____________________________________________________________...

Reviews: