


Getting Started Manual
23
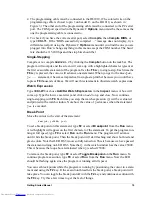
Before running the
LCD_DEMO.C
sample program, you will need an LCD based on the
HD44780 (or an equivalent) controller.
•
LCD_DEMO.C
—demonstrates a 4-bit interface to an LCD based on the HD44780 (or an
equivalent) controller.
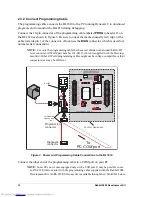
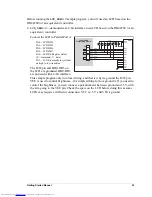
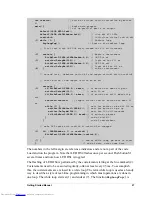
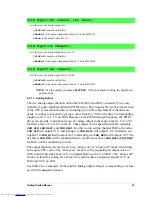
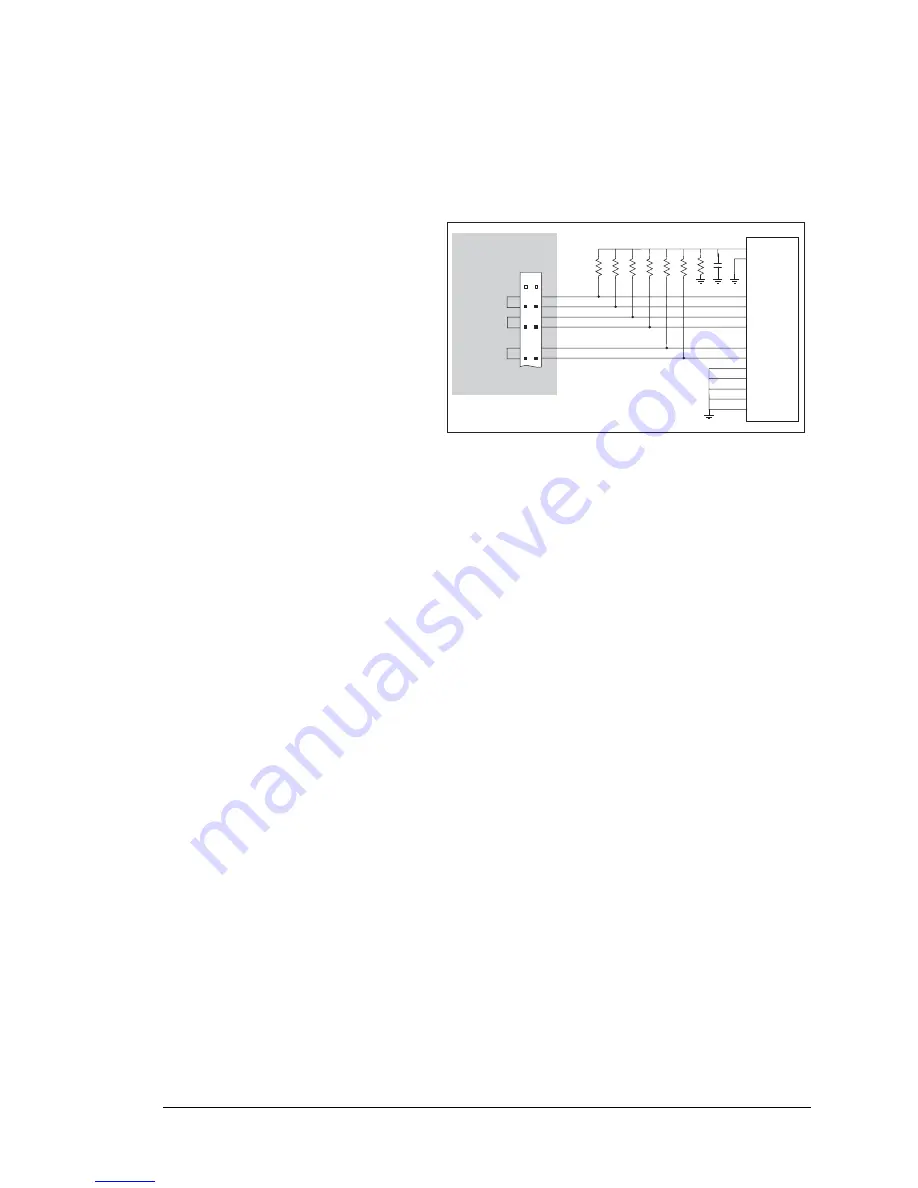
Connect the LCD to Parallel Port A.
PA0—LCD DB4
PA1—LCD DB5
PA2—LCD DB6
PA3—LCD DB7
PA6—LCD RS Register Select
(0 = command, 1 = data)
PA7—LCD E:normally low, latches
on high to low transition
The R/W pin and DB0–DB3 on
the LCD are grounded. DB0–DB3
are not used with a 4-bit interface.
This sample program only involves writing, and that is why we ground the R/W pin.
VEE is used to control brightness—the simplest thing to do is ground it. If you need to
control the brightness, you can connect a potentiometer between ground and -5 V, with
the arm going to the VEE pin. Check the specs on the LCD before doing this as some
LCDs may require a different connection. VCC is +5 V and VSS is ground.
PA2
PA1
PA3
PA6
PA7
VCC
20
k
W
10
k
W
4.7
k
W
2.2
k
W
1
k
W
470
W
680
W
100 nF
Jackrabbit
Prototyping Board
J3
3
4
5
6
9
10
LCD
DB4
DB5
DB6
DB7
RS
E
DB0
DB1
DB2
DB3
R/W
VCC
VEE
PA0
Downloaded from
Elcodis.com
electronic components distributor
Summary of Contents for 2000
Page 20: ...16 Rabbit 2000 Development Kit Downloaded from Elcodis com electronic components distributor...
Page 34: ...30 Rabbit 2000 Development Kit Downloaded from Elcodis com electronic components distributor...
Page 50: ...46 Rabbit 2000 Development Kit Downloaded from Elcodis com electronic components distributor...
Page 52: ...48 Rabbit 2000 Development Kit Downloaded from Elcodis com electronic components distributor...
Page 54: ...Downloaded from Elcodis com electronic components distributor...


