background image

Getting Started Manual

11

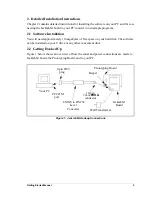
A message reports that “No Rabbit processor detected” in cases where the Jackrabbit 
and Prototyping Board are not connected together, the wall transformer is not con-
nected, or is not plugged in. (The red power LED lights whenever power is connected.) 

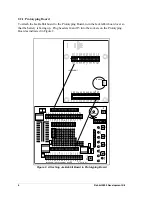
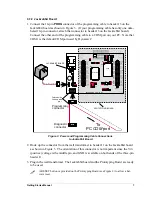
The programming cable must be connected to the Jackrabbit board.  (The colored wire 
on the programming cable is closest to pin 1 on header J3 on the Jackrabbit board, as 
shown in Figure 3 on page 7.)  The other end of the programming cable must be con-
nected to the PC serial port, possibly, using the 9- to 25-pin adapter if necessary. The 
COM port specified in the Dynamic C 

Options

 menu must be the same as the one the 

programming cable is connected to. 

To check if you have the correct serial port, select 

Compile

, then 

Compile BIOS

, or 

type 

<ctrl-Y>

.  If the “BIOS successfully compiled …” message does not display, try a 

different serial port using the Dynamic C 

Options

 menu until you find the one you are 

plugged into. Don’t change anything in this menu except the COM number. The baud 
rate should be 115,200 bps and the stop bits should be 1.

3.2  Single-Stepping

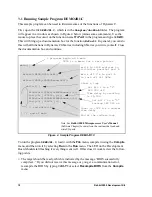
Compile or re-compile 

DEMOJR1.C

 by clicking the 

Compile

 button on the task bar.  The 

program will compile and the screen will come up with a highlighted character (green) at 
the first executable statement of the program.  Use the 

F8

 key to single-step. Each time the 

F8

 key is pressed, the cursor will advance one statement.  When you get to the 

for(j=0, 

j< ...

 statement, it becomes impractical to single-step further because you would have 

to press 

F8

 thousands of times. We will use this statement to illustrate watch expressions.

3.2.1  Watch Expression

Type 

<ctrl-W>

 or chose 

Add/Del Watch Expression

 in the 

Inspect

 menu.  A box will 

come up.  Type the lower case letter j and click on add to top and close.  Now continue 
single-stepping with 

F8

. Each time you step, the watch expression (

j

) will be evaluated 

and printed in the watch window.  Note how the value of 

j

 advances when the statement 

j++

 is executed.

3.2.2  Break Point

Move the cursor to the start of the statement: 

   for(j=0; j<1000; j++);

To set a break point on this statement, type 

F2

 or select 

Breakpoint

 from the 

Run

 menu. 

A red highlight will appear on the first character of the statement.  To get the program run-
ning at full speed, type 

F9

 or select 

Run

 on the 

Run

 menu.  The program will advance 

until it hits the break point.  Then the break point will start flashing and show both red and 
green colors.  Note that LED DS3 is now solidly turned on.  This is because we have 
passed the statement turning on LED DS3.  Note that 

j

 in the watch window has the value 

25000. This is because the loop above terminated when 

j

 reached 25000.

To remove the break point, type 

F2

 or select 

Toggle Breakpoint

 on the 

Run

 menu. To 

continue program execution, type 

F9

 or select 

Run

 from the 

Run

 menu. Now the LED 

should be flashing again since the program is running at full speed.

Summary of Contents for 2000

Page 1: ...Rabbit 2000 Microprocessor Development Kit Getting Started 010118 D...

Page 2: ...nst consequences resulting from system failure is the buyer s responsibility This device is not approved for life support or medical systems All Rabbit Semiconductor products are 100 percent functiona...

Page 3: ...3 2 4 Watching Variables Dynamically 12 3 2 5 Summary of Features 12 3 3 Cooperative Multitasking 13 3 4 Advantages of Cooperative Multitasking 15 4 Software Reference 17 4 1 More About Dynamic C 17 4...

Page 4: ...Rabbit 2000 Development Kit...

Page 5: ...of the basics of operating a software program and editing files under Windows on a PC Knowledge of basic assembly language and architecture for controllers For a full treatment of C refer to the follo...

Page 6: ...ng Board includes various accessories such as pushbutton switches LEDs and a beeper In addition you can add your own circuitry Programming cable This is a cable that is used to connect your PC serial...

Page 7: ...yping Board that includes pushbutton switches LEDs and a beeper can be plugged into the Jackrabbit board By writing pro grams that run on the Jackrabbit board you can flash the LEDs beep the beeper an...

Page 8: ...s whenever a break point is set in the program This can crash fast interrupt routines that are running while you stop at a breakpoint or single step the program Flash or RAM is selected on the Options...

Page 9: ...4 Rabbit 2000 Development Kit...

Page 10: ...ely 10 megabytes of free space on your hard disk The software can be installed on your C drive or any other convenient drive 2 2 Getting Hooked Up Figure 1 below shows an overview of how the serial an...

Page 11: ...ND RXC TXC PC1 PC3 PC5 PC7 AGND DA1 PD1 PD3 PD5 PD7 GND 485 VCC SM1 STAT VBAT GND Z World Inc GND PA0 PA2 PA4 PA6 GND PB0 PB2 PB4 PB6 WDO GND PE6 PE4 PE2 PE0 HV0 HV2 K GND VCC PA1 PA3 PA5 PA7 GND PB1...

Page 12: ...VIN positive voltage is the middle pin and GND is available on both ends of the three pin header J1 3 Plug in the wall transformer The Jackrabbit board and the Prototyping Board are ready to be used...

Page 13: ...y the different COM ports in the OPTIONS menu until you find the one you are connected to If you can t get Dynamic C to recognize the target on any port then the hookup may be wrong or the COM port is...

Page 14: ...sample programs are listed in Table 1 The first five sample programs provide a step by step introduction to the Jackrabbit board Additional sample programs illustrate more advanced topics Each sample...

Page 15: ...evelopment Board should start flashing if everything went well If this doesn t work review the follow ing points The target should be ready which is indicated by the message BIOS successfully compiled...

Page 16: ...to single step Each time the F8 key is pressed the cursor will advance one statement When you get to the for j 0 j statement it becomes impractical to single step further because you would have to pre...

Page 17: ...ble to view variables while the program is running Use the F9 key to compile and run DEMOJR2 C Now type ctrl W to open the watch window and add the watch expression k to the top of the list of watch e...

Page 18: ...on is evaluated as if it were in a separate function with no local variables 3 3 Cooperative Multitasking Cooperative multitasking is a convenient way to perform several different tasks at the same ti...

Page 19: ...itfor BitRdPortI PBDR 2 wait for button to go up waitfor DelayMs 200 wait for 200 milliseconds if BitRdPortI PBDR 2 break if button up break end of while 1 end of costatement make LED agree with vswit...

Page 20: ...bort state ment is illustrated at 5 If executed the internal statement pointer is set back to the first statement within the costatement and a jump to the closing brace of the costatement is made At 6...

Page 21: ...16 Rabbit 2000 Development Kit...

Page 22: ...le debugging is being done because it is more flexible than flash memory Dynamic C does not use include files rather it has libraries which are used for the same purpose that is to supply function pro...

Page 23: ...t E bits 0 3 for digital output and starts up the pulse width modulation routines for the A D and D A channels Note that these routines can consume up to 20 of the CPU s processing power the routines...

Page 24: ...oth D A channels are used A voltage is selected by giving a value from 0 to 1024 to the driver corresponding roughly to 0 1 V to 3 5 V on DA0 Because of the PWM interrupt frequency the PWM driver can...

Page 25: ...y the driver and cause fluctuations in the voltage out puts Avoid using serial communications or printf statements during portions of your program where the voltage must remain steady Also be aware th...

Page 26: ...only on the Jackrabbit An integer between 0 and 1024 will be returned in value corresponding to a voltage obtained if output channel DA0 was set to that value If a value is found but the voltage has...

Page 27: ...llowing groups Open and Close Functions Non Cofunction Blocking Input Functions Non Cofunction Blocking Output Functions Single User Cofunction Input Functions Single User Cofunction Output Functions...

Page 28: ...able Parameters None Return Value An integer with return character in the low byte No character is represented by a return of 1 int serXread void data int length unsigned long tmout Reads a block of c...

Page 29: ...te Return Value 1 for success 0 if the character could not be written to the port int serXputs char s Calls serXwrite s strlen s Parameters s Null terminated character string source to write to the se...

Page 30: ...ecution and only returns control to the following statement in its own costatement block when it completes Parameters data Destination data structure The user must ensure data is allocated for at leas...

Page 31: ...Parameters c Character to write to the serial port Return Value None scofunc void cof_serXputs char s Writes a null terminated character string to the serial port yielding to other tasks when unsucces...

Page 32: ...ze of 31 will be used and a compiler warn ing will be given When using cofunctions smaller buffer sizes can yield more frequently to other tasks but have the risk of a large input data stream overrunn...

Page 33: ...becoming full int serXwrFree Calculates the free space in the serial port transmit buffer Parameters None Return Value The number of characters the serial port transmit buffer can accept before becom...

Page 34: ...de A D input input range 0 V to 3 V 10 bit resolution 8 bit accuracy average acquisition time 150 ms 165 ms maximum with 14 7 MHz clock Analog Outputs Two filtered and buffered PWM outputs Digital Out...

Page 35: ...30 Rabbit 2000 Development Kit...

Page 36: ...Getting Started Manual Schematics...

Page 37: ...B DRAWING CONTENT APPROVALS INITIAL RELEASE SIGNATURES 2900 SPAFFORD ST DAVIS CA 95616 530 757 4616 THIS DOCUMENT APPEND THE FOLLOWING DOCUMENTS WHEN CHANGING ECO APPROVAL APPROVAL CONTROL DOCUMENT DA...

Page 38: ...B NONE B NONE...

Page 39: ...B NONE B NONE...

Page 40: ...B DRAWING CONTENT APPROVALS INITIAL RELEASE SIGNATURES 2900 SPAFFORD ST DAVIS CA 95616 530 757 4616 THIS DOCUMENT APPEND THE FOLLOWING DOCUMENTS WHEN CHANGING ECO APPROVAL APPROVAL CONTROL DOCUMENT DA...

Page 41: ...B NONE B NONE...

Page 42: ...ALS INITIAL RELEASE DRAWING CONTENT B 2900 SPAFFORD ST DAVIS CA 95616 ZWORLD DATE NONE 530 757 4616 THIS DOCUMENT APPEND THE FOLLOWING DOCUMENTS WHEN CHANGING ECO APPROVAL APPROVAL CONTROL DOCUMENT DA...

Page 43: ......

Reviews: