background image

13

User Maintenance Instructions

This appliance requires little maintenance. It contains no user-serviceable
parts. Any servicing requiring disassembly must be performed by a quali-
fied appliance repair technician.

Cleaning Instructions

CAUTION:  The Blades are sharp! Handle with care! Use extreme
care when handling the Blades. Do not touch the Blades with your
fingers. The Blades are very sharp and can cause injury if touched.

CAUTION:  Never place Processor Power Base in water or any
other liquid.

1. Always unplug the unit before cleaning. Make sure the Chopping

Blade or Blade Holder Assembly has completely stopped before any
disassembly.

2. Remove all attachments.

3. Wash the Processor Bowl with Rubber Seal Ring, Lid with Feed

Chute, Food Pusher, Blade Holder, Blade Holder Stem,
Slicing/Shredding/Grating Blades, Chopping Blade and Spatula in
warm soapy water. Removable parts may also be cleaned in the dish-
washer. Load parts on the top rack away from the dishwasher heating
coil.

4.

Never immerse the Processor Power Base in water or any
other liquid. 

If necessary, wipe exterior surface with a soft, damp

cloth or sponge and dry thoroughly.

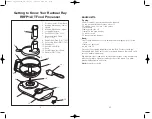
Storage Instructions

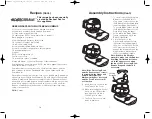
1. Pack the Storage Tray. Fit the Blade

Holder Stem down into the recessed
area of the Tray. The unused Blades fit
easily into any of the 4 storage areas
(see illustration).

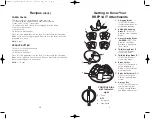
2. Make sure the Rubber Seal Ring fits

flat and not twisted, in the upper
groove along the top of the Processing Bowl. Place the Processing
Bowl in position on the Power Base. Grasping the Storage Trays cen-
ter hub, lower the packed Storage Tray into the Bowl. Replace the Lid
and lock before storing.

3. Push the cord into the Cord Storage area located on the underside of

the appliance. Never wrap the cord around the appliance. The appli-
ance should be stored in a clean, dry place.

12

Food Processing Hints

Chopping

- For best results, cut or tear food into pieces approxi-

mately equal in size before processing. The finished results will be
more uniform. Consistent processing results are achieved if the con-
tainer has 2 to 7 1/2 cups of fruits or vegetables.

Mincing

- Pre-cooked meat into cubes approximately 1-inch square.

Fruits and Vegetables

- Before processing fruits and vegetables,

clean and cut into 1-inch pieces.

Mixing

- Quantities that can be processed within the Processing Bowl

will vary depending upon the density of the ingredients being used.

Adding Ingredients

- Liquid ingredients may be added while the

processor is operating by pouring through the Feed Tube in the Cover.
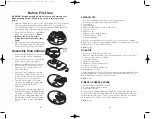
Using the Feed Tube

- The most important factor for successful slic-

ing and shredding is the way in which the food is packed into the
Feed Tube. The Feed Tube should always be packed firmly to allow
each piece of food to support the others. There will always be a small
portion of food left unprocessed between the Food Pusher and the
Blade.

Caution:

Never use fingers or other utensils to push food down the

Feed Chute. Always use the Food Pusher.

Slicing, Shredding and Grating -

Cut all ingredients to a size that

fits comfortably into the Feed Tube. Pack the Feed Tube and, while
holding food steady and upright with the Food Pusher, press down
evenly until all ingredients are sliced or shredded. Do not use exces-
sive force or you may damage the Food Processor.

Long Slices:

Pack food items horizontally in Feed Tube.

Short Slices:

Pack food items vertically in Feed Tube.

Grating:

For best results remember that softer foods such as cheese

(Cheddar, mozzarella or Swiss) should be well chilled before process-
ing. Harder foods such as Parmesan or Romano cheese should be at
room temperature before processing. 

Note:

When grating Parmesan

cheese do not apply excessive pressure to the Food Pusher.

Storage Tray with Attachments

RACHAEL RAY_RRFP1AT_IB_22-6-06  6/22/06 5:12 PM  Page 23

Summary of Contents for RRFP1A/T

Page 1: ...er If you get satisfaction out of treating your family and friends to foods made with your own two hands then get in the kitchen and have a blast Try new flavors tastes experiment And forget about tho...

Page 2: ...either 1 repair the product or 2 replace the product with a reconditioned comparable model These remedies are the purchaser s exclusive remedies under this warranty Warranty Service To obtain warrant...

Page 3: ...or tabletop or other furniture place NON PLASTIC coasters or placemats between the appliance and the finish of the countertop or tabletop Failure to do so may cause the finish to darken permanent blem...

Page 4: ...e from the Bowl to serve on warm grilled bread Mix together olive oil and garlic salt Brush both sides of the sliced bread with the oil mixture Lightly brown both sides of the bread Top warm bread wit...

Page 5: ...the refrigerator to keep fresh Yield 1 1 2 cups Getting to Know Your RRFP1A T Attachments P 0FF 1 2 CONTROL DIAL with Indicator Light P Pulse OFF 1 Low Speed 2 High Speed 3 2 4 5 1 1 Chopping Blade P...

Page 6: ...nd refrigerate for 2 hours Yield 4 cups Before First Use WARNING Blade Attachments are very sharp Use extreme care when handling Blades Failure to do so can result in personal injury 1 Carefully unpac...

Page 7: ...ur way down Keep a paper towel in your hand as you eat to catch any drips Batches of white bean spread are also a terrific dip for specialty chips celery or bread sticks Yield 8 wraps 7 Note If the Pr...

Page 8: ...ay and all Blades are out of the reach of children Attach the Processing Bowl to the Power Base See ASSEMBLY INSTRUCTIONS for details 2 Insert a Slicing Shredding or Grating Blade into the Blade Holde...

Page 9: ...s Although this automatic brake provides an additional measure of safety make sure that the Blade has completely stopped before you remove the Cover or unplug the unit 8 Turn the Cover clockwise to di...

Page 10: ...ground nutmeg 1 2 pound about 2 3 4 cups grated Parmigiano Reggiano or Romano cheese a couple of handfuls 10 Instructions for Use Cont Chopping Continued 5 Make sure unit is in the OFF position then...

Page 11: ...s to coat evenly and adjust seasoning Serve immediately Yield 8 servings or 1 1 4 cups 11 Slicing Shredding and Chopping Guide CHOPPING BLADE Push food from sides of bowl with spatula when necessary F...

Page 12: ...clean dry place 12 Food Processing Hints Chopping For best results cut or tear food into pieces approxi mately equal in size before processing The finished results will be more uniform Consistent proc...

Page 13: ...clean dry place 12 Food Processing Hints Chopping For best results cut or tear food into pieces approxi mately equal in size before processing The finished results will be more uniform Consistent proc...

Page 14: ...s to coat evenly and adjust seasoning Serve immediately Yield 8 servings or 1 1 4 cups 11 Slicing Shredding and Chopping Guide CHOPPING BLADE Push food from sides of bowl with spatula when necessary F...

Page 15: ...ground nutmeg 1 2 pound about 2 3 4 cups grated Parmigiano Reggiano or Romano cheese a couple of handfuls 10 Instructions for Use Cont Chopping Continued 5 Make sure unit is in the OFF position then...

Page 16: ...s Although this automatic brake provides an additional measure of safety make sure that the Blade has completely stopped before you remove the Cover or unplug the unit 8 Turn the Cover clockwise to di...

Page 17: ...ay and all Blades are out of the reach of children Attach the Processing Bowl to the Power Base See ASSEMBLY INSTRUCTIONS for details 2 Insert a Slicing Shredding or Grating Blade into the Blade Holde...

Page 18: ...ur way down Keep a paper towel in your hand as you eat to catch any drips Batches of white bean spread are also a terrific dip for specialty chips celery or bread sticks Yield 8 wraps 7 Note If the Pr...

Page 19: ...nd refrigerate for 2 hours Yield 4 cups Before First Use WARNING Blade Attachments are very sharp Use extreme care when handling Blades Failure to do so can result in personal injury 1 Carefully unpac...

Page 20: ...the refrigerator to keep fresh Yield 1 1 2 cups Getting to Know Your RRFP1A T Attachments P 0FF 1 2 CONTROL DIAL with Indicator Light P Pulse OFF 1 Low Speed 2 High Speed 3 2 4 5 1 1 Chopping Blade P...

Page 21: ...e from the Bowl to serve on warm grilled bread Mix together olive oil and garlic salt Brush both sides of the sliced bread with the oil mixture Lightly brown both sides of the bread Top warm bread wit...

Page 22: ...or tabletop or other furniture place NON PLASTIC coasters or placemats between the appliance and the finish of the countertop or tabletop Failure to do so may cause the finish to darken permanent blem...

Page 23: ...either 1 repair the product or 2 replace the product with a reconditioned comparable model These remedies are the purchaser s exclusive remedies under this warranty Warranty Service To obtain warrant...

Page 24: ...er If you get satisfaction out of treating your family and friends to foods made with your own two hands then get in the kitchen and have a blast Try new flavors tastes experiment And forget about tho...

Reviews: