background image


Trak Jack - 910192


Phone: (262) 637-9681  

Email: 

custserv@racinerailroad.com 

www.racinerailroad.com


10.2019 Rev 3 

Page 

11

 of 

18


Tool Connecting Procedures  

1.  Stop the engine before connecting the tool and or hoses to the OFF power unit, and when switching 

hoses or tools.  

2.  Turn the hydraulic on/off valve to the off position before starting the engine.  

Make sure all hoses are connected for correct flow direction to and from the tool being used.  
When routing hose in the work area, position them where personnel will not be at risk of tripping over 

them where vehicles can run over the hoses. Do not lay hose over sharp objects.  


Pressurized fluid escaping from a damaged hose can penetrate the 

skin and be injected in the body causing injury or death. 
Do not pull on hoses to drag the power unit or tool

Connecting Hoses  

1.  Wipe quick couplers with a clean lint free cloth before connecting them. 
2.  Depressurize the system.  
3.  Allow system and hydraulic fluid to cool if too hot to handle. 
4.  Securely connect the return (tank “R”) hose from the power source to the tool. 
5.  Securely connect the supply (pressure “P”) hose from the power source to the tool. 

It is recommended that you connect the return hoses first and disconnect last to minimize or avoid 

trapping pressure within the tool.  
When connecting the quick couplers, the flow should run from male coupler to the female coupler. 

The female coupler on the tool is the inlet. Quick couplers are marked with a flow direction arrow.  


Pressurized fluid escaping from a damaged hose can penetrate the 

skin and be injected in the body causing injury or death. 
Do not pull on hoses to drag the power unit or tool

Note

:  When possible, connect the free ends of uncoupled hoses to prevent build up in the hoses. The 

sun can also increase pressure in the hoses and make connecting them difficult.  

1.  Grip the handles firmly with both hands.  
2.  Pull down with thumb on the safety lock and pull the trigger to the handle to start the grinder.  
3.  When starting the tool, hold it off from all surfaces.  
4.  Start grinding with the tool running.  
5.  When finished, release trigger and allow stone to stop turning and make sure trigger is in the locked 

position before placing the tool on any surface.  


Summary of Contents for 910192

Page 1: ...lroad Products 1955 Norwood Court Mount Pleasant WI 53403 Phone 262 637 9681 Fax 262 637 9069 Email custserv racinerailroad com www racinerailroad com Hydraulic Trak Jack 910192 Operating and Maintena...

Page 2: ...tserv racinerailroad com www racinerailroad com 10 2019 Rev 3 Page ii Hydraulic Trak Jack 910192 Record of Changes Rev No Date Description of Changes Rev 1 9 2017 Initial Release Rev 2 1 2019 Branding...

Page 3: ...Before Operating 7 Section 2 Specifications and Installation 8 Specifications 8 Installation Instructions 9 Hose Requirements 9 Hose Types 10 Hydraulic Hose Recommendation 10 Hydraulic Fluid Recommen...

Page 4: ...new machine and new parts of our manufacture are warranted against defects in material and workmanship for one year from the date of shipment from our factory When contacting customer service for fact...

Page 5: ...mber and not a Racine Railroad Products part number Safety Information For safe installation and operation of this equipment carefully read and understand the contents of this manual Improper operatio...

Page 6: ...feet head clothing etc out of the operating area and away from all rotating or moving components when operating working on or near this machine Always make sure that all guards covers belts hoses and...

Page 7: ...at are damaged altered or in poor condition The reservoir must have enough hydraulic fluid to fully stroke the jack Use only approved hydraulic fluids Users must make sure that all safety related deca...

Page 8: ...ke single speed Advance rate per stroke 14 in 3 6 mm Pressure at rated load 7300 psi 500 bar Maximum pump handle effort 80 lbs 355 N Dimensions and Weight Baseplate Size 6 x 11 in 15 x 28 cm Lift Toe...

Page 9: ...ions Make sure all sockets are securely mounted Follow all safety precautions when inspecting tool Connect the tool to the power source Hold the impact by the handles resting it on the ground When the...

Page 10: ...SAE 100R8 10 5 to 8 19 to 30 100 to 300 30 to 90 Pressure Return 5 8 3 4 16 19 SAE 100R2 10 SAE 100R1 12 SAE 100R8 10 SAE 100R7 12 9 to 12 34 to 45 To 50 To 15 Both 5 8 16 SAE 100R2 10 SAE 100R8 10 9...

Page 11: ...return tank R hose from the power source to the tool 5 Securely connect the supply pressure P hose from the power source to the tool It is recommended that you connect the return hoses first and disco...

Page 12: ...Trak Jack into initial service or after an extended period of being unused perform a visual inspection for bent broken cracked missing or worn components Make sure the hydraulic fluid and lubricant l...

Page 13: ...hand tight 3 Pump the handle socket until the lifting toe or the head of the lifting toe firmly engages the more moveable of the two items Make sure personnel are clear of alI items being jacked befo...

Page 14: ...and re lubricated as necessary Keep the cylinder clean at all times Keep the piston retracted when not in use Operating lever and load bearing surfaces should be free of slippery material or fluids Ke...

Page 15: ...om of the fill plug 5 Before returning the jack to service fully extend the piston without a load by pumping the pump handle without the long extension handle If the fluid level is correct the pump ha...

Page 16: ...Release valve ball not seating properly Have hydraulic jack serviced by a qualified technician Relief valve set too low or malfunctioning Have hydraulic jack serviced by a qualified technician Seal fa...

Page 17: ...l or Field Service Support Warranty Technical or Field Service Support Depending upon the circumstances and availability of technical service personnel we may provide technical assistance and or field...

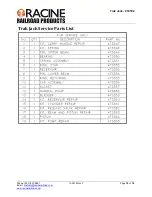
Page 18: ...Trak Jack 910192 Phone 262 637 9681 Email custserv racinerailroad com www racinerailroad com 10 2019 Rev 3 Page 18 of 18 Trak Jack Service Parts List...

Reviews: