background image

11 


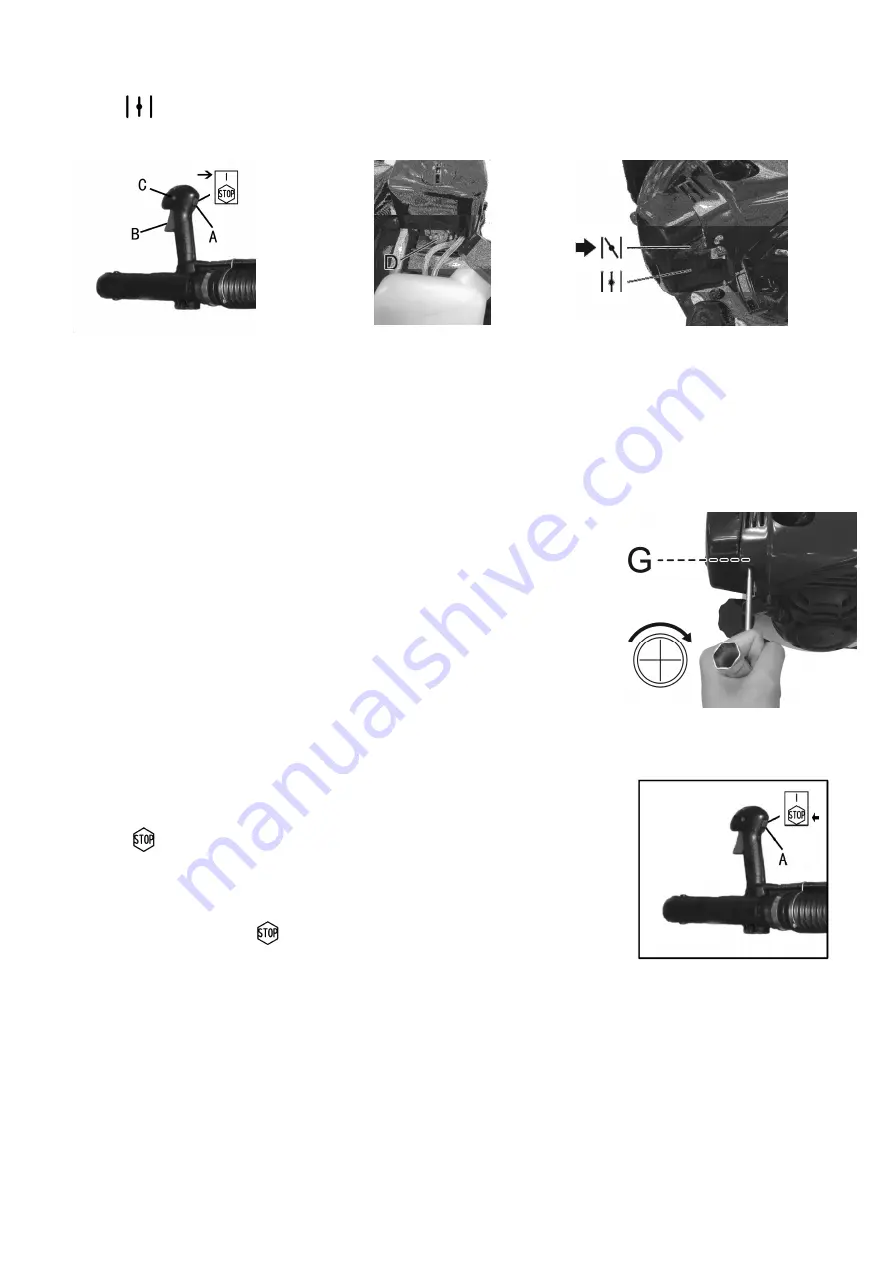
5.    Pull the starter rope 4-6 times – if unit does not start, move choke lever to PARTIAL CHOKE by setting it between 

the two choke positions. Pull starter rope 4-6 more times. Wait 10 sec. after unit starts, then move choke lever to 

RUN “          “. 

6.    Push the lock-out button (C) and press throttle trigger (B) to run.   


                            Fig.9                                                        Fig.10                                                          Fig.11 


NOTE:

 If engine fails to start after repeated attempts, refer to Troubleshooting section. 

NOTE:

 Always pull starter rope straight out. Pulling starter at an angle will cause rope to rub against the eyelet. This 

friction will cause the rope to fray and wear more quickly.   

NOTE: 

Always hold starter handle when rope retracts. Never let a rope snap back from an extended position. This 

could cause the rope to snag or fray and also damage the starter assembly. 


5.2 Important idling information   

In some cases due to operating conditions (altitude, temperature etc.) your blower 

may need a slight adjustment to the idle speed. After warming up, if unit does not 

idle after restarting 2 times, follow these steps to adjust idling. 

1.    Locate the idle adjustment screw (G) on the carburetor (Fig.12).                                                     

2.    Using a Phillips or slotted screwdriver, turn screw 1/4 to 1/2 turn clockwise (to   

the right). Unit should then idle properly. 


  Fig.12 

5.3 Stopping the engine 


5.3.1 Emergency stopping procedure 

When it is necessary to stop blower engine immediately, PRESS the   

OFF “STOP        “switch (A) (Fig.13).                       


5.3.2 Normal stopping method


For normal stopping, release trigger and allow engine to return to idle speed.   

Then PRESS the OFF “STOP        “switch (A) (Fig.13).   


  Fig.13 


5.4 Starting a warm engine (Engine has been stopped for no more than 15-20 minutes) 

1.    Set throttle latch (see step 2 for starting a cold engine), pull starter rope briskly. 

2.    If  engine  does  not  start,  or  starts  and  then  stops  after  5  rope  pulls,  follow  procedure  “STARTING  A  COLD 

ENGINE”. 


Summary of Contents for RAC26BPB

Page 1: ...AL INSTRUCTIONS Gasoline Backpack Blower Model RAC26BPB Instruction manual WARNING Read the instruction manual thoroughly before use BUILDER SAS 32 rue Aristide Berg s ZI 31270 Cugnaux France MADE IN...

Page 2: ...2 CONTENTS 1 SAFETY INSTRUCTIONS 3 2 YOUR TOOL 7 3 ASSSEMBLY 9 4 FUELLING AND LUBRICATION 9 5 OPERATING INSTRUCTIONS 10 6 MAINTENANCE 13 7 STORAGE 14 8 DECLARATION OF CONFORMITY EU 15 9 DISPOSAL 16...

Page 3: ...ents or hazards occurring to persons or their belongings Do not disassemble the tool yourself Disassembly repair or verification must be made exclusively by qualified personnel WEAR CLOSE FITTING TOUG...

Page 4: ...t tilt the machine while the power source is running Operate the machine at the lowest possible engine speed to do the job Like this vibration and noise levels as well as the tool s wear can be kept t...

Page 5: ...lear of the discharge zone when operating this machine Maintenance and storage When the machine is stopped for servicing inspection or storage or to change an accessory shut off the power source and m...

Page 6: ...usually appear on the fingers hands or wrists Risk increases at low temperatures Inhalation of particles of material blown Unattended projections Contact with foreign objects Contact with the tool in...

Page 7: ...n case of rain or humid environments is prohibited Any other use might lead to damage of the appliance property or personal injury 2 YOUR TOOL 2 1 Description 1 Throttle trigger 09 Fuel tank 17 Hose c...

Page 8: ...5 m s2 Uncertainly K 1 5 m s2 Dry weight 5 7 Kg Year of construction BJ2020 Wear hearing protection while operating the tool The declared vibration total value has been measured in accordance with a s...

Page 9: ...the flex tube to secure the throttle cable Fig 5 and Fig 6 Fig 3 Fig 4 Fig 5 Fig 6 3 3 Attaching intermediate tube and nozzles Connect the intermediate tube H and one of the two nozzles I Push the tub...

Page 10: ...care when handling fuel Fuel is highly flammable Never attempt to fuel the blower if the fuel system components are damaged or are leaking Never attempt to refuel the engine while it is running or st...

Page 11: ...In some cases due to operating conditions altitude temperature etc your blower may need a slight adjustment to the idle speed After warming up if unit does not idle after restarting 2 times follow the...

Page 12: ...ent used at any one time 8 Check your equipment before operation especially the muffler air intakes and air filters 9 Use rakes and brooms to loosen debris before blowing In dusty conditions slightly...

Page 13: ...aged or unable to be cleaned 6 2 Fuel cap Fuel filter CAUTION Remove fuel from unit and store in approved container before starting this procedure Open fuel cap slowly to release any pressure which ma...

Page 14: ...t idle until unit stops This will purge the carburetor of fuel 6 Allow engine to cool approx 5 minutes 7 Using a spark plug wrench remove the spark plug 8 Pour 1 teaspoon of clean 2 cycle oil into the...

Page 15: ...ersonnel i e free assembly by our technicians Provided that the damage is not due to improper use of the device To help you with your product we invite you to use this link or call us on 33 0 9 70 75...

Page 16: ...een designed in compliance with the following standards EN 15503 A2 2016 EN ISO 14982 2009 EN ISO 3744 1995 ISO 11094 1991 And in accordance with the following directives Directive Machine 2006 42 EC...

Page 17: ...17...

Reviews: