22
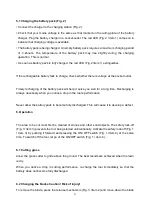
as shown in Fig. 3 / Item 2.
Once you have removed the blade you will be able to see the toothed wheels of the gear unit
(Fig. 4). Make sure that no dirt gets into the gear unit when you change the blade.
To assemble, proceed in the reverse order.
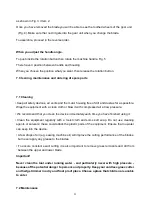
When you adjust the handle angle.
To push inside the rotation button then rotate the machine handle. Fig. 5
There have 3 position between handle and housing.
When you chosen the position what you want, then release the rotation button.
7. Cleaning, maintenance and ordering of spare parts
7.1 Cleaning
• Keep all safety devices, air vents and the motor housing free of dirt and dust as far as possible.
Wipe the equipment with a clean cloth or blow it with compressed air at low pressure.
• We recommend that you clean the device immediately each time you have finished using it.
• Clean the equipment regularly with a moist cloth and some soft soap. Do not use cleaning
agents or solvents; these could attack the plastic parts of the equipment. Ensure that no water
can seep into the device.
• A few drops of oil (e.g. sewing machine oil) will improve the cutting performance of the blades,
but never apply any grease to the blades.
• To ensure constant exact cutting it is also important to remove grass remnants and dirt from
between the upper and lower blade.
Important!
Never clean the tool under running water - and particularly never with high pressure -
because of the potential danger to persons and property. Keep your cordless grass cutter
and hedge trimmer in a dry and frost proof place. Choose a place that children are unable
to enter.
7.2 Maintenance


