Page 3
Step 4
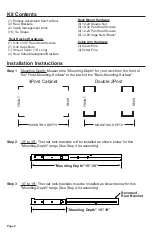
Rear Bracket Attachment: Move the slide rails out approximately 8". You may
need to loosen the thumb screws to do this.
Attach the "Rear Rack Brackets" as shown below. Attach using (4) 8-32 x 3/8"
panhead screws and(4) 8-32 Nuts. The screws should be located in the slots as
far apart from one another as possible (see below). Tighten all screws.
Step 5
Secure Laptop: Velcro is included to allow you to secure your laptop to the shelf.
Be very careful where you place the Velcro on your laptop, stay clear of fans,
vents, and the battery cover.
Rack Mount Hardware
The Rack Hardware kit provides various screws and nuts for the four most common types
of racks.
Square Hole Racks: Install Cage Nuts in appropriate positions. Attach with the
larger 12-24 Screws.
12-24 Threaded Racks: Attach with the larger 12-24 Screws.
10-32 Threaded Racks: Attach with the smaller 10-32 Screws.
Round Hole Racks: (non-threaded) Attach with the larger 12-24 Screws and the
square nuts.
Screws as far apart
as rail allows
Rear Rack
Brackets
Slide Rail Out


