background image

 9 of 16   


     TC-1000 Radar Speed Sign Installation Manual MN0018 v21.01 


Installing and Positioning the Radar Speed Sign  

 
Step 3A:  Mounting the Radar Speed Sign a Round Pole (cont’d) 

• 

Loosely 

add nuts to bolts.  Use 5/16" x 1.5" carriage bolt to secure sign to 

pole. Use standard nut to tighten on pole. 

• 

Slide the radar speed sign up the pole to desired level (bottom of sign should 
be 7 to 10 feet above the ground), and tighten nuts to hold the sign in place.  

• 

Note for solar models:  Do not tighten mounting nuts on the clamps until 
solar mounting has been installed and the conduit to solar panel has been 
run underneath he clamps/brackets on the pole. 


• 

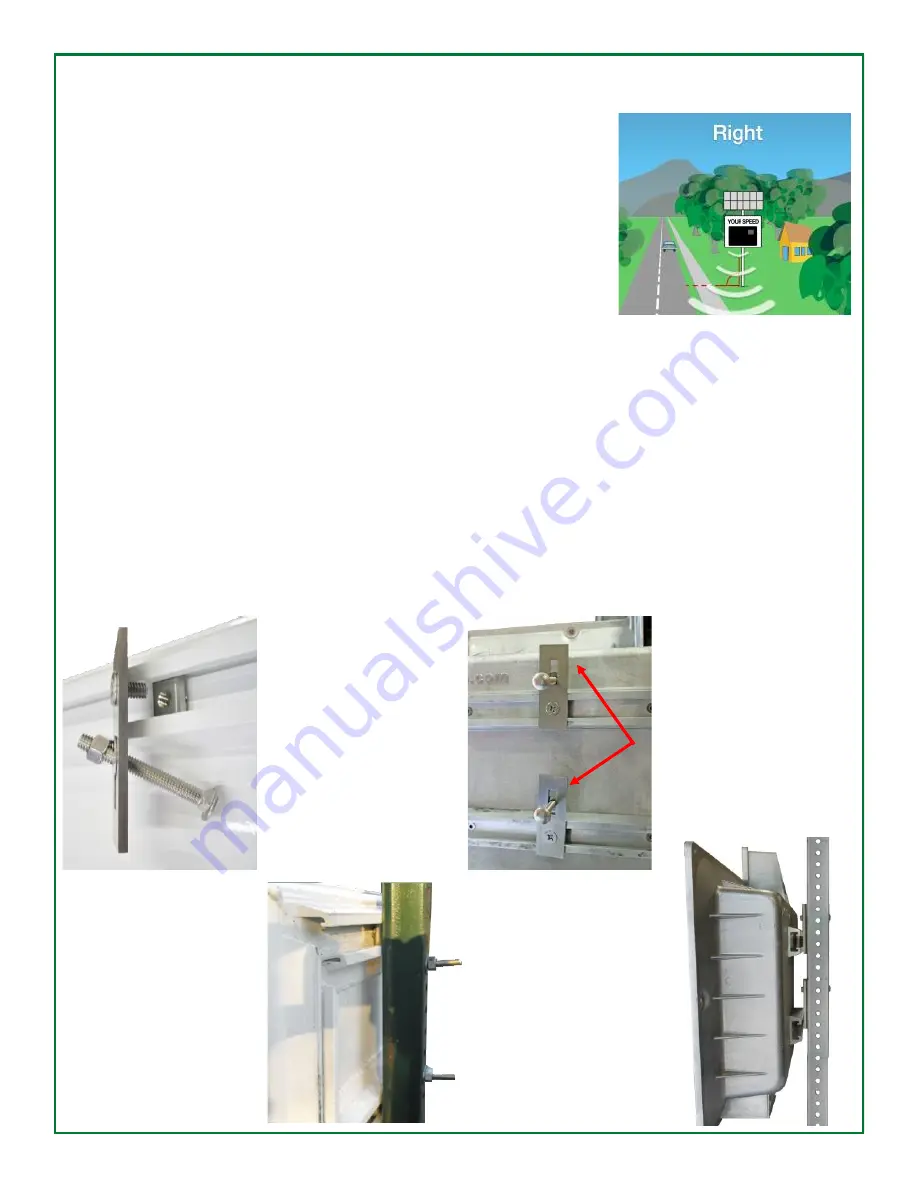
Rotate entire sign slightly left or right to obtain the most accurate radar  
readings of on-coming traffic.  The best direction is usually directly down the curb of the road.  


Step 3B:  Mounting the Radar Speed Sign to a Square Pole or Post (bolted method) 

• 

DO NOT attach the YOUR SPEED faceplate to the radar speed sign until it is mounted on the pole.  It will be 
much easier to mount the radar unit without the faceplate attached.   

• 

Mark pole with pencil or tape at the minimum height level for bottom of sign, usually 7 feet or 7.5 feet above street 
level.  With two people, attach the radar speed sign to the pole. This should be done at the 2-4 foot level first, or 
you may want to set the sign on top of a 4-foot or 6-foot ladder to help make the bracket mounting easier. 

• 

Install the flat brackets on the back of the sign housing. The bracket can be positioned either above or below the 
housing.  When installing the flat brackets on the back of the sign housing, the bracket can be positioned either 
above or below the housing. 

Sign mounted on  

U-channel pole with 

flat bracket 

Bracket mounted  

above sign housing


Flat bracket  

installed on sign 

housing 

Sign mounted on  

2x2 pole with flat 

bracket 

Summary of Contents for TC-1000

Page 1: ...1 of 16 TC 1000 Radar Speed Sign Installation Manual MN0018 v21 01 TC 1000 Radar Speed Sign Installation Manual October 2020 2005 2021 Radarsign LLC All Rights Reserved...

Page 2: ...2 of 16 TC 1000 Radar Speed Sign Installation Manual MN0018 v21 01 THIS PAGE LEFT BLANK...

Page 3: ...Connections Solar Power Connections for the TC 1000S pg 12 13 A C Power Connections for the TC 1000A pg 14 Final Touches pg 15 Radar Speed Sign Settings pg 15 Customer Resource Center pg 15 Radarsign...

Page 4: ...ing and equipment To reduce the risk of burns or other acid related injury resulting from exploding batteries Always use the recommended charging systems with this product To reduce the risk associate...

Page 5: ...in a cool dry place Do not store the sign outside Do not store the sign in a horizontal position Storing the radar speed sign horizontally outside where it is exposed to the weather voids the warranty...

Page 6: ...solar panel is installed facing as close to South as possible solar models only The radar speed sign should be installed on the same side of the street as oncoming traffic If installed on the wrong s...

Page 7: ...support for the sign Please note that the solar models will need the larger stronger poles as there is nearly 4 square feet of surface on the sign itself plus an additional 4 square feet of surface fo...

Page 8: ...about 25 Step 3A Mounting the Radar Speed Sign to a Round Pole DO NOT attach the YOUR SPEED faceplate to the radar speed sign until it is mounted on the pole It will be much easier to mount the radar...

Page 9: ...Step 3B Mounting the Radar Speed Sign to a Square Pole or Post bolted method DO NOT attach the YOUR SPEED faceplate to the radar speed sign until it is mounted on the pole It will be much easier to mo...

Page 10: ...banding clamps Radarsign provides two banding clamps that will fit 3 4 diameter poles For larger or smaller poles customer must provide clamps Radarsign sells an Astro Bracket that will mount signs t...

Page 11: ...up pole to desired position with solar panel facing as close to south as possible and secure to pole The solar panel should be positioned to face south at a 45 angle Tighten all nuts on mounting brack...

Page 12: ...wer wires through conduit connector on the radar sign bell box 1 2 Twist conduit into junction box connector until secure 2 3 DO NOT CONNECT WIRING TO SIGN UNTIL STEP 7 4 Make conduit as straight as p...

Page 13: ...s If you do not do this your sign will operate only during the daytime using solar energy To Check Solar Panel Connection 1 Disconnect 4 prong loop connector a 2 Keep the 2 wire connector from the sol...

Page 14: ...onvenience 1 Locate the open outlet box at bottom of radar speed sign 2 Feed incoming AC power wires through conduit connection 3 Connect the exposed black black and green wires as shown below in Phot...

Page 15: ...The factory settings are Min Speed 20 Max Speed 55 Speed Limit 30 Using a Wi Fi browser set up sign with correct time and date then set initial parameters for sign operation See Operation Manual avai...

Page 16: ...tomer is responsible for inbound shipping Radarsign will pay for return shipping to the customer for the entire warranty period if customer is located within North America Customers from a country out...

Reviews: