Dynalyzer – High Voltage Unit
OPERATION MANUAL
18
Removing High Voltage Unit from X-ray Installation
CAUTION:
Turn off the main power before removing the Dynalyzer. At the completion of testing
remove the cables in the sequence provided to prevent any possible cross connection
of anode and cathode cables.
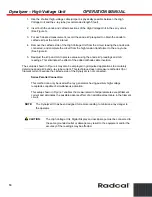
1. Remove anode cable first. The jumper cable from the Dynalyzer to either the x-ray tube or
high-voltage transformer, depending on test configuration, should be disconnected. Do not
handle the insulator.
2. Touch the pins of the cable to ground to remove any residual charge remaining in the cable.
NOTE:
Grid bias operation often causes large residual cable voltages if no bleeder resistance
is present at the high tension transformer.
3. Clean off the oil or grease and place a protective cover over the cable ends.
4. Disconnect the system cable from the other anode connector of the Dynalyzer.
5. Reconnect the x-ray tube to the high-voltage transformer. Be sure sufficient oil or
vaporproofing compound remains in the receptacle or on the cable.
6. Repeat the procedure for the cathode cables.
Interpreting Oscilloscope Measurement Waveforms
Three-phase current waveforms are generally easier to interpret than single-phase waveforms,
however, following the procedure outlined, measurements may be made for both waveforms.
Fluoroscopic exposure current values may be read directly on the DVM. The scale factor is 20
mV/mA. Filament current may be viewed on the scope, or may be measured with a digital
voltmeter connected to the High Voltage Unit readout terminal. The waveform of the filament
current will to some extent influence the accuracy of the reading of the peak reading as ac rectifier
circuit used in most DVMs. For low current level exposures, the zeroing of the High Voltage Unit
should be checked and adjusted, if necessary, through the access hole on the base. Fluoro gain
should be selected. The limiting parameter for measurements will be the response time of the
DVM. In general, exposures having a duration of at least 3 seconds should be adequate for most
DVMs to integrate and display.
Single-Phase Current Waveform
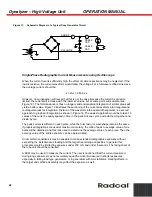
Figure 9 illustrates the waveform of a typical single-phase generator for an exposure of 200 mA,
120 kVp, 1/20 sec. A properly timed single-phase generator will contain one or more complete
pulses, each lasting 1/120 of a second on a 60 Hz power line, or 1/100 of a second on a 50 Hz
system. Thus, a single-phase exposure time for normally operating equipment is N x 1/120, where
N is the number of pulses. For longer exposures, the time may be read from the start of the first
major pulse to the end of the last pulse. The trailing off of the voltage, (region C of Figure 9), is due
to cable capacitance. Cable capacitance is also responsible for the failure of the voltage to drop to
zero at the end of each pulse.
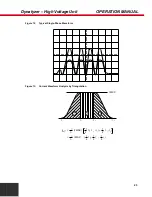
In low-level fluoroscopic systems, or in systems with a capacitor bank, level B may be equal to the
kVp. By convention, kVp is the greatest amplitude value observed, which may vary by amount D.
Pulse A is due to the system of contacting which provides for the closing of the contactor during
the end of the last pulse preceding the beginning of the exposure. This is done to minimize the

