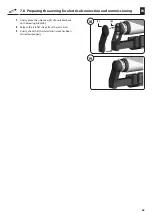
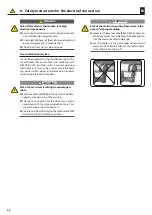
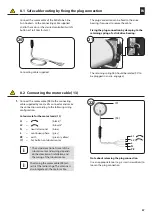
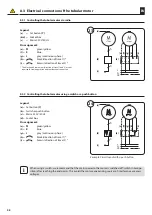
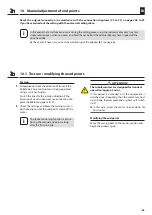
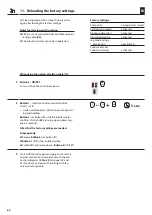
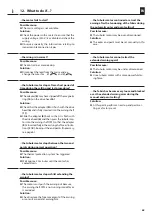
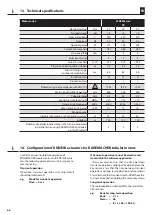
background image

65

EN

...the motor fails to start?
Possible cause:


 The mains voltage is not available.

Solution:


 Check the power with a meter to ensure that the 
supply voltage (230 V) is available and check the 
wiring.


 Observe especially the information relating to 

impermissible connection types.

...the wiring is incorrect?
Possible cause:


 The control lines are mixed up.

Solution:


 Disconnect the lead from the mains and ex-

change the wires for  

L1


 and 

L1


.

12.  What to do if... ?

...the tubular motor stops between the two end 
points during normal operation?
Possible cause:


 The thermal protection system has triggered.

Solution:


 Wait approx. 20 minutes until the motor has 

cooled down.

...the tubular motor stops after a short period of 
time during the setting and test procedures? 

Possible cause: 


 The  adapter


(8)

 may have slipped off the magnetic 

ring 

(14)

 on the drive head


(6)

.

Solution:


 Check that the adapter 

(8)

 sits flush with the drive 

head 

(6)

 and is fully inserted into the awning shaft 

(11)

.


 Slide the adapter 

(8)

 back so that it is flush with 

the drive head 

(6)

 and then press the tubular mo-

tor into the awning shaft 

(11)

 so that the adapter 

(8) 

is inserted fully in the awning shaft, see illustra-

tions 

[ 3 / 8 ]

. Re-adjust the end points if necessary, 

see page 61.

...the tubular motor stops whilst extending the 
awning? 
Possible cause:


 The motor must push the awning out because 
the awning shaft 

(11)

 is not running smoothly or 

is corroded.

Solution:


Check/restore the free movement of the awning 

or consult a specialist awning firm.

i

... the tubular motor continues to retract the 
awning after the tensioning of the fabric during 
the automatic outer end point setting? 

Possible cause:


The tubular motor may be over-dimensioned.

Solution:


 The outer end point must be set manually in this 

case.

... the tubular motor cannot retract the 
extended awning again? 

Possible cause:


The tubular motor may be under-dimensioned.

Solution:


Use a tubular motor with a more powerful driv-

ing force.

... the fabric has become very loose and blocked 
over the extended awning arms during the 
manual end point setting?
Solution:


At this point, perform a new top end point set-
ting or a factory reset.

Summary of Contents for 2378 30 76

Page 1: ... Site of installation Seriennummer Serial number RolloTube S line Sun DuoFern Rohrmotoren Original Betriebs und Montageanleitung 1 DE RolloTube S line Sun DuoFern Tubular Motors Translation of the Original Operating and Assembly Manual 37 EN Bitte kleben Sie hier das beiliegende Etikett mit dem DuoFern Funkcode auf Please stick the enclosed label showing the DuoFern radio code here VBD 694 5 05 20...

Page 2: ... Das Antriebslager als Clicklager 4 18 7 7 2 Einbau anderer Varianten von Antriebslagern 18 7 8 Die Markise für den elektrischen Anschluss und für die Inbetrieb nahmen vorbereiten 19 8 Sicherheitshinweise zum elektrischen Anschluss 20 8 1 Sichere Kabelführung durch Fixieren der Steckverbindung 21 8 2 Das Motorkabel 13 anschließen 21 8 3 Elektrischer Anschluss des Rohrmotors 22 8 3 1 Steuerung des ...

Page 3: ...ntagekapitel Kapitel mit Einstellungen und Taste drücken i weitere nützliche Informationen Lesen Sie die zugehörige Anleitung unzulässige Handlung oder Anordnung i 1 Diese Anleitung beschreibt Ihnen die Montage den elektri schen Anschluss und die Bedienung von RADEMACHER Rohrmotoren der Serien RolloTube S line Sun DuoFern Medium Bitte lesen Sie diese Anleitung vollständig durch und beachten Sie al...

Page 4: ...rochen muss der Rohrmotor mindestens 20 Minuten lang ab kühlen Beim Betrieb ohne eingestellte Endpunkte besteht Lebensgefahr Für einen sicheren Betrieb müssen die Endpunk te eingestellt sein Lesen Sie dazu die Angaben in den Kapiteln 9 und 10 ab Seite 25 Bei unsachgemäßem Gebrauch besteht erhöhte Verletzungsgefahr Unterweisen Sie alle Personen im sicheren Ge brauch des Rohrmotors Verbieten Sie Kin...

Page 5: ...rEinbauundderBetriebdesRolloTubeS lineSun DuoFern ist nur für solche Anlagen und Geräte zu lässig beideneneineFunktionsstörungimSender oder Empfänger keine Gefahr für Personen oder Sachen ergibt oder bei denen dieses Risiko durch andere Sicherheitseinrichtungen abgedeckt wird i Funkanlagen die auf der gleichen Frequenz senden können zu Empfangs störungen führen Einsatzbedingungen für den selbstler...

Page 6: ...ken etc Drehmomentüberwachung Die Drehmomentüberwachung schützt die Markise unddaskompletteSystemvorZerstörungsowieden Menschen vor Verletzung Sie dient unter anderem auch zur Findung der Endpunkte DuoFern RADEMACHER Funk Technik zur Steuerung kompatibler Produkte Endpunkte In jede Laufrichtung der Markise wird ein Endpunkt definiert und eingestellt bei deren Erreichen der Rohrmotor abschaltet und...

Page 7: ...mit Buchse 1 x c Adapter 1 x d Mitnehmer 1 x e Click Antriebslager für Markisen 1 x Bitte beachten Kundenspezifischer Lieferumfang Vergleichen Sie nach dem Auspacken den Packungsinhalt mit den Angaben zum Lieferumfang auf der Verpackung Prüfen Sie die Angaben auf dem Typenschild Vergleichen Sie die Angaben zum Motortyp Vergleichen Sie die Angaben zur Spannung Frequenz mit denen des örtlichen Netze...

Page 8: ...rmationen und Anleitungen finden Sie auf unserer Internetseite www rademacher de i 1 Seitenabdeckung 2 Montageschrauben 3 Lagerbock 4 Click Antriebslager 5 Federring 6 Antriebskopf 7 Setztaste 8 Adapter 9 Rohrmotor 10 Mitnehmer 11 Markisenwelle 12 Markisentuch 13 Motorkabel inkl Stecker und steckbarem Anschlusskabel 14 Magnetring 15 Rastbügel 16 Abtriebsadapter 17 Grundplatte des Antriebslagers 18...

Page 9: ...ne Sun DuoFern durch die Blockiererkennung in beide Laufrichtungen und durch die Hinderniser kennung für höchste Sicherheit und einen behang schonenden Lauf Verwendung im DuoFern Netzwerk Sobald Sie den RolloTube S line Sun DuoFern in ein DuoFernFunk Netzwerkeinbinden könnenSieviele Automatikfunktionen mit Hilfe von DuoFern Steue rungen wie dem HomePilot einstellen und nutzen DuoFern Steuerungen u...

Page 10: ...HomePilot deaktiviert aktiviert werden 6 1 Funktion der Tuchentlastung und der Blockiererkennung Automatische Tuchentlastung während des Normalbetriebs Während des Normalbetriebs fährt die Markise gegen den oberen Endpunkt und anschließend automatisch kurz in die Gegenrichtung reversiert um das Markisentuch zu entlasten Bedingungen für die korrekte Funktion der Tuchentlastung Diese Funktion ist nu...

Page 11: ... kann vor Ort mit einem Schalter gesteuert werden Durch Betätigen der Auf oder Ab Richtung am Schalter fährt die Markise vollständig Aus oder Ein bis zum eingestellten Endpunkt Durch Aus schalten der vorgegebenen Laufrichtung kann der Motor an gewünschter Position gestoppt werden i 6 5 Tippbetrieb mit einem 1poligen Taster Der RolloTube S line Sun DuoFern kann vor Ort auch mit einem 1poligen Taste...

Page 12: ...en der Stromzufuhr ist der Funk code max 2 Stunden lang aktiv Nach Ablauf dieser ZeitisteineAktivierungmittelsFunkcodenichtmehr möglich Trennen Sie den RolloTube S line Sun Duo Fern kurzzeitig vom Netz um das Zeitfenster erneut zu aktivieren Den DuoFern Funkcode finden Sie auf dem bei liegenden Etikett am Motorkabel i Bewahren Sie das beiliegende Etikett un bedingt sicher auf z B durch Aufkleben a...

Page 13: ...abstand von 0 4 m zu den Teilen in der Umgebung bei voll ausgerollter Markise zu beachten Bei Einsatz in Markisenanlagen darf der unterste Punkt der Markise 1 8 m nicht unterschreiten Durch direkten Wettereinfluss auf den unge schützten Rohrmotor besteht Kurzschluss und Brandgefahr Der montierte Rohrmotor darf niemals direktem RegenoderSchneefallausgesetztsein daskannzu lebensgefährlichen Situatio...

Page 14: ...n Sie die Gelenkarme 19 mit Spanngurten gegen plötzliches Herunterfallen 3 Bauen Sie das Markisengetriebe aus i Auf Grund der verschiedenen Markisen modelle müssen Sie die Vorbereitungen auf die am Einbauort vorhandene Marki senanlage abstimmen Montage des Adapters 8 1 Schieben Sie den Adapter 8 über den Magnetring 14 am Antriebskopf bis er einrastet Achten Sie dabei auf die richtige Lage der Nut ...

Page 15: ...Freilauf 1 Schieben Sie den Mitnehmer 10 so auf den Ab triebsadapter 16 dass er Freilauf hat und hinter dem Rastbügel 15 einrastet Im Freilauf lässt sich der Mitnehmer 10 leicht hin und herdrehen i Soll der Rohrmotor mit der selbtslernenden Endpunkteinstellung und mit der Hinderniserkennung arbei ten müssen Sie den Mitnehmer 10 mit Freilauf montieren Auslieferungszustand ACHTUNG EIne Montage des M...

Page 16: ...u seiner Zerstörung Schlagen Sie nie den Rohr motor 9 mit Gewalt in die Markisenwelle 11 ein 1 Schieben Sie zuerst den Mitnehmer 10 in die Markisenwelle 11 2 Drücken Sie danach den Rohrmotor so in die Mar kisenwelle 11 bis der Adapter 8 vollständig in der Markisenwelle steckt ACHTUNG Achten Sie darauf dass der Adapter 8 während der Montage nicht vom Magnetring 14 am Antriebskopf 6 abrutscht Es kom...

Page 17: ...Befestigungslöcher und bohren Sie diese anschließend durch das Präzisionsrohr in den Mitnehmer 10 ACHTUNG Zu tiefes Bohren kann die Freilauffunktion zerstören Bohren Sie nie tiefer als 10 mm in den Mitnehmer 10 Bohren im Bereich des Antriebs führt zu seiner Zerstörung Bohren Sie nie im Bereich des Antriebs 9 5 DasPräzisionsrohramMitnehmer 10 festschrauben oder vernieten Verwenden Sie dazu vier sel...

Page 18: ... werden Das gilt besonders bei Verwendung der inneren Montagelöcher auf der Grundplatte 17 2 Schieben Sie anschließend den Lagerbock 3 wie der auf die Quertraverse 18 bis das Antriebslager 4 vollständig am Antriebskopf 6 einrastet 2 1 Prüfen Sie ob die Setztaste 7 des Rohrmotors 9 frei zugänglich ist Korrigieren Sie gegebenenfalls diePositiondesAntriebslagers 4 amLagerbock 3 i DerRohrmotorkannin4S...

Page 19: ...ür die Inbetriebnahmen vorbereiten 1 Setzen Sie zum Schluss die Seitenabdeckung 1 falls vorhanden wieder auf den Lagerbock 3 2 Lösen Sie die Spanngurte wieder von den Gelenk armen 3 Überprüfen Sie abschließend noch einmal die Montagearbeiten auf ihre korrekte Ausführung ...

Page 20: ... ablaufendes Wasser am tiefsten Punkt der Schlaufe gesammelt wird und dort abtropft 8 Sicherheitshinweise zum elektrischen Anschluss WARNUNG WARNUNG Kurzschlussgefahr durch beschädigte Kabel Verlegen Sie das Motorkabel 13 so dass es nicht durch bewegliche Teile der Markise beschädigt werden kann Die Netzanschlussleitung dieses Antriebs darf nur durch den gleichen Leitungstyp angeschlossen werden W...

Page 21: ...wünschte Steuerung Schalter Taster oder Troll Comfort etc angeschlossen Fixierung der Steckverbindung durch Festklem men am Federring eines Click Antriebslagers Der Federring 5 sollte bei Bedarf um 90 gedreht aufgesteckt und wieder eingerastet werden Beiliegendes Anschlusskabel Zur Sicherung des Kabels kann die Steckverbin dung bei Bedarf am Antriebslager fixiert werden Hinweis zum Lösen der Steck...

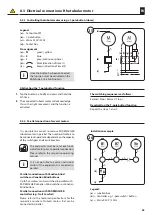
Page 22: ...st es empfehlenswert nach Erreichen der Endpunkte den Motor spannungs frei Schalter in Null Stellung zu schalten Dadurch werden Störquellen oder Überspannungen vom Motor ferngehalten Legende a Setztaste 7 b d Schalterdose c Netz 230 V 50 Hz Anschlussbelegung e PE grün gelb f N blau g L grau Dauerphase h schwarz Laufrichtung 1 i braun Laufrichtung 2 Die schwarze und die braune Ader Laufrichtung 1 u...

Page 23: ... mit RADEMACHER Steuerun gen z B Troll Comfort AnzahlderjeweilsparallelschaltbarenRohrmotoren s Technische Daten Installationsbeispiel Legende a Abzweigdose b Steuergerät z B 1poliger Schalter Taster c Netz 230 V 50 Hz 8 3 3 Steuerung des Rohrmotors mit einem 1poligen Taster Schließer Legende a Setztaste 7 b 1poliger Taster c Netz 230 V 50 Hz d Schalterdose Anschlussbelegung e PE grün gelb f N bla...

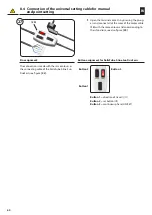
Page 24: ...Sie alle Adern des Motorkabels 13 farbgleich und entsprechend Ihren Funktionen an siehe Abbildung 22 Anschlussbelegung Der Anschluss erfolgt farbgleich zum Anschluss kabel des RolloTube S line Sun DuoFern siehe Abbildung 22 Tastenbelegung für RolloTube S line Sun DuoFern Taste 1 Laufrichtung I II Taste 2 Setztaste III Taste 3 Dauerphase ON SET Taste 1 Taste 2 Taste 3 ...

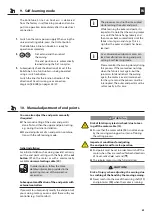
Page 25: ...tionen werden automa tisch während der ersten Fahrzyklen gelernt 3 Kontrollieren Sie anschließend die Laufrichtung falls der RolloTube S line Sun DuoFern mit einem Schalter oder Taster bedient wird Tauschen Sie bei falscher Laufrichtung die Lei tungen für die Drehrichtung siehe Anschlussplan 24 25 auf Seite 22 23 Erstinstallation Bei einer Erstinstallation kann der Markisenmonteur dieEinstellungde...

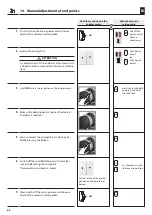
Page 26: ...ung stromlos Der jeweilige Endpunkt ist gespeichert Den Schalter in Neutral position stellen und die Setztaste loslassen Laufrichtung 1 zwei Mal kurz schalten tippen und beim dritten Mal gedrückt halten Schaltwippe in Mittel stellung stellen Laufrichtung 2 II I III III III II I oder 1 Schalten Sie zuerst die Netzspannung bzw die Dauerphase am Universal Einstellkabel ein Die LED der Taste 3 muss da...

Page 27: ... Laufrichtung falls der RolloTube S line Sun DuoFern mit einem Schalter oder Taster bedient wird Tauschen Sie bei falscher Laufrichtung die Lei tungen für die Drehrichtung siehe Anschlussplan 24 25 auf Seite 22 23 2 Kontrollieren Sie Ihre Einstellungen und lassen Sie die Markise in beide Richtungen laufen bis die Endpunkte den Motor ausschalten Verändern der Endpunkte Fahren Sie die Markise in die...

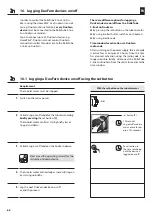
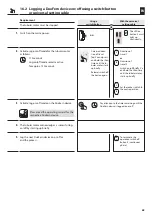
Page 28: ...rwendung des Universal Einstellkabels 20 3 Schalten Sie die Netzversorgung aus und stellen Sie den ursprünglichen Anschluss gemäß den An schlussplänen 23bis 25 auf den Seiten 22 und 23 wieder her falls Sie die Einstellung mit dem Universal Einstellkabel vorgenommen haben 1 Taste 3 ON SET Zuerst die Dauerphase einschalten ON SET II I III 2 Taste 1 in eine beliebige Laufrichtung I oder II schalten u...

Page 29: ...rücken Sie anschlie ßend den Rohrmotor so in die Markisenwelle 11 dass der Adapter 8 vollständig in der Markisen welle steckt siehe Abbildungen 3 8 Stellen Sie ggf die Endpunkte neu ein siehe Seite 25 der Rohrmotor beim Ausfahren der Markise stehen bleibt Mögliche Ursache Der Motor muss die Markise rausschieben da die Markisenwelle 11 schlecht läuft oder korrodiert ist Lösung Die Leichtgängigkeit ...

Page 30: ...otor muss nach spätestens 180 Sekunden spannungslos geschaltet werden z B Basis für Langzeitbetrieb Basis 2 1 s Faktor 86 2 1 s x 86 180 6 s Motorserie SLDSM xx xx PZ Nenndrehmoment Nm 30 40 50 Leerlaufdrehzahl U min 16 16 12 Nennspannung V 230 230 230 Frequenz Hz 50 50 50 Nennleistung W 191 198 205 Stromaufnahme A 0 83 0 86 0 89 Einschaltdauer KB Min 4 4 4 Anzahl der Adern 5 5 5 Aderquerschnitt m...

Page 31: ... der Serie RolloTube S line Sun DuoFern Medium den Richtlinien 2006 42 EG Maschinenrichtlinie und 2014 53 EU Funkanlagenrichtlinie entsprechen Der vollständigeText der EU Konformitätserklärung liegt dem Produkt bei und ist beim Hersteller hin terlegt RADEMACHER Geräte Elektronik GmbH Buschkamp 7 46414 Rhede Deutschland i ...

Page 32: ...ung via DuoFern Funkcode Nach dem Einschalten der Stromzufuhr ist der Funkcode max 2 Stunden lang aktiv Nach Ablauf dieser Zeit ist eine Aktivierung mittels Funkcode nicht mehr möglich Trennen Sie den RolloTube S line Sun DuoFern kurzzeitig vom Netz um das Zeitfenster erneut zu aktivieren Mit der Setztaste am Rohrmotor EIN 1 Die Netzspannung einschalten 2 Den An Abmeldemodus des Rohrmotors durch k...

Page 33: ...lten 3 Den Anmelde oder Abmeldemodus am DuoFern Gerät aktivieren Lesen Sie dazu die Bedienungsanleitung des jeweiligen DuoFern Geräts 4 Der Rohrmotor quittiert eine erfolgreiche Anmel dung bzw Abmeldung durch kurzes Anfahren 5 Das nächste DuoFern Gerät an oder abmelden oder den Vorgang beenden ODER Mit dem Universal Einstellkabel Danach die Schaltwippe in Mittelstellung stellen II I Die LED der Ta...

Page 34: ...defunktion aktivieren In Kombination mit einem HomePilot oder ei ner DuoFern Handzentrale kann der RolloTube S line Sun DuoFern durch die Fernanmeldefunktion in den Anmeldemodus versetzt werden um andere DuoFern Geräte z B DuoFern Handsender anzu melden ...

Page 35: ...Reparaturen und Abänderungen von dritten nicht autorisierten Stellen Verwendung ungeeigneter Zubehörteile Schäden durch unzulässige Überspannungen z B Blitzeinschlag Funktionsstörungen durch Funkfrequenzüberla gerungen und sonstige Funkstörungen VoraussetzungfürdieGarantieist dassdasNeugerät bei einem unserer zugelassenen Fachhändler erwor ben wurde Dies ist durch Vorlage einer Rechnungs kopie nac...

Page 36: ...DEMACHER Geräte Elektronik GmbH Buschkamp 7 46414 Rhede Deutschland info rademacher de www rademacher de Service Hotline 01807 933 171 Telefax 49 2872 933 253 service rademacher de 30 Sekunden kostenlos danach 14 ct Minute aus dem dt Festnetz bzw max 42 ct Minute aus dem dt Mobilfunknetz ...

Page 37: ...loTube S line Sun DuoFern Medium SLDSM Item numbers 2378 30 76 2378 40 76 2378 50 76 Please note Site of installation Serial number RolloTube S line Sun DuoFern Rohrmotoren Original Betriebs und Montageanleitung 1 DE RolloTube S line Sun DuoFern Tubular Motors Translation of the Original Operating and Assembly Manual 37 EN ...

Page 38: ...e bearing 4 54 7 7 1 The drive bearing as a click bearing 4 54 7 7 2 Mounting in other drive bearing versions 54 7 8 Preparing the awning for electrical connection and commissioning 55 8 Safety instructions for the electrical connection 56 8 1 Safe cable routing by fixing the plug connection 57 8 2 Connecting the motor cable 13 57 8 3 E lectrical connection of the tubular motor 58 8 3 1 Controllin...

Page 39: ...ings and button operation i Further useful information Please read the respective manual Unauthorised handling or configuration i 1 This manual serves to describe the installation electrical connection and operation of RADEMACHER tubular motors of the RolloTube S line Sun DuoFern Medium series Before you begin please read this manual through completely and follow all the safety instructions and as...

Page 40: ...r motor has a running time limit KB transient operation of four minutes If the running time limit is triggered then the tubular motor must be left for at least 20 minutes to cool down Risk of fatal injury from crushing in the event of operation without set end points The end points must be set in order to ensure safe operation In order to do so please refer to the corresponding chapters 9 and 10 o...

Page 41: ...nd must not jam Installation and operation of the RolloTube S line Sun DuoFern is only permitted for those systems anddeviceswhereamalfunctioninthetransmitter or receiver would not cause a danger to personnel or property or where this risk is already covered by other safety equipment i Radio systems which transmit on the same frequency can cause interference Operating conditions for the self learn...

Page 42: ...ooms with a bath or shower basin etc Torque monitoring The torque monitoring protects the awning and the complete system from being destroyed and people from being injured It is also used to find the end points amongst other things DuoFern RADEMACHER radio technology for controlling compatible products End points An end point is defined and set for each direction of travel of the awning Once this ...

Page 43: ...sembled with connector 1 x c Adapter 1 x d Catch 1 x e Click drive bearing for awnings 1 x Please note Customer specific scope of delivery After unpacking please check the following Check that the package contents match the scope of delivery listed on the package Check the details on the type plate Check the details for the motor type Check that the voltage frequency corresponds to the local mains...

Page 44: ...hnical information and manuals can be found on our website www rademacher de i 1 Side cover 2 Assembly screws 3 Bearing block 4 Click drive bearing 5 Retaining spring 6 Drive head 7 Set button 8 Adapter 9 Tubular motor 10 Catch 11 Awning shaft 12 Awning shaft 13 Motor cable incl plug and plug in connect ing cable 14 Magnetic ring 15 Retaining clip 16 Drive adapter 17 Base plate for drive bearing 1...

Page 45: ...nwithblockagedetectioninbothdirections of travel and through the obstacle detection ensur ing maximum safety and gentle operation Use in the DuoFern network As soon as you integrate your RolloTube S line Sun DuoFern into a DuoFern radio network you can set and make use of many different automatic functions using DuoFern controllers such as the HomePilot DuoFern controllers and transmitters must be...

Page 46: ... detection can be activated deactivated via the HomePilot 6 1 Function of the fabric relief and blockage detection system Automatic fabric relief during normal operation During normal operation the awning runs up to the upper end point and subsequently shifts briefly in the opposite direction reverses in order to automatically relieve the strain on the awning fabric Requirements for correct fabric...

Page 47: ...n DuoFern can be controlled on site using a switch By briefly pressing the up or down direction on the switch the awning will extend or retract complete ly until it reaches the set end point By deactivating the specified direction of travel the motor can be stopped at the desired position i 6 5 Jog mode using a 1 pole button The RolloTube S line Sun DuoFern can also be controlled on site using a 1...

Page 48: ...ower supply the radio code is active for a maximum of 2 hours Once this time has elapsed activation using the radio code is no longer possible Briefly disconnect the RolloTube S line Sun DuoFern from the mains to reactivate the time window You will find the DuoFern radio code on the enclosed label on the motor cable i It is imperative that you store the en closed label safely e g by fixing it to t...

Page 49: ...ly operated awnings A minimum gap of 0 4 m to other parts in the area must be maintained when the awning is fully extended Awnings used in an awning system must maintain a minimum height of 1 8 m There is a risk of short circuits and fire in the event of direct weather influences to the unprotected tubular motor The mounted tubular motor may never be sub jected to direct rain or snow as this may l...

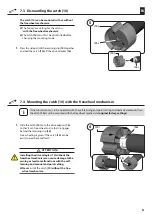
Page 50: ...9 with ratchet straps in order to avoid sudden dropping 3 Remove the awning gear mechanism i The preparation measures must be adapted to the existing awning system on site due to the various models of awning available Mounting the adapter 8 1 Slide the adapter 8 over the magnetic ring 14 on thedriveheaduntilitengages Indoingso checkthe correct positioning of the groove in the adapter 8 Dismantling...

Page 51: ...de the catch 10 onto the drive adapter 16 so that it can free wheel and so that it engages behind the retaining clip 15 Free wheeling is given if the catch 10 can be easily turned back and forth i If the tubular motor is to be operated with the self learning end point setting and obstacle detection then the catch 10 must be mounted with the freewheel mechanism original factory settings ATTENTION I...

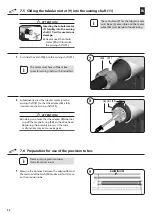
Page 52: ...ock the tubular motor 9 with force into the awning shaft 11 1 First slide the catch 10 into the awning shaft 11 2 Subsequently press the tubular motor into the awning shaft 11 so that the adapter 8 is fully inserted into the awning shaft 11 ATTENTION In doing so ensure that the adapter 8 does not slip off the magnetic ring 14 on the drive head 6 during the assembly process Otherwise malfunctions m...

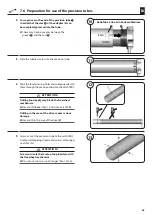
Page 53: ... the four fastening holes and subsequently drill them through the precision tube into the catch 10 ATTENTION Drilling too deeply may break the freewheel mechanism Never drill deeper than 10 mm into catch 10 Drilling in the area of the drive causes serious damage Never drill in the area of the drive 9 5 Screw or rivet the precision tube to the catch 10 Use four self tapping sheet metal screws or fo...

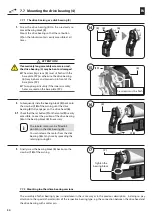
Page 54: ...arly if the inner assembly holes are used on the base plate 17 2 Subsequently slide the bearing block 3 back onto the crossbar 18 of the awning until the drive bearing 4 fully engages on the drive head 6 2 1 Checkthatthesetbutton 7 onthemotor 9 iseasily accessible Correct the position of the drive bearing 4 on the bearing block 3 if necessary i The tubular motor can be fitted in 4 positions in the...

Page 55: ...g for electrical connection and commissioning 1 Finally place the side cover 1 if available back on the bearing block 3 2 Release the ratchet straps from the joint arms 3 Finally check that the installation work has been carried out properly ...

Page 56: ...ollect at the lowest point from where it can drain off 8 Safety instructions for the electrical connection WARNING WARNING Risk of short circuit resulting from damaged cable Lay the motor cable 13 so that it cannot be dam aged by moving parts of the awning The mains connection for the drive may only be connected with the same conduction type Con sult customer services if necessary Sealthewallducta...

Page 57: ... and to the mains or the desired controller Switch button or Troll Comfort etc Fixing the plug connection by clamping to the retaining spring of a click drive bearing The retaining spring 5 should be rotated 90 to be plugged in and re engaged Connecting cable supplied The plug connection can be fixed to the drive bearing if required to secure the cable Note about releasing the plug connection Use ...

Page 58: ...mend that the mains power to the motor is switched off switch in zero po sition after reaching the end points This avoids the motor experiencing sources of interference or excess voltages Legend a Set button 7 b d Socket box c Mains 230 V 50 Hz Pin assignment e PE green yellow f N blue g L grey continuous phase h black direction of travel 1 i brown direction of travel 2 The black and brown wires d...

Page 59: ...ease refer to the technical specifications for the respective number of tubular motors that can be connected in parallel Installation example Legend a Junction box b Controller e g 1 pole switch button c Mains 230 V 50 Hz 8 3 3 Controlling the tubular motor using a 1 pole button closer Legend a Set button 7 b 1 pole button c Mains 230 V 50 Hz d Socket box Pin assignment e PE green yellow f N blue ...

Page 60: ...ble 13 with the same colours and corresponding to their functions see also figure 22 Pin assignment The connection is made with the same colours as the connecting cable of the RolloTube S line Sun DuoFern see figure 22 Button assignment for RolloTube S line Sun DuoFern Button 1 direction of travel I II Button 2 set button III Button 3 continuous phase ON SET Button 1 Button 2 Button 3 ...

Page 61: ...re automatically learned during the first run cycles 3 Subsequently check the direction of travel if the RolloTube S line Sun DuoFern is being operated using a switch or button Switch the lines for the rotation direction if the direction of travel is wrong see connection diagrams 24 25 on pages 58 59 Initial installation For initial installation the awning specialist can carry out the end point se...

Page 62: ...d points The respective end point is stored Set the switch to the neutral position and release the set button Direction of travel 1 press tap twice briefly and press and hold the third time Set the rocker switch to the centre position Direction of travel 2 II I III III III II I or 1 First switch on the mains power or continuous phase at the universal setting cable The LED on button 3 must light up...

Page 63: ... RolloTube S line Sun DuoFern is being operated using a switch or button Switch the lines for the rotation direction if the direction of travel is incorrect see connection dia grams 24 25 on pages 58 59 2 Check the settings and allow the awning to run in both directions until the end points switch off the motor Modifying the end points Move the awning back to the centre position and begin the proc...

Page 64: ... universal setting cable 20 3 Switch off the mains power supply and reset the original connection in accordance with the con nection diagrams 23 to 25 on pages 58 and 59 if you have carried out the setting with the universal setting cable 1 Button 3 ON SET First switch on the continuous phase ON SET II I III 2 Button 1 switch on the desired direction of travel I or II while simultaneously within o...

Page 65: ...the adapter 8 back so that it is flush with the drive head 6 and then press the tubular mo tor into the awning shaft 11 so that the adapter 8 is inserted fully in the awning shaft see illustra tions 3 8 Re adjust the end points if necessary see page 61 the tubular motor stops whilst extending the awning Possible cause The motor must push the awning out because the awning shaft 11 is not running sm...

Page 66: ...d off at the latest after 180 seconds e g Basis for long term operation Basis 2 1 s Factor 86 2 1 s x 86 180 6 s Motor series SLDSM xx xx PZ Nominal torque Nm 30 40 50 No load speed rpm 16 16 12 Nominal voltage V 230 230 230 Frequency Hz 50 50 50 Nominal power W 191 198 205 Current consumption A 0 83 0 86 0 89 On period KB min 4 4 4 Number of wires 5 5 5 Core cross section mm2 0 75 0 75 0 75 Plug ...

Page 67: ...e RolloTube S line Sun DuoFern Medium series comply with the Directives 2006 42 EC Machinery Directive and 2014 53 EU Radio Equipment Directive The full text of the EU declaration of conformity is included with the product and is kept on file by the manufacturer RADEMACHER Geräte Elektronik GmbH Buschkamp 7 46414 Rhede Germany i ...

Page 68: ...window for activation via DuoFern radio code After switching on the power supply the radio code is active for a maximum of 2 hours Once this time has elapsed activation using the radio code is no longer possible Briefly disconnect the RolloTube S line Sun DuoFern from the mains to reactivate the time window With the set button on the tubular motor ON 1 Switch on the mains power 2 Activate log on o...

Page 69: ...e log on off mode on the DuoFern device Please read the operating manual for the respective DuoFern device 4 The tubular motor acknowledges a successful log on off by starting up briefly 5 Log the next DuoFern device on or off or end the process OR With the universal setting cable Set the rocker switch to the centre position II I The LED on button 3 must light up continously ON SET ON SET II I Pay...

Page 70: ... log on function The RolloTube S line Sun DuoFern can be set to log on mode in combination with a HomePilot oraDuoFernManualCentralOperatingUnitbyusing the remote log on function in order to activate other DuoFern devices e g DuoFern ManualTransmitter ...

Page 71: ...epairs and modifications by third parties unau thorised persons Use of unsuitable accessories Damage caused by inadmissible excess voltages e g lightning strikes Operational malfunctions caused by radio frequency overlapping and other such radio interference Aprerequisiteforthewarrantyisthatthenewdevice musthavebeenpurchasedfromoneofourapproved specialist retailers Proof of this must be provided b...

Page 72: ... Elektronik GmbH Buschkamp 7 46414 Rhede Germany info rademacher de www rademacher de Service Hotline 01807 933 171 Telefax 49 2872 933 253 service rademacher de 30 seconds free of charge subsequently 14 cents minute from German fixed line networks and max 42 cents minute from German mobile networks ...

Reviews: