background image

14

EN

i

Electrical connection

Connection diagram

L1

M

230 V/50 Hz

Extension inputs, e.g. 
connection of an external pushbutton

Mains

UP

DOWN

DOWN

UP

TOP

L

N

N

Insert the connector into the 

device after the connection is 

completed.

Use the enclosed connector to con

-

nect the Modi Belt Box Timer to the 

mains power and the tubular motor. 

You can prewire the connector prior 

to the final installation in accordance 

with the connection diagram.

Installation of the protective cover 

after the electrical connection.

TO

P

Summary of Contents for 3100 05 12

Page 1: ...VBD 628 2 01 21 Modi Belt Box Timer Installation and Instruction Manual Item no 3100 05 12 EN ...

Page 2: ...e 18 Basic settings summer and winter time 19 Standard programme 20 Week programme 21 Setting the automatic sun function 25 Setting the automatic dusk function 27 Operating the Modi Belt Box Timer manual mode 29 Operation in jog mode 30 Manual mode with an external button 31 Deleting all settings software reset 32 What to do if 33 Technical specifications 35 Dimensions 36 Simplified EU declaration...

Page 3: ... passed on as well Damage resulting from non compliance with this manual and the safety instruc tions will void the warranty We assume no liability for any consequential dam age Hazard symbols The following hazard symbols are used in this manual Danger to life resulting from electric shock Danger area dangerous situation Levels of danger and signal words DANGER This hazard will lead to serious inj...

Page 4: ...4 EN i Symbols and depictions used Depiction Description Press or tap the button Release the button 1 Procedures 2 Itemisation i Further useful information Please read the respective manual ...

Page 5: ...ou use a metal belt box this needs to be earthed Make sure that the leads do not touch the belt box The use of defective devices can lead to personal injury and damage to prop erty electric shock short circuit Check the Modi Belt Box Timer for damage prior to installation Never use defective or damaged devices Please contact our Service department in this case see page 40 Improper use leads to an ...

Page 6: ...and damage to the device or the connected tubular motor As the manufacturer we provide no guarantee for the use of third party compo nents and accept no liability for consequential damage resulting from such All repairs to the Modi Belt Box Timer must only be undertaken by authorised customer service personnel Intended use Improper use i Using the Modi Belt Box Timer for any other purpose than pre...

Page 7: ...Week button Operating mode selector button Sun button Dusk button Slot under the cover Slot under the cover Plug in connection for the light sensor Changeover Summer winter time Front cover removable DOWN UP Operating modes Display of the week days MO Monday SO Sunday Sun or dusk symbol Hours Summer time So Winter time Wi ...

Page 8: ...igured operating mode Activated functions Current time of day Configured switching times The following section serves to briefly describe the individual operating modes and functions Manual mode Operation by hand is always possible In manual mode you can open close and also stop the roller shutter again using the UP and DOWN buttons Manual operation with an external button In addition you can conn...

Page 9: ...roller shutter which will apply to all days of the week Random mode The operating mode selector button can be used to set the time control to random mode This configuration enables a delay to the configured switching times of 0 to 30 minutes Example You have set the opening time to 8 00 hours and switched on random mode Your roller shutters will now open automatically at random be tween 8 00 hours...

Page 10: ...d position can be freely selected by changing the light sensor position Automatic lowering Once the daylight exceeds the set limit the roller shutter is lowered as far as the light sensor after approx imately 10 minutes This delay is necessary so that passing clouds have no effect on the function Automatic clearing The roller shutter is automatically raised a small amount to enable the sensor afte...

Page 11: ...to the lower end stop The roller shutter will only open again once the configured opening time is reached or in the event of a manual UP command i If your roller shutter is to be lowered as a result of the automatic dusk function then you must set the automatic closing time to a time after the onset of dusk Example 1 Configured closing time 23 00 hours Onset of dusk 20 30 hours The roller shutter ...

Page 12: ...functions In order to do so follow the information provided in the operating manual for the respective tubular motor Parallel connection of tubular motors You can connect a maximum of two RADEMACHER tubular motors in parallel with the Modi Belt Box Timer Other tubular motor products may only be connected in parallel after consultation with the respective manufacturer When using more than two tubul...

Page 13: ...tem is de energised Strip the leads of the connecting cable so that the live leads do not protrude from the connecting terminals or the protective cover Install the enclosed protective cover before switching on the power supply see figure WARNING WARNING Incorrect wiring may lead to short circuits and destroy the device Observe the connector pin assignments in the connection diagram on page 14 Fol...

Page 14: ... N Insert the connector into the device after the connection is completed Use the enclosed connector to con nect the Modi Belt Box Timer to the mains power and the tubular motor You can prewire the connector prior to the final installation in accordance with the connection diagram Installation of the protective cover after the electrical connection TOP ...

Page 15: ...may cause a short circuit Ensure that the connecting cable is laid safely The connecting cable may not be pinched when screwing on the Modi Belt Box Timer as this could lead to damage 2 Then screw the housing to the belt box with the two screws provided 3 Finally push the front panel back onto the device with light pres sure Plug in connection for the light sensor Slot For mounting on the belt box...

Page 16: ...the Modi Belt Box Timer Automatic sun function Select the position of the light sensor as the position to which your roller shutter should be lowered if the set limit too much sun is exceeded Automatic dusk function The position of the light sensor is freely configurable You can keep the position of the light sensor selected for the automatic sun function ATTENTION Avoid damaging the light sensor ...

Page 17: ... use immediately after switching on the device provided that the end stops of the tubular motor are configured You can raise or lower your roller shutter at any time using the two operating buttons UP or DOWN Some of the buttons are slightly recessed in the front panel e g sun button Please use a thin pen or a similar tool in order to press these buttons Observing the time out If no input is made ...

Page 18: ...ant to set 13 00 hours otherwise choose to move the time back 2 SET Release the buttons as soon as the digits display the current time of day adjust by running through the digits slowly if necessary How to adjust the digits SET moves the time forward SET moves the time back Run through the digits quickly e g to move the time forward SET Press and hold Run through the digits slowly e g to move the ...

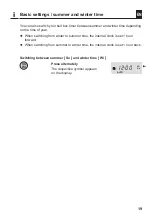
Page 19: ...nding on the time of year When switching from winter to summer time the internal clock is set 1 hour forward When switching from summer to winter time the internal clock is set 1 hour back I 2 00 AUTO Wi So Switching between summer So and winter time Wi SO WI Press alternately The respective symbol appears on the display ...

Page 20: ... hours SET Press and hold moves the time back SET Release the buttons as soon as the desired opening time is reached adjust by running through the digits slowly if necessary 7 00 AUTO So 7 15 AUTO So 2 0 00 AUTO So 1 9 30 AUTO So How to adjust the digits or SET moves the time forward SET or moves the time back Run through the digits quickly e g to move the time forward SET Press and hold Run throu...

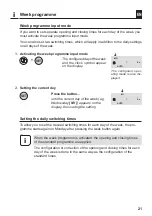
Page 21: ... 2 Setting the current day SET Press the button until the current day of the week e g Wednesday MI appears on the display thus saving the setting i When the week programme is activated the opening and closing times of the standard programme are applied The configuration or correction of the opening and closing times for each day of the week is done in the same way as the configuration of the stand...

Page 22: ...0 30 AUTO So DI 2 0 00 AUTO So 2 Setting the closing time for Monday MO 2 1 Accessing the factory setting 2 2 SET Press and hold moves the time forward 2 3 SET Release the button when the desired opening time is displayed e g 7 30 hours the desired closing time is displayed e g 20 30 hours 3 7 1 Accessing the next day Tuesday DI 3 1 Setting the opening and closing time for Tuesday Repeat the confi...

Page 23: ...e last day of the week the following display appears after you press the week button again 2 For configuring additional opening and closing times as described above see page 23 i If no input is made the two additional weekly switching times remain inactive 3 Exiting the week programme input mode The week programme is now active Displays the current time and the current day of the week Checking and...

Page 24: ...Week programme MO DI MI DO FR SA SO 2 2 I 7 AUTO MANU So Switch between the week and standard programme 7 1 2 sec The operating mode changes 2 sec after pressing the week button The standard programme is active ...

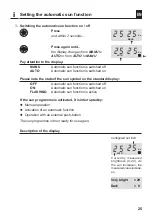
Page 25: ...ases the measured value increas es Pay attention to the display MANU Automatic sun function is switched off AUTO Automatic sun function is switched on Please note the state of the sun symbol on the standard display OFF Automatic sun function is switched off ON Automatic sun function is switched on FLASHING Automatic sun function is active If the sun programme is activated it is interrupted by Manu...

Page 26: ...s the set limit i Configure the brightness set limit at which your roller shutter should be lowered If the current brightness value is above the meas uring range when configuring the set limit the set limit is set to the measuring range limit 29 If it is too dark for a sensible measurement the current set limit is retained and configuring the measuring range limit does not make sense in this case ...

Page 27: ... note the state of the moon symbol on the standard display OFF Automatic dusk function is switched off ON Automatic dusk function is switched on FLASHING Automatic dusk function is active Observe the cut off time for the reactivation of the automatic dusk function If your roller shutter has been closed by the automatic dusk function and then opened again with a manual movement command the automati...

Page 28: ...d be closed If the current dusk value is above the measuring range when configuring the set limit the set limit is set to the measuring range limit 29 If it is too bright for a sensible measurement the current set limit is retained and configuring the measuring range limit does not make sense in this case The current set limit is retained Value is outside the measuring range 3 Changing the configu...

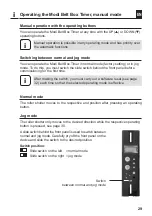
Page 29: ...missioning for the first time i After making the switch you must carry out a software reset see page 32 each time so that the selected operating mode is effective Normal mode The roller shutter moves to the respective end position after pressing an operating button Jog mode The roller shutter only moves to the desired direction while the respective operating button is pressed see page 30 Aslide sw...

Page 30: ...y Operating the Modi Belt Box Timer manual mode 7 00 MANU So 2 0 00 MANU So Operation in jog mode i Tap The roller shutter opens and stops as soon as you release the button 3 sec Press for 3 sec The roller shutter moves to the upper end stop or Tap The roller shutter stops Tap The roller shutter closes and stops as soon as you release the button 3 sec Press for 3 sec The roller shutter moves to th...

Page 31: ...also connect other controllers instead of a push button Switching sequence with an external button Ext Press the UP button The roller shutter travels upwards Ext Tap on the UP button The roller shutter stops The same applies to the DOWN direction Change of direction Ext Press the UP button The roller shutter travels upwards Ext Press the DOWN button Change of direction the roller shutter stops bri...

Page 32: ...de is adopted i The factory set times apply after a software reset AUTO Wi i MO DI MI DO FR SA SO 88 88 AUTO MANU Wi So I 2 00 AUTO Wi 1 Deleting all settings software reset SET Press and hold the buttons 2 The software reset is carried out after approximately 8 seconds and the display goes out 3 SET Release the buttons when the display goes out Display after a soft ware reset or after a power fai...

Page 33: ...omatic mode AUTO The Modi Belt Box Timer no longer responds properly in manual or automatic mode Carry out a software reset in accordance with page 32 Then repeat all settings from page 17 If necessary test the Modi Belt Box Timer with the factory settings The automatic sun function does not work The light sensor s cable is heavily kinked A per manent kink can be seen on the sensor cable The light...

Page 34: ...e roller shutter on the sensor is even higher than the preconfigured set limit Configure the set limit for the automatic sun func tion at a higher setting The roller shutter does not lower in the evening when the automatic dusk function is active The set limit for dusk has not been exceeded Check if any ambient light is hitting the sensor and adjust the set limit if necessary ...

Page 35: ...r power reserve approx 8 hours All data will be lost in the event of a power failure lasting more than 8 hours The same display appears in this case as after a soft ware reset All settings must be repeated see page 17 Data retention In the event of a brief power failure the times programmed by the user and the current data time day of the week are retained The display flashes in this case and gets...

Page 36: ...36 EN i 210 33 2 12 7 33 6 53 4 100 2 56 4 137 8 190 6 AUTO ZUFALL MANU SO WI SET 7 1 Dimensions All dimensions in mm ...

Page 37: ... Low Voltage Directive and 2014 30 EU EMC Directive The full text of the declaration of conformity is available at the following website www rademacher de ce Simplified EU declaration of conformity Factory settings of automatic timer Time 12 00 hours Switching times in standard programme UP 7 00 hours DOWN 20 00 hours Daily switching times in week programme UP 7 00 hours DOWN 20 00 hours Simultane...

Page 38: ...ening time UP hours General closing time DOWN hours Week programme Opening time Closing time Monday hours hours Tuesday hours hours Wednesday hours hours Thursday hours hours Friday hours hours Saturday hours hours Sunday hours hours Additionally for all days hours hours ...

Page 39: ... and modifications by third parties unauthorised persons Use of unsuitable accessories Damage caused by unacceptable excess voltage e g stroke of lightning Operational malfunctions caused by radio frequency overlapping and other such radio interference A prerequisite for the warranty is that the new device must have been purchased from one of our approved specialist retailers Proof of this must be...

Page 40: ...eräte Elektronik GmbH Buschkamp 7 46414 Rhede Germany info rademacher de www rademacher de Service Hotline 01807 933 171 Telefax 49 2872 933 253 service rademacher de 30 seconds free of charge subsequently 14 cents minute from German fixed line networks and max 42 cents minute from German mobile networks ...

Reviews: