background image

57

EN

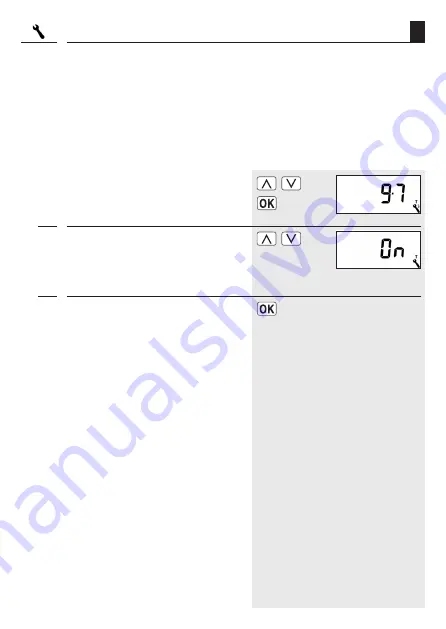
18.6  Menu 9.7 - Set jog mode [ T ]

This function enables you to use the DuoFern HomeTimer to control Venetian blinds. Briefly 
tapping the operating buttons enables Venetian blinds slats to be conveniently configured. 
In order to conveniently move the Venetian blinds to the end points, actuate the control key 


[ Up / Down ]

 for at least 1 second.

1. 

Select and open menu 

9.7


-


Jog mode

.

2. 

Activate or deactivate 

jog mode

.

On 

= on


OFF 

= off

3. 

Confirm the previous setting and return to the 
"System settings" menu.

Summary of Contents for 3250 13 71

Page 1: ...VBD 593 2 1 01 21 DuoFern HomeTimer 9498 UW 9498 AL Instruction manual for the electrical connection and for commissioning Item no 3250 13 71 ultra white 3250 13 81 aluminium EN ...

Page 2: ...u 1 Automatic mode on off 37 17 3 Switching times 38 17 4 Menu 2 Configuration of opening and closing times 40 17 5 Switch the automatic timer on off for individual DuoFern actuators 43 17 6 Automatic dusk function 44 17 7 Menu 3 Customising the automatic dusk function 44 17 8 Automated solar function 46 17 9 Menu 4 Switching the automated solar function on off 46 17 9 1 Setting the local sunshine...

Page 3: ...ontents 19 Software reset restore factory settings 64 20 Dismantling 65 21 Simplified EU Declaration of Conformity 65 22 Technical Specifications 66 23 Factory settings 66 24 Time zone table 67 25 Warranty conditions 69 ...

Page 4: ...tructions will void the guarantee We assume no liability for any consequential damage 1 Key to symbols Risk of fatal electric shock Thissignwarnsofdangerwhenworkingonelectricalconnections components etc Itrequires that safety precautions be taken to protect the life and health of the person concerned This concerns your safety Please pay particular attention and carefully follow all instructions ma...

Page 5: ...eTimer for controlling DuoFern actuators e g DuoFern tubular motor actuators universal actuators etc for Roller shutters Venetian blinds and slats Awnings or lamps and other electrical appliances Operating conditions The associated tubular motor must be fitted with a mechanical or electronic end posi tion switch Only use the DuoFern HomeTimer in dry rooms TheDuoFernHomeTimerisbattery operated Itis...

Page 6: ...uoFern radio system and its components e g DuoFern HomeTimer for remotecontrolofdevicesandsystemswithheightenedsafety relevantrequirementsor where there is a heightened risk of accidents This shall require additional safety equip ment Observe the respective statutory regulations for the installation of such systems Do not install the DuoFern HomeTimer outside ...

Page 7: ...ed in delivery 1 2 3 Legend Installation see page 18 1 Control unit 50 x 50 mm 2 Frame 3 Wall bracket 4 1 x battery type CR2450 1 x double sided adhesive strip not illustrated Operating instructions not illustrated 4 ...

Page 8: ...8 i EN 6 General view operating unit Set key Display Set key SET Stop key Down key OK key Up key 1 Operating unit Menu key ...

Page 9: ...main menu Go back one step e g to close a menu Back to standard display press for 1 second The set keys Select actuators devices individually or group control Select the desired menu item Setting the parameters increase decrease pressing and holding a key for an extended period causes the digits to change more quickly OK key Toggle auto manual mode press for 1 second Confirms and opens the selecte...

Page 10: ...Astro time Setting Automatic operation Postcode ACTUAL value Direction of travel up down Automatic mode off Timer periods Automatic dusk function Automated solar function Automatic dawn function Random function System settings Jog mode Switching modes OFFSET AUTO MO SO PLZ IST T NORMAL ASTRO SET Setting display illumination see page 59 ...

Page 11: ...slide the battery out of the battery compartment using a flat non conductive object e g a plastic rod Pay attention to the correct polarity when inserting a new battery Initial commissioning The positive terminal should point outwards Danger to life from acid burns Keepchildrenawayfromnewandusedbatteries Ifabatteryhasbeenswallowed medical assistance must be requested immediately Incaseofcontactwit...

Page 12: ... 9 4 Postcode page 55 9 5 Switching time program page 56 9 7 Jog mode page 57 9 8 Device settings page 58 4 Automated solar function page 46 5 Automatic dawn function page 48 6 Random function page 50 9 System settings page 51 Main menu page 19 1 Automatic mode page 36 9 9 DuoFern settings page 29 i EN 9 Menu overview main menu and system settings ...

Page 13: ...g page 59 9 8 5 Key lock page 60 9 8 7 Reversal of rotation direction page 61 9 8 9 End points page 62 9 8 0 Software version page 63 9 9 DuoFern settings page 29 9 9 1 Logging on off page 30 9 9 7 DuoFern radio code page 33 9 9 8 Remote login off page 35 i EN 9 1 Menu overview menu 9 8 menu 9 9 ...

Page 14: ...ters must be connected to the DuoFern network Youcanfindadetaileddescriptionofthevariousfunctions configurationoptionsandpossible combinations for the DuoFern system at http www rademacher de duofern The following DuoFern devices cannot be registered configured or controlled with the DuoFern HomeTimer DuoFern sensors DuoFern transmitters Mounting with existing switches The DuoFern HomeTimer can be...

Page 15: ...a solo impuls GIRA Standard System S Color System stainless steel range Standard 55 JUNG CD500 ST550 LS990 CDplusasperCDbutwithcolouredrings MERTEN M1 Atelier Artec Trancent Antik Neu PEHA Standard Dialog Aura LEGRAND Creo Tenara VEDDER Alessa plus It may be necessary to use an adapter frame 50 x 50 DIN 49075 depending on the respective switch range used not included ...

Page 16: ...or MO FR MON FRI One switching time pair for SA SO SAT SUN 3 Individual day switching times One switching time pair for every day of the week MO DI MI DO FR SA SO MON TUE WED THU FRI SAT SUN Automatic dusk function with Astro programme Switch the automated solar function on off Setting the sunshine position for the selected actuator Automatic dawn function with the Astro programme Random function ...

Page 17: ...figuration of the individual functions A precise description of the individual functions and settings is included starting on page 19 DuoFern settings The settings required for operating the equipment in a DuoFern network are specified starting on page 29 ...

Page 18: ...eight of 2 m Installation procedure 1 Mount the wall bracket in the desired mounting position 2 Carefully remove the separating film from the battery compartment see page 11 Please ensure that none of the buttons are pressed during the mounting process Screws or adhesive 3 Finally apply slight pressure to insert the operating unit 1 and covering frame 2 into the wall bracket 3 not included ...

Page 19: ...alltubularmotorsandbeltwinders asfailuretodosocanleadtomalfunctions Inordertodoso followtheinformationprovidedintheoperatingmanualfortherespec tive tubular motor or belt winder ForelectronicRADEMACHERtubularmotorsfromyearofmanufacture2000onwards the end points can be configured with the help of the DuoFern HomeTimer see page 62 13 Brief description of the standard display and main menu The standar...

Page 20: ...e main menu No automatic control commands will be executed during the configuration process Ifnokeyispressedwithin120seconds thedisplayautomaticallychangesfromtheactive menu back to the standard display Changes to settings are nevertheless saved Functions menus Menu number 13 Brief description of the standard display and main menu ...

Page 21: ...Select the desired menu or menu number The selected menu is indicated by a flash ing icon 3 Open the menu by pressing the OK button 4 Select the desired setting and confirm with OK 5 Subsequently the main menu will be displayed again approx 1 sec Pressing the M key from any of the menus will return you to the standard display ...

Page 22: ...the installation wizard has finished In addition you can individually customise your settings and make changes at any time from the main menu and the system settings menu 13 2 Group and single control The DuoFern HomeTimer offers the option of simultaneously controlling ALLE ALL registered DuoFern actuators Alternatively it is also possible to select individual actuators to be controlled Please re...

Page 23: ...esired international time zone Time zone table see page 67 2 Set and confirm the date 14 Initial commissioning with the help of the installation wizard Configuration sequence for the installation wizard Time 12 00 Date Day Month Year 2013 Postcode 46 Assign actuator 01 nn Select switching time mode for opening time NORMAL ASTRO OFF Opening time Select switching time mode for closing time NORMAL AS...

Page 24: ...page 38 NORMAL At the configured time an Up signal will be sent to the assigned DuoFern actuators Example The roller shutters open at the configured opening time ASTRO The control command is sent at the daily re calculated dawn time The previously configured opening time is interpreted as earliest at xx xx hours Example Therollershuttersopenatthedailyre calculated dawn time OFF No automatic contro...

Page 25: ...ching time mode will be sent to all registered DuoFern actuators Bywayofconfirmation forexample the motors briefly start up and the display counts all registered actuators Intheeventofafault forexample ifan actuator cannot be reached then the following message is shown 9 Set and confirm the opening time Pre setting This closing time mode applies to the entire week MON SUN MO SO a If ASTRO is selec...

Page 26: ... ready for operation Example i You have the option of deactivating individual switching times as required In order to do so the value OFF can be selected after the value 23 59 ASTRO The control command is sent at the daily re calculated dusk time The previously configured closing time is interpreted as latest at xx xx hours Example The roller shutters close at the daily calculated dusk time OFF No...

Page 27: ...e lower end point Ventilation position see page 54 Iftheventilationpositionisconfigured therollershutterswillfirstrolldowntothisposition Pressing the Down key once more causes the roller shutters to continue downwards Manual operation is possible from the standard display at any time and has priority over the programmed automatic functions Operating keys Group or single control Youcancontrol ALLE ...

Page 28: ... confirm the desired DuoFern actuator or ALLE ALL 2 Press briefly TheVenetian blinds move upwards briefly or 2 1 Press TheVenetian blinds open TheVenetian blinds move up to the upper end point 3 TheVenetian blinds to stop in the interim 4 Press briefly TheVenetian blinds move downwards briefly or 4 1 Press TheVenetian blinds close The Venetian blinds move to the configured ventilation position or ...

Page 29: ...rn HomeTimer TheDuoFernHomeTimerisidentifiedwithintheDuoFernnetworkasabattery operated sensor Forthisreason nootherDuoFernsensorscanbeassignedtotheDuoFernHome Timer Additionalinformationaboutloggingoncanbeobtainedfromtheloginmatrixonour website under www rademacher de The following section serves to describe all required DuoFern settings for the DuoFern HomeTimer Menu 9 9 DuoFern Settings TheDuoFe...

Page 30: ...DuoFern actuator a Switch the desired DuoFern actuator to registering mode b Start the login procedure on the DuoFern HomeTimer c The display flashes On d The new number of registered devices is displayed after successful login e g two actuators f Login the next DuoFern actuator e Subsequently registering mode is automati cally re activated Repeat 3 a or g Back to menu selection ...

Page 31: ... number of registered devices is displayed after successful logout e g one actuator e Subsequently registering mode is auto matically re activated Repeat 3 a g Back to menu selection or f Log out the next DuoFern actuator 5 Delete all of the registered DuoFern actuators a Ifyouwanttodeleteallconnectionstoallas signedDuoFernactuators pressandholdthe setkey inmenu9 9 1forfourseconds 4 sec b Subseque...

Page 32: ...tion In order to do so press and hold the key for approx four seconds a The current number of registered DuoFern actuators flashes in the display b All currently registered DuoFern actuators will be displayed after successful clearance 4 sec a The number of assigned DuoFern actuators is displayed Example 3 Back to menu selection i In order to prevent unintentional log out ensure that all DuoFern a...

Page 33: ...oFern actuator and on a label attached to the packaging For DuoFern radio tubular motors you will find the radio code on the motor and on a label fitted to the connecting cable Please read the operating instructions for the relevant DuoFern actuator in order to activate the registering procedure Registering a DuoFern actuator per radio code to the DuoFern HomeTimer 1 Select and open menu 9 9 7 Rad...

Page 34: ...shown successively 4 Back to menu selection 5 Select and open menu 9 9 1 Log on off a The number of assigned DuoFern devices is displayed see page 30 b Start the login procedure on the DuoFern HomeTimer c The display flashes On d The new number of registered devices is briefly displayed after successful login 6 Back to menu selection Registering mode re mainsactiveformaxi mum 120 seconds ...

Page 35: ...e log on off 1 Select and open menu 9 9 8 Remote log on off a The number of the first actuator is indicated on the display 3 If necessary a brief test signal can be sent to the selected actuator in order for it to be uniquely identified 4 Subsequently thefollowingdisplayappears 5 Continue with Activate registering mode on the DuoFern actuator or Activate logout mode on the DuoFern actuator or Quit...

Page 36: ... 17 1 AUTO Automatic mode i Automatic mode on All of the activated automatic functions will be executed if the automatic mode is switched on The corresponding icon is then shown in the standard display Manual operation is also possible in automatic mode Automatic mode off Icon in standard display All automatic functions are deactivated only manual operation is possible All automatic icons are swit...

Page 37: ...n Automatic mode off 17 2 Menu 1 Automatic mode on off Switch on off in menu 1 1 Call up the main menu 3 Select and confirm the desired actuator or ALLE ALL 4 Select and confirm the desired setting 2 Select and open menu 1 AUTO On Automatic mode on OFF Automatic mode off 5 Subsequently the main menu will be displayed again The respective icon flashes if configuration is successful ...

Page 38: ...or every day of the week MO DI MI DO FR SA SO MON TUE WED THU FRI SAT SUN Youcanconfigurevariousopening andclosingtimes fortheDuoFernHomeTimer in order to open or close your roller shutters at your preferred times For this purpose there are three switching time programmes available in menu 9 5 see page 56 Selecting a switching time mode Various switching time modes can be selected when configuring...

Page 39: ...onfiguredopening time is interpreted as earliest at xx xx hours Example a Dawn begins at 5 00 a m The opening time has been set to 7 00 a m Your roller shutters will open at 7 00 a m Example b Dawn begins at 08 00 a m The opening time has been set to 7 00 a m Your roller shutters will open at 08 00 a m Link to the closing time The roller shutters close at the daily calculated dusk time The configu...

Page 40: ...t the configured time an Up signal will be sent to the assigned DuoFern actuators Example The roller shutters open at the configured opening time ASTRO The control command is sent at the daily re calculated dawn time The previously configured opening time is interpreted as earliest at xx xx hours Example The roller shutters open at the daily re calculated dawn time If you want to configure the ope...

Page 41: ...STRO OFF OFF No automatic control function is executed for Up 5 Set and confirm the opening time Weekly switching times Weekday weekend switching times Individual day switching times a If ASTRO is selected then the calculated openingtimeforthecurrentdayisdisplayed b Continue at point 6 The header of the display indicates which switching time programme is currently active see example to the right F...

Page 42: ...me ASTRO The control command is sent at the daily re calculated dusk time The previously con figured closing time is interpreted as latest at xx xx hours Example The roller shutters close at the daily re calculated dusk time OFF No automatic control function is executed for Down 7 Set and confirm a closing time The header of the display indicates which switching time programme is currently active ...

Page 43: ...an offset between 60 and 60 minutes Dusk can be configured in menu 3 see page 44 Dawn can be configured in menu 5 see page 48 17 5 Switch the automatic timer on off for individual DuoFern actuators 1 Call up the main menu a Switch the automatic timer on or off for the selected DuoFern actuator On automatic timer on OFF automatic timer off b Return to main menu 2 Select and open menu 2 switching ti...

Page 44: ...he current date defined by the configured postcode 1 Call up the main menu 2 Select and open menu 3 Automatic dusk function 3 Select and confirm the desired DuoFern actuator or ALLE ALL 17 7 Menu 3 Customising the automatic dusk function 4 Switch the automatic dusk function on off On automatic dusk function on OFF automatic dusk function off i If only a single DuoFern actuator is selected in point...

Page 45: ...onlypossibleifthefollowing functions have been previously configured Point 3 ALLE ALL Switching time mode ASTRO a Set the offset Example With a negative offset e g 20 the calculated Astro time is triggered 20 minutes earlier b Return to main menu 17 7 Menu 3 Customising the automatic dusk function ...

Page 46: ...Fern sun sensor 17 9 Menu 4 Switching the automated solar function on off 1 Call up the main menu 4 Activate deactivate and confirm automated solar functions On automated solar functions on OFF automated solar functions off 2 Select and open menu 4 Automated solar function 3 Select and confirm the desired DuoFern actuator or ALLE ALL a Subsequently the main menu will be displayed ...

Page 47: ...ioninawaythattherollershuttersremainabovethelightsensor Otherwise the light sensor cannot correctly measure the brightness level 1 Call up the main menu 2 Select and open menu 4 Automated solar function 3 Select a DuoFern actuator a Switchtheautomatedsolarfunctionsonand confirm for the selected DuoFern actuator 4 Subsequently the local sunshine position can be configured On automated solar functio...

Page 48: ...17 10 Automatic dawn function 17 11 Menu 5 Customising the automatic dawn time 1 Call up the main menu 2 Select and open menu 5 dawn function 3 Select and confirm the desired DuoFern actuator or ALLE ALL 4 Switching the automatic dawn function on off On automatic dawn function on OFF automatic dawn function off i If only a single DuoFern actuator is selected in point 3 then the system returns to t...

Page 49: ...nisonlypossibleifthefollowing functions have been previously configured a Set the offset b Return to main menu Point 3 ALLE ALL Switching time mode ASTRO Example With a negative offset e g 20 the calculated Astro time is triggered 20 minutes earlier 17 11 Menu 5 Customising the automatic dawn time ...

Page 50: ...iods ranging between 0 and 30 minutes The random function is executed for all automatic opening and closing times 1 Call up the main menu 2 Select and open menu 6 Random function 3 Select and confirm the desired setting On random function on OFF random function off Subsequently the main menu will be displayed again ...

Page 51: ...DuoFern settings are introduced and described from page 29 onwards The DuoFern settings are shown in menu order in menu 9 9 as shown below PLZ T Menu 9 System settings Icon Menu Page 9 1 Time and date 52 9 2 Motor running time 52 9 3 Ventilation position 54 9 4 Postcode 55 9 5 Switching time program 56 9 7 Jog mode 57 9 8 Device settings 58 9 9 DuoFern settings 29 ...

Page 52: ...sesthenumberstoprogressmorequickly 18 2 Menu 9 2 Configure motor running time The run time setting must be configured if you intend to use the ventilation position function see page 54 you intend to use the position of the sun see page 46 TherunningtimecanbedetecteddirectlybytheDuoFernHomeTimeroryoumay forexample measure and configure it with the help of a stopwatch ...

Page 53: ...ed Iftherunningtimeisconfigured forexample withthehelpofastopwatch thenthespeed should be measured in the up direction and approx 10 should be added 18 2 Menu 9 2 Configure motor running time 1 Select and open menu 9 2 Motor running time 2 Select a DuoFern actuator 4 Pressthe Up buttonandwaituntiltheroller shuttershavetravelledtotheupperendpoint 6 Back to system menu The running time will be timed...

Page 54: ...can subsequently be closed completely via manual operation Manually setting the running time e g 15 sec a Fully close the roller shutters b Subsequently move the roller shutters to the upper end point and make a note of the time required c Enter and confirm the measured running time in menu 9 2 18 2 Menu 9 2 Configure motor running time 1 Select and open menu 9 3 Ventilation position 2 Select a Du...

Page 55: ...m settings menu Example 18 4 Menu 9 4 Set postcode PLZ 1 Selectandopenmenu9 4 Postcode PLZ 2 Set and confirm the postcode Please observe the following notes Only the first two digits of the code are entered for German cities Please refer to the time zone table on page 67 for various European cities If the DuoFern HomeTimer is not being used in Germany it may be necessary to switch offtheautomatics...

Page 56: ...SUN 2 Working day and weekend switching times One switching time pair for MO FR MON FRI One switching time pair for SA SO SAT SUN 3 Individual day switching times One switching time pair for every day of the week MO DI MI DO FR SA SO MON TUE WED THU FRI SAT SUN 1 Select and open menu 9 5 Motor running time 2 Select and confirm the desired switching time programme 1 Weekly switching times 2 Weekday...

Page 57: ...rating buttons enablesVenetian blinds slats to be conveniently configured In order to conveniently move theVenetian blinds to the end points actuate the control key Up Down for at least 1 second 1 Select and open menu 9 7 Jog mode 2 Activate or deactivate jog mode On on OFF off 3 Confirmtheprevioussettingandreturntothe System settings menu ...

Page 58: ...gs menu overview Menu 9 8 Device settings Icon Menu Page 9 8 1 Automatic summer winter changeover 59 9 8 3 Display backlighting 59 9 8 5 Key lock 60 9 8 7 Reversal of rotation direction 61 9 8 9 End points 62 9 8 0 Software version 63 ...

Page 59: ...over 2 Activate deactivate summer winter changeover and confirm On Function on OFF Function off 1 Select and open menu 9 8 3 Display backlighting 2 Configure and confirm the desired bright ness OFF off 1 3 brightness level i The intensity of the display backlighting can vary for a number of functions because for example automatic changes can cause more current to be drawn from the battery i If the...

Page 60: ...hin a period of two minutes the key lock is activated automatically 1 Select and open menu 9 8 5 Key lock 2 Activate or deactivate the key lock On on OFF off Press and hold the SET Stop key for four secondsinordertoremoveoractivatethekey lock in the standard display approx 4 sec Display When pressing the menu key i The roller shutters can be moved manually even with the key lock activated Display ...

Page 61: ...onfunctioncanbeusedtochangethedirectionofrotation if the direction of a DuoFern actuator is incorrect 1 Select and open menu 9 8 7 Reversal of rotation direction 2 Select a DuoFern actuator 3 Test the current direction 4 Activate or deactivate reversal of rotation direction 5 Test the new direction ...

Page 62: ...ss and hold the set button The roller shutters travel upwards The upper end point is thereby stored for the motor a You can send a brief test signal in order to identify the DuoFern actuator The actuator executes a brief movement or switching command by way of confirmation b Release the button as soon as the desired end point is reached i The end point setting function is only available for RADEMA...

Page 63: ...omtheendpointthatistobechanged Checkthecorrectsettingoftheendpointsdirectlyaftercompletingtheconfigurationprocess with the help of the operating keys b Release the button as soon as the desired end point is reached 18 7 5 Menu9 8 9 Configurationofendpointsforthetubularmotor 18 7 6 Menu 9 8 0 Display software version This menu enables the current software version for the DuoFern HomeTimer to be dis...

Page 64: ...e software version will be displayed for a few seconds All settings will be erased and reset to the default factory settings 1 Simultaneously press and hold all four keys for 5 seconds until all of the icons are shown on the display approx 5 sec 3 The system returns to the installation wizard automatically after resetting Carry out the initial settings see page 22 ...

Page 65: ...e wall bracket 3 21 Simplified EU Declaration of Conformity RADEMACHERGeräte ElektronikGmbHherebydeclaresthattheDuoFernHomeTimercomplies with the Directive 2014 53 EU Radio Equipment Directive The full text of the declaration of conformity is available at the following website www rademacher de ce ...

Page 66: ... switching processes per day Permissible ambient temperature 5 to 40 C Protection class II only for use in dry areas Transmission frequency 434 5 MHz Transmission power max 10 mW Range indoorsapprox 30m outdoorsapprox 100m dependingonthebuildingstructure 23 Factory settings Automatic On Timer periods On Up time and mode 7 00 hours NORMAL Down time and mode 20 00 hours NORMAL Random function OFF Po...

Page 67: ...bourg 158 Luxembourg The Netherlands 159 Amsterdam 160 Eindhoven 161 Enschede 162 Groningen 163 Maastricht 164 Rotterdam 165 Utrecht Norway 166 Oslo 167 Stavanger 168 Bergen 169 Trondheim Austria 170 Amstetten 171 Baden 172 Braunau 173 Brixen 174 Bruck Mur 175 Eisenstadt 176 Graz 177 Innsbruck 178 Klagenfurt 179 Landeck 180 Linz 181 Nenzing 182 Salzburg 183 Vienna Poland 184 Wroclaw 185 Bromberg 1...

Page 68: ...238 Zaragoza 239 La Palma 240 Tenerife 241 Grand Canaria 242 Fuerteventura South east Europe 243 Athens 244 Belgrade 245 Bratislava 246 Bucharest 247 Budapest 248 Istanbul 249 Maribor 250 Prague 251 Sarajevo 252 Sofia 253 Skopje 254 Thessaloniki 255 Zagreb 24 Time zone table ...

Page 69: ... Repairs and modifications by third parties unauthorised persons Use of unsuitable accessories Damage caused by unacceptable excess voltage e g lightning Operational malfunctions caused by radio frequency overlapping and other such radio interference A prerequisite for the warrant is that the new device must have been purchased from one of our approved specialist retailers Proof of this must be pr...

Page 70: ...70 EN ...

Page 71: ...71 EN ...

Page 72: ...r de Service Hotline 01807 933 171 Fax 49 2872 933 253 service rademacher de Subject to technical modifications misprints and errors Illustrations not binding 30 seconds free of charge subsequently 14 cents minute from German fixed line networks and max 42 cents minute from German cellular networks ...

Reviews: