background image


- Page 22 - 


3.


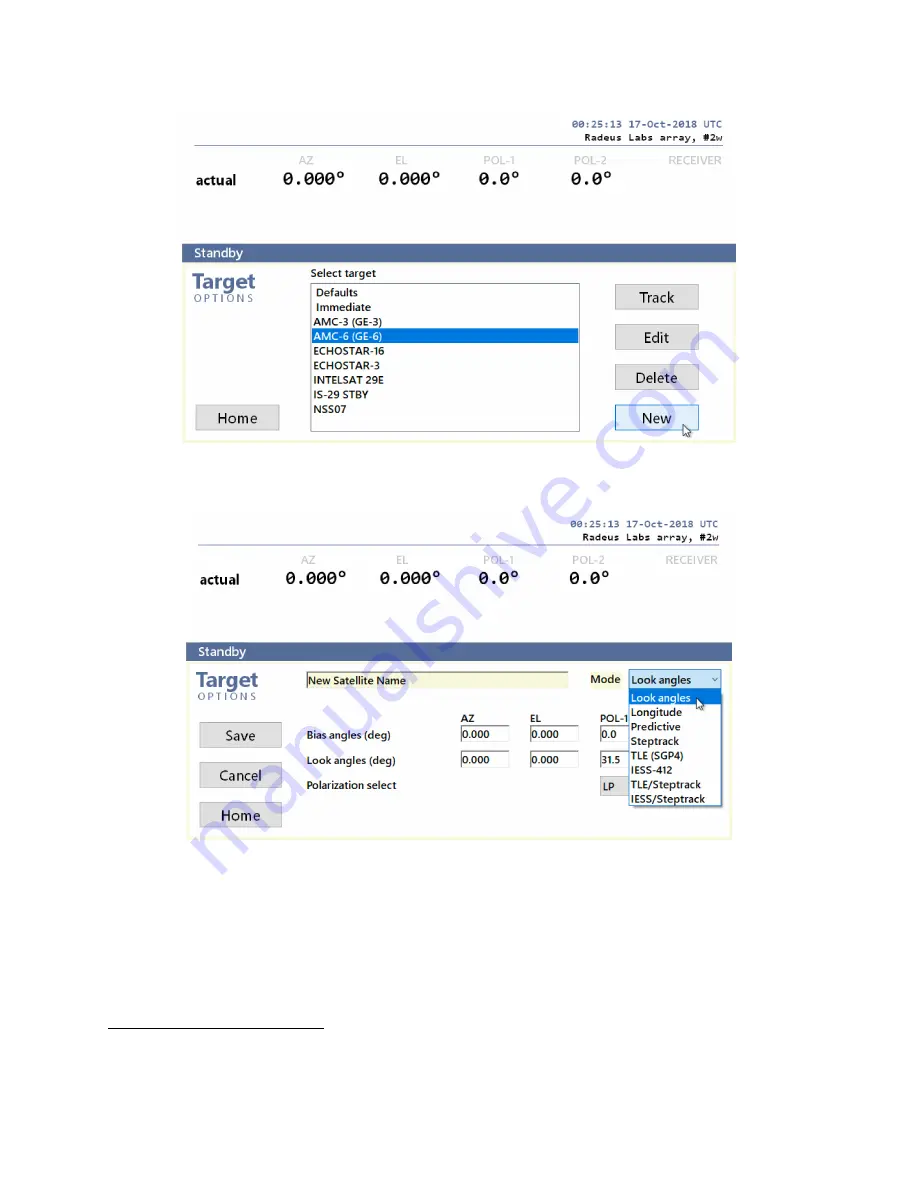
The fields shown depend on your selection in the Mode

*

 drop-down:


4.


Assign a unique name to the satellite unless you’re using TLE or IESS data, which provides 
a non-editable name.


5.


Complete the other displayed fields and, when you’re done, use the Save button.


6.


The new target will now appear in the list shown at Home > Target. To track/point at any 
satellite in the list, highlight it and click the Track button.


*

 Some modes require the system to have a receiver.


Summary of Contents for 8000 ACS Series

Page 1: ...rights reserved Satellite Earth Station Antenna Control Systems Series 8000 ACS Quick Start Guide Model 8200 Antenna Control Unit Model 8250 Drive Cabinet 22 MARCH 2019 Need details See the manual Ser...

Page 2: ...Page 2 1 Series 8000 Setup Overview...

Page 3: ...S Operation Maintenance manual Detailed checklists as well as procedures for checking the power limit switches and motors are found in Appendix 11 Series 8000 On Site Test Procedure All procedures are...

Page 4: ...res information from the motor s nameplate 1 The inverters must be connected and have power 2 The motors must not be installed on jacks they need to be able to turn freely 3 Motor wiring must be conne...

Page 5: ...nded Ethernet using RJ45 connectors IFL F is dual fiber using LC connectors in multi mode by default and single mode as an option Fiber cable shorter than 600 meters 2 strand Male Male LC LC OM2 50 12...

Page 6: ...violet NUM FUNCTION WIRE COLOR AZ RESOLVER POSITION FEEDBACK 220 7 CBL SHLD cable braid 220 6 R red white 220 5 RN yellow white 220 4 S red 220 3 SN black 220 2 C yellow 220 1 CN blue This organizatio...

Page 7: ...TION E STOP 163 SW1 LEAD 162 SW1 RETURN 161 SW2 LEAD 160 SW2 RETURN AZ LIMIT 152 CW LIM 151 COM 150 CCW LIM EL LIMIT 142 UP LIM 141 COM 140 DN LIM POL1 LIMIT 132 CW LIM 131 COM 130 CCW LIM POL2 LIMIT...

Page 8: ...1 11 RETURN or L2 10 CCW or L3 MAINS 5 L1 4 L2 3 L3 2 Neutral 1 GND The CIB is shown as item 8 in the preceding illustration of the drive cabinet s interior in section 2 Installing the Model 8250 Driv...

Page 9: ...e Model 8250 Drive Cabinet 3 1 Emergency Stop To stop all antenna motion as quickly as possible push the red e stop switch To release the e stop twist the knob clockwise During an emergency disconnect...

Page 10: ...these jog controls overriding the ACU Slew jog buttons will move the antenna as its slew speed Toggle sustain antenna motion once started instead of only moving while a jog button is depressed 2 As n...

Page 11: ...del 8200 ACU is designed to work with the Model 8250 drive cabinet from Radeus Labs It requires fewer connections and has simpler cabling than legacy systems The legacy compatible version of the Model...

Page 12: ...ay vary When in doubt refer to documentation that accompanied the system 4 2 1 Minimum Connections Legacy compatible 8200 Standard 8200 Power plus RF 1 J3 J7 J8 J9 J10 Power plus RF 1 E2 Described bel...

Page 13: ...Type female connector for RF Input 1 vertical polarization to internal RF switch system defaults to RF 1 user selectable RF 2 N Type female connector for RF Input 2 horizontal polarization to internal...

Page 14: ...nal receiver s analog output J7 AZIMUTH DB25F connector for encoder or resolver position feedback on AZ axis J8 ELEVATION DB25F connector for encoder or resolver position feedback on EL axis J9 POLARI...

Page 15: ...ing the connected ACU 1 Verify that the ACU is connected to power 2 Turn on the ACU via the power switch on its rear panel The touchscreen will illuminate when it is ready 5 2 Hide quit or power down...

Page 16: ...and Configuration Software setup and typical operation is performed via the ACU front panel s touchscreen display Home screen of the Model 8200 ACU Real time data display shown above controls for acce...

Page 17: ...orth Longitude degrees east Altitude antenna site s altitude in meters Antenna name unique name to show on the touchscreen Axes under ACU control the number of axes on the antenna CP LP selection whet...

Page 18: ...cy enter the vertical and horizontal values or left and right for circular polarization 2 The receiver attenuation in dB 3 Specify the upper and lower limits of the frequency range in any order The op...

Page 19: ...eg field 1 Use the jog controls to manually point the antenna to a known or referenced look angle e g known satellite position star true north horizon etc 2 If the angles are unknown and there is no r...

Page 20: ...200 must be installed and connected properly including the Setup screens for Site Receiver if any and Encoders see above The antenna must not be tripping any limit switches Any limit jumpers need to b...

Page 21: ...ompted When the Setup Wizard has finished the system will go into Standby For details the settings determined or calculated by the Setup Wizard are discussed in section 1 4 Setup Wizard of the Series...

Page 22: ...ng TLE or IESS data which provides a non editable name 5 Complete the other displayed fields and when you re done use the Save button 6 The new target will now appear in the list shown at Home Target...

Page 23: ...Windows via the Start menu that will restart the ACU application too 5 6 2 Quit the ACU application If a fault condition or some task requires quitting the ACU software use the touchscreen s Home Setu...

Page 24: ...on and the operating Then you may power down the ACU via the power switch on its back panel 5 7 Standby Home Standby immediately puts the ACU in Standby mode While in standby the ACU will not command...

Reviews: