background image

9

Owner’s Manual: 

1015

1784593 Rev  AD

ECO  18-0069

July 2020

www.radiaproducts.com  (PHONE) 800-221-1083 | (INTL) +1-763-533-2969 | (FAX) 763-533-0015


      Always unplug the power cord before 

cleaning! 

DO NOT

 get the timer, control 

panel, or wiring wet.

CLEANING:

Keeping the machine clean is important for 

reliable operation. 

• 

Colorant or base paint spilled on machine 

surfaces can be removed using lukewarm 

water and mild detergent for water-based/

glycol colorants. 

• 

To preserve the appearance of the 

machine, do not use abrasives to clean 

machine surfaces. 

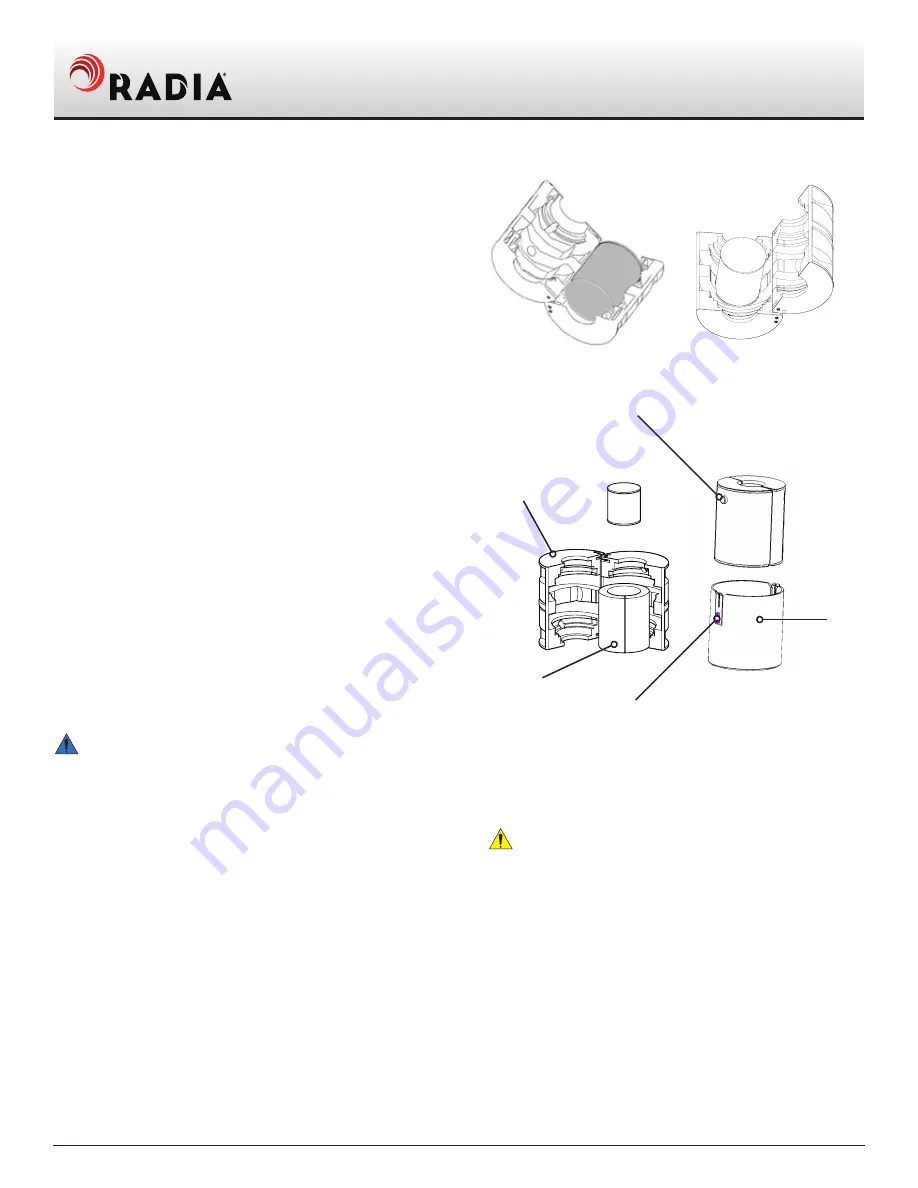
Figure 1

Figure 2

Figure 4

1.  Open the cabinet Door
2.  Load the can into the machine for mixing:

• 

Gallon Cans:

 Insert the can into the can holder. 

Slip the bail handle into the clip retainers (D).

• 

Quart Cans: 

Place the can inside the quart 

adapter,

 6783756

 (A). Set the quart can 

horizontally with the lid up. 

 (See Figure 1)

•  Pint Cans: 

 Place round pint cans vertical, with 

the lid up.  Close the 

6783756

 adapter around 

the can. (See Figure 2)

•  Half Pint Cans: 

Place the half pint can inside 

the 6786133 (E) foam adapter (Optional for this 

machine). Close the 

6783756

 adapter arount 

the 6786133 foam adapter. (See figure 3)

3.  For 

Quarts, Pints & Half pints: 

Insert the adapter 

into the can holder .Make sure the 

6783756


adapter lugs 

(C)

 are lined up with the bail retainers 

and the adapter is all the way to the bottom of 

the can holder 

(B)

. (See Figure 4)

4.  Close the cabinet door. The mixer has a safety 

switch that interrupts operation if the door is open.
5.  Select the desired mix time.   


       If the container handle wasn’t properly 

secured, press the STOP button on the control 

panel.

NOTE:

 If colorant has been added to the paint, 

be sure to reattach paint can lid tightly (using the 

RADIA© Lid Press, Part No. 0-5080).

5. Cleaning

5. Cleaning

Figure 3

(C)

(A)

(E)

(B)

(D)

4.2 Install a Container

4.2 Install a Container

Summary of Contents for 1015 Speed Demon

Page 1: ...015 Speed Demon 1015 Speed Demon One Gallon Vortex Mixer Models 0 1015 PB 110V 60Hz Digital Display 0 1015 PBDL 110V 60Hz Digital Display with Door lock www radiaproducts com PHONE 800 221 1083 INTL 1...

Page 2: ...Operation Operation 4 1 Control Panel 1015 PB 4 2 Install a Container Cleaning Cleaning 1 1 2 2 3 3 4 4 5 5 3 3 4 5 6 6 6 6 7 7 8 8 8 9 9 9 Trouble Shooting Trouble Shooting Wiring Diagram Wiring Diag...

Page 3: ...on or hearing Take all necessary precautions to avoid unnecessary injury CAUTION indicates a hazardous situation which if not avoided could result in minor or moderate injury NOTICE indicates practice...

Page 4: ...ion avant de proce der a l entretien le nettoyage ou le retrait des capots suivez la proce dure d isolation consignation proce dures dans le manul de l opre rateur E chec de de brancher la source d al...

Page 5: ...out procedures of your company DO NOT open the door until the machine comes to a complete stop To avoid electric shock don t get the timer control panel or wiring wet This machine is not explosion pro...

Page 6: ...your machine s features and proper operation to take full advantage of its capabilities Read this entire manual completely before operating the machine Practice installing and removing a pail before...

Page 7: ...s down far enough to remove the retaining pins and washers underneath the pallet 4 Remove the shipping rods by sliding them up through machine frame Set aside the rods washers yellow lanyard and retai...

Page 8: ...ing Ninety Second Cycle D Push to set a 1 30 minute cycle Press again to increase the cycles in 1 30 minute increments Note On the PBDL model the door locks until 9 seconds after the cycle completes T...

Page 9: ...rt can horizontally with the lid up See Figure 1 Pint Cans Place round pint cans vertical with the lid up Close the 6783756 adapter around the can See Figure 2 Half Pint Cans Place the half pint can i...

Page 10: ...ab when door is closed Fix or replace pail Contact Radia Customer Care Contact Radia Customer Care Contact Radia Customer Care Machine won t operate Excessive Vibration Machine doesn t shut off at end...

Page 11: ...MOTOR 5788335 POWER SWITCH 5782445 DIGITAL DISPLAY TIMER VERTICAL DISPLAY 5787405 GROUND GREEN YELLOW POWER CORD 5780485 MOTOR HARNESS 5784216 BLACK GREEN BLACK WHITE WIRE 5786422 DOOR SWITCH 5783815...

Page 12: ...PERATION HARNESS LONG SHORT DASH WIRES 5787629 COM T2 T1 NEUTRAL GREEN WHITE BLACK DOOR SWITCH 5783815 MOTOR HARNESS 5784216 POWER CORD 5780485 GROUND GREEN YELLOW DIGITAL DISPLAY TIMER W DOOR LOCK VE...

Page 13: ...9787635 PANEL CONTROL DIGITAL DISPLAY 1015 PBDL 5787405 TIMER DIGITAL VERTICAL 120V 5787617 TIMER DIGITAL VERTICAL 120V 1015 PBDL 9783595 Nut Lock Nylon 4 40 9786232 SPACER 9781840 Nut Keps 8 32 1787...

Page 14: ...inued PART NUMBERS LISTED MAY ONLY BE AVAILABLE IN KIT FORM OR AS AN ASSEMBLY Exploded Views Continued ID Description 1 9787630 SOLENOID BRACKET 1015 2 5787618 SOL 120VDC DOOR LOCK 3 9787631 1015 DOOR...

Page 15: ...2020 www radiaproducts com PHONE 800 221 1083 INTL 1 763 533 2969 FAX 763 533 0015 Exploded Views Continued PART NUMBERS LISTED MAY ONLY BE AVAILABLE IN KIT FORM OR AS AN ASSEMBLY 8 3 Enclosure Compon...

Page 16: ...July 2020 www radiaproducts com PHONE 800 221 1083 INTL 1 763 533 2969 FAX 763 533 0015 8 4 Frame Assembly 8 4 Frame Assembly Exploded Views Continued PART NUMBERS LISTED MAY ONLY BE AVAILABLE IN KIT...

Page 17: ...July 2020 www radiaproducts com PHONE 800 221 1083 INTL 1 763 533 2969 FAX 763 533 0015 8 5 Drive Assembly 8 5 Drive Assembly Exploded Views Continued Exploded Views Continued PART NUMBERS LISTED MAY...

Page 18: ...020 www radiaproducts com PHONE 800 221 1083 INTL 1 763 533 2969 FAX 763 533 0015 Exploded Views Continued 8 6 Rotating Arm Assembly 8 6 Rotating Arm Assembly Exploded Views Continued PART NUMBERS LIS...

Page 19: ...parts GENERAL PARTS REPLACEMENT POLICIES While your machine is under warranty do not attempt on site repair or parts replacement without first contacting RADIA to protect your warranty After the warr...

Page 20: ...ction damage or wear caused by the incompatibility of Radia equipment with structures accessories equipment or materials not supplied by Radia Subject to the limitations set forth above Radia shall i...

Page 21: ...21 Owner s Manual 1015 1784593 Rev AD ECO 18 0069 July 2020 www radiaproducts com PHONE 800 221 1083 INTL 1 763 533 2969 FAX 763 533 0015 Notes Notes...

Page 22: ...22 Owner s Manual 1015 1784593 Rev AD ECO 18 0069 July 2020 www radiaproducts com PHONE 800 221 1083 INTL 1 763 533 2969 FAX 763 533 0015 Notes Notes...

Page 23: ...23 Owner s Manual 1015 1784593 Rev AD ECO 18 0069 July 2020 www radiaproducts com PHONE 800 221 1083 INTL 1 763 533 2969 FAX 763 533 0015 Notes Notes...

Page 24: ...ts com For sales or service please contact For sales or service please contact RADIA Attn Customer Service Department 14900 21st Ave N Plymouth MN 55447 USA 800 221 1083 763 533 2969 763 533 0015 info...

Reviews: