background image


10

Technology

Radicson

www.radicson.com

info@radicson.com

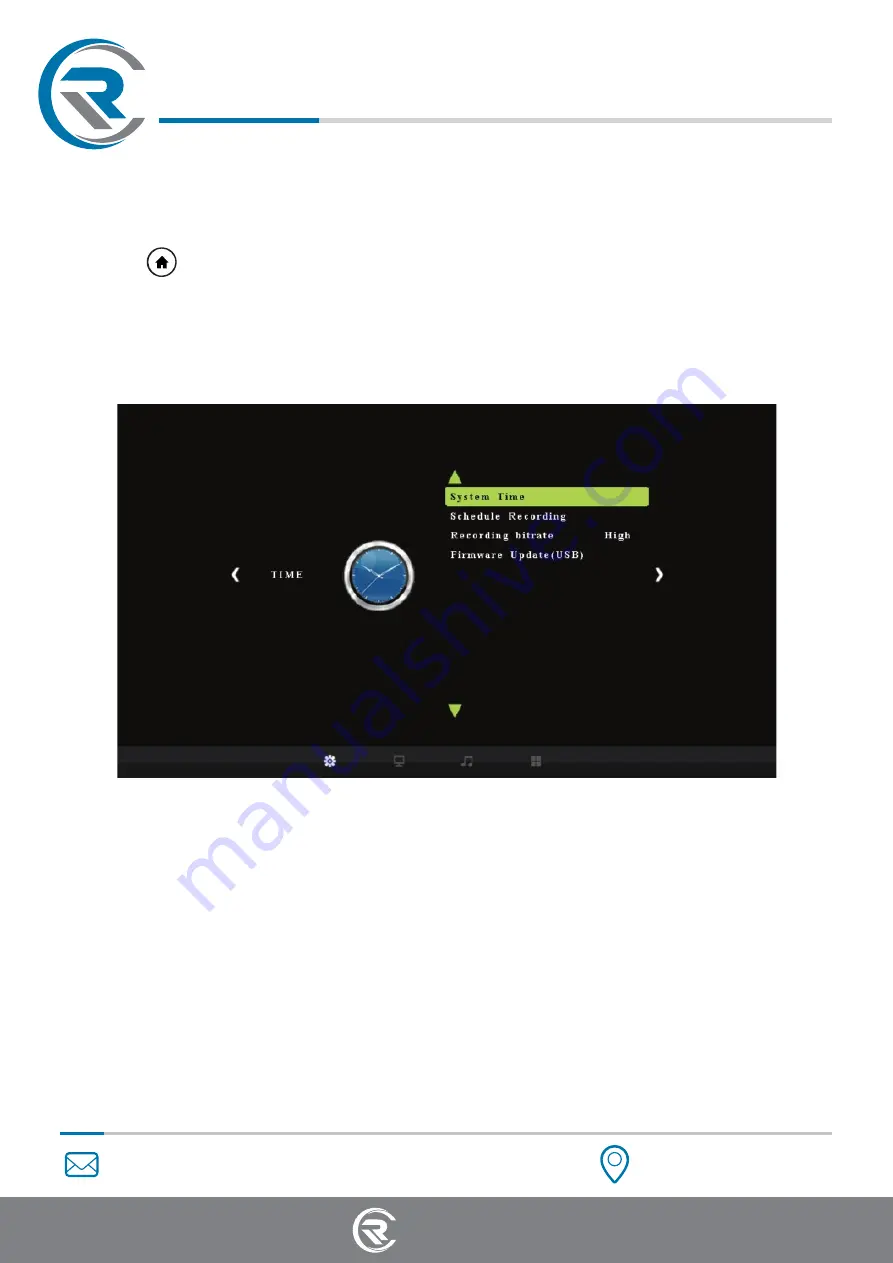
5. Menu Navigation


Press            on  the  remote  control  to  browse  the  menu  setting  of  HDR-510, 

    which are TIME, PICTURE, SOUND and OPTION.

    - Under the TIME column, there are four aspects:
      System Time, Schedule Recording, Recording Bitrate and Frimware Update.


System Time:


Set the time by year, month, day, hour, minute and second.


  Schedule Recording:

 Set


the


recording


frequency, start


& recording


time.

         Then video


will be recorded


automatically according


to your setting.


Recording Bitrate: 

Set the recording bitrate by High, Middle and Low. 


Frimware Update: 

Upgrade the frimware when


a


new version is available.

    - Under the Picture


column, there


are three


aspects:

      Picture Mode, Color Temperature and Aspect Ratio.


Technology

Radicson

Full HD

 Recorder

HDR-

5

10

Summary of Contents for HDR-510

Page 1: ...om info radicson com Various Video Input Signals HDMI VGA AV YPbPr Instant Video Playback after Recording Record Videos to the USB Storage Schedule Recording Record Live Voice Proffesional Full HD Rec...

Page 2: ...record videos to the USB storage device 5 1 Connect 5 Tips on selecting a proper USB ash drive 5 2 Record 6 3 Schedule Recording 6 4 Playback 8 5 Menu Navigation 10 TIME Submenu 10 PICTURE Submenu 11...

Page 3: ...guage in any form or by any means electronic mechanical magnetic optical chemical manual or otherwise without the prior written permission of Radicson Inc Safety Notices Before using HDR 510 device pl...

Page 4: ...00 60p 1280x720 60p 1360x768 60p 1024x768 60p Recording PC 1920x1080 30p 1280x720 60p 720x480 60p Supported Resolutions Output Format MP4 H 264 Video Standards Input NTSC PAL PAL 60 Supported Disk For...

Page 5: ...recording OK button Adjust the volume of MIC input Show the main menu Back to the previous interface Set the system time Play back the contents in USB storage device Set the recording frequency start...

Page 6: ...not less than 10Mbps It is recommended that you format the USB ash drive or erase data before connecting it to our product It is recommended that you use a USB ash drive with LED indicator so that you...

Page 7: ...d properly press and hold the ON OFF button for a few seconds to switch on the HDR 510 and turn on other devices Press the REC STOP button on the device or press REC button on the remote control to st...

Page 8: ...ss on the remote control and return to the video playback interface then device will start to record video automatically at the scheduled time IMPORTANT if you set the recording frequency to Once plea...

Page 9: ...all devices are connected properly plug the USB storage device into HDR 510 and press the Playback button on the remote control to enter the playback menu interface Select one category and press OK Th...

Page 10: ...ll see the le list Select your desired le by using the four buttons of volume control on the remote control You can preview the les press OK to select multiple les Press on the remote control to play...

Page 11: ...Update System Time Set the time by year month day hour minute and second Schedule Recording Set the recording frequency start recording time Then video will be recorded automatically according to you...

Page 12: ...Dynamic and Standard are available Color Temperature Medium Warm User and Cool are available Aspect Ratio Auto 4 3 16 9 default Zoom 1 Zoom 2 Just Scan are available Under the SOUND column there are...

Page 13: ...e displayed on the menu English Japanese Simpli ed Chinese and Traditional Chinese are available Restore Factory Default Restore the factory settings OSD Transparency Set the transparency of menu by H...

Page 14: ...etect USB Device Please format your USB stick or unplug the USB stick from the USB port and plug it into HDR 510 again If the solutions don t work please send an email to for direct help support radic...

Reviews: