background image


47 

Radijator Inženjering d.o.o, 36000 Kraljevo, Živojina Lazića - Solunca br.6, Srbija 

tel. +381 36 399 140, fax. +381 36 399 150, http://www.radijator.rs 

e-mail: radijator@radijator.rs 


3.


Installing 

3.1


General warnings 

The stove must be properly installed to work properly! 


CUBA  stove  is  intended  to  work  on  central  heating  installations  with  an 
operating  pressure  of  up  to  2.5  bars  and  a  maximum  operating  temperature  of 
85 degrees Celsius. 


The stove door has to be closed during its operation.. 


CUBA  stove  comes  with  the  fan,  automatic  controls,  and  the  motor  and  all 
devices  use  the  power  supply  of  230V,  therefore  installing  improperly  and 
handling carelessly may endanger human life with a possible electric shock. 


As a fuel, it uses only pellets. 


During the installation, please consider its weight..


During  the  installation,  stick  to  the  law-regulated  norms  and  regulations 
designed  for  the  installation  of  a  wood  water  pellet  stove  with  the  hot  water 
generator, and which apply in the country where the device is installed. On the 
contrary,  Radiator  inzenjering  as  the  manufacturer  doesn’t  take  any 
responsibility for the consequences of such installing.


In the case of certain construction changes, particularly on safety devices, lead to 
unwanted consequences that can impair a person’s health and even endanger life 
Radiator inzenjering doesn’t take any responsibility. 


The  device  has  to  work  with  all  completely  functional  safety  devices  listed  and 
described  in  the  following  text.  Glass-ceramic  on  the  door  and  every  smoke 
channel  have  to  be  in  perfect  condition.  Perform  the  maintenance  of  safety 
devices  exclusively  upon  consulting  licensed  persons  by  the  manufacturer  or 
contact the manufacturer directly. 

Radijator inženjering, as the boiler’s manufacturer doesn’t take any responsibility 

for damages caused by improper installing. 
 
*


All national and local regulations and the European standard have to be met during the 

installation of the boiler. 

Summary of Contents for CUBA 15

Page 1: ...Kamin na BIOMASU BIOMASS heating STOVE SADRŽ CUBA 15 i 20 INSTRUKCIJE INSTRUCTION MANUAL Montaža korišćenje i održavanje kotla Assembly use and maintenance of heating boiler ...

Page 2: ...i kod CUBA kamina 6 3 3 Radni prostor i pozicioniranje CUBA kamina 8 3 4 Montaža CUBA kamina na dimnjak 9 4 Presek CUBA kamina sa opisom elemenata 13 5 Šema povezivanja automatike 14 6 Tabela sa tehničkim podacima 15 7 Hidraulička šema 16 8 Start rada CUBA kamina i održavanje 18 8 1 Displej automatike 19 8 2 Kratko uputstvo za korisnika automatike 21 8 3 Start rada CUBAkamina 25 8 4 Greške priliko...

Page 3: ...lika zahteva se poštovanje sledećih opštih i posebnih sigurnosnih mera Zabranjeno je korišćenje pelet kamina od strane dece i osoba sa ograničenim mogućnostima bez pratnje Zabranjeno je korišćenje pelet kamina na instalacijama sa radnim pritiskom većim od 2 5 bara i radnom temperaturom većom od 90 C Ovaj uređaj je proizvođač toplotne energije kako preko vode tako i direktnim putem emisijom u okoln...

Page 4: ...branjen je istovremeni rad prinudne ventilacije na primer kuhinjski aspirator i pelet kamina u istoj prostoriji Ovo može dovesti do slabog rada uređaja ali i do curenja ugljenik monoksida koji može da izazove čovekovo gušenje 1 1 Minimalna udaljenost od zapaljivih materijala Obezbedite odgovarajuću udaljenost od zapaljivih materijala ako je potrebno obezbediti zaštitu istih Minimalna udaljenost od...

Page 5: ... obavezne da se isporučuju u standardnoj verziji Kotlovski deo sa turbulatorima i dimovodnim kanalima silos sa dozererom spoljna oplata vrata koja sadrže staklokeramičku komponentu Displej ploča automatike motor reduktor pelet transportera ventilator dimnih gasova sigurnosni presostat dimnih gasova senzor temperature vode u kaminu senzor temperature dimnih gasova senzor protoka vazduha u kaminu i ...

Page 6: ...h normi i propisa predviđenih za montažu kamina na drveni pelet sa generatorom tople vode a koji važe u zemlji u kojoj se uređaj montira U suprotnom Radijator inženjering kao proizvođač ne preuzima odgovornost za posledice takve montaže Ukoliko neka promena na konstrukciji naročito na sigurnosnim uređajima dovede do neželjenih posledica koje mogu da naruše čovekovo zdravlje pa i život Radijator in...

Page 7: ...želi da je namontira mora da bude od cevi čiji je prečnik najmanje jednak nazivnom prečniku ispusnog dela ventila Takođe dozvoljeno je za njegovu izradu koristiti najviše jedan luk radijusa r 3d Sigurnosni ventil mora posedovati nazivnu pločicu i na njoj sledeće podatke naziv proizvođača oznaka tipa sigurnosnog ventila godina ispitivanja nazivni protok podatak za koji toplotni učinak je sigurnosni...

Page 8: ...aja Slika 5 Senzor za protok vazduha Presostat dimnih gasova Slika 6 Služi da meri pritisak gasova u ložištu u slučaju da niste neki od poklopaca dobro zatvorili prilikom čišćenja ili sl ili niste dobro zatvorili vrata uređaj u tom slučaju pokreće gašenje kamina i izbacuje grešku To je još jedan vid mere bezbednosti rada kamina Slika 6 Presostat dimnih gasova Ovakvi uslovi mogu da dovedu do lošeg ...

Page 9: ...e što bliže Ako je to moguće kamin treba da bude u najvećoj centralnoj prostoriji objekta koji se greje zbog što boljeg efekta grejanja zračenjem Uređaj nikad ne sme biti instaliran u spavaćoj sobi niti u prostoriji koju je nemoguće vratima odvojiti od spavaće sobe U prostoriji u kojoj se montira pelet kamin ne sme biti korišćena još neka peć ili kamin na čvrsto gorivo i pelet Potrebna cirkulacija...

Page 10: ...mina sa dimnjakom razlikuju se dve faze montaže i to Montaža dimovodnih kanala i dovod svežeg vazduha za sagorevanje Priključenje na dimnjak Montaža dimovodnih kanala i dovod svežeg vazduha za sagorevanje Slika 9 i 10 Za povezivanje pelet kamina sa dimnjakom mora da se koriste specijalne dimovodne cevi koje imaju sertifikate za ovu namenu Materijali koji se koriste za izradu ovih cevi su konstrukc...

Page 11: ...ktno iz spoljne okoline onda mora biti omogućen dovod iz prostora koji je u direktnom kontaktu sa okolinom Veza takvog prostora sa okolinom mora biti takva da nije moguće slučajno prekinuti dovod vazduha zatvaranjem vrata prozora itd Priključenje na dimnjak Slika 9 i 10 Prilikom montaže dimnjaka razlikujemo dve situacije Situacija 1 Kamin se priključuje na standardni dimnjak zidani ili metalni koj...

Page 12: ...kondenzacioni komad na samom izlasku iz kamina kao i mogućnost demontaže zbog čišćenja UPOZORENJE Nepridržavanje pravila tokom izvođenja dimovodnih kanala i dimnjaka može da dovede do nepravilnog rada kamina ali i do ugrožavanja zdravlja ljudi pa i njihovih života Najveća opasnost je od otrovnih gasova koji su produkti sagorevanja U ovakvim situacijama gde nisu dimovod i dimnjak kao i dovod vazduh...

Page 13: ...36 399 150 http www radijator rs e mail radijator radijator rs Slika 10 Prikaz priključenja na dimnjak Slika 11 Prikaz preporuka gradnje dimnjaka Preporučuje se čišćenje dimnjaka bar jednom godišnje kako bi se smanjio rizik od požara u dimnjaku Ukoliko dođe do požara zaustaviti rad kamina i pozvati vatrogasce ...

Page 14: ...mina sa opisom elemenata Slika 12 Presek kamina sa opisom elemenata 1 Izmenjivač sa turbulatorima 2 Šolja za sagorevanje 3 Pepeljara 4 Dozator 5 Silos 6 Dimovodni kanali 7 Vrata 8 Oplata 9 Plotna 10 Poklopac izmenjivača 11 Displej automatike 12 Procesor automatike 13 Presostat dimnih gasova 14 Pumpa 15 Ventilator 16 Motor dozatora 17 Grejač 18 Ekspanziona posuda 19 Senzor protoka vazduha ...

Page 15: ...ra tehničko lice prilikom priključenja spoljnih uređaja na automatiku kotla Sva priključenja dodatnih uređaja tehničko lice obavlja preko tropolnog konektora koja se nalaze na zadnjem delu kotla Tropolni je za priključenje sobnog termostata što je prikazano na nalepnici samog konektora Za sobne termostate koji se vezuju na tropolni konektor bitno je da koristite beznaponski kontakt tj da nemaju na...

Page 16: ...ija CO pri redukovanoj toplotnoj snazi 165 9 165 9 Zapremina vode u kotlu L cca 40 40 Masa kotla kg 227 228 Potrebna promaja Pa 10 2 10 2 Max radni pritisak bar 2 5 2 5 Probni pritisak 4 5 4 5 Max temperatura potisnog voda C 85 85 Min temperatura povratnog voda 60 60 Stepen iskorišćenja 93 93 DIMENZIJE A mm 620 620 B 641 641 B1 726 726 C 144 144 ØD 80 80 E 1115 1115 F 160 160 ØG 60 3 2 60 3 2 H 12...

Page 17: ...bija tel 381 36 399 140 fax 381 36 399 150 http www radijator rs e mail radijator radijator rs 7 Hidraulička šema Slika 14 Šema povezivanja 1 PELET kamin 2 Pumpa 3 Ekspanzivna posuda 4 Radijator izmenjivač NAPOMENA U sklopu PELET kamina ulazi i pumpa i ekspanzivna posuda od 10L ...

Page 18: ...račenja maksimalne radne temperature i pritiska Za propisnu montažu odgovoran je instalater centralnog grejanja koji priključuje kotao na hidraulički sistem Radijator inženjering kao proizvođač kotla ne preuzima nikakvu odgovornost za štete prouzrokovane lošim instaliranjem kotla Napomena Prilikom punjenja hidrauličkog sistema obratiti pažnju na sigurnosne elemente prikazane na slici 15 Slika 15 P...

Page 19: ...m prvog paljenja dok kopiju izveštaja o puštanju kotla u rad zadržava Garancija i upustvo za upotrebu se daje kupcu Jedan primerak garancije se šalje proizvođaču Ako garancija nije ispunjena ona nije važeća Samo kotlovi koji su pušteni u rad od strane ovlašćenog tehničkog lica podležu uslovima kompletne garancije od dve godine Naredni tekst je namenjen samom korisniku kotla kao jedna vrsta podsetn...

Page 20: ...g d o o 36000 Kraljevo Živojina Lazića Solunca br 6 Srbija tel 381 36 399 140 fax 381 36 399 150 http www radijator rs e mail radijator radijator rs 8 1 Displej automatike Slika 16 Slika i šematski prikaz displeja automatike ...

Page 21: ...uvati podatke u meniju Resetovanje sistema održavanja 2 funkcije Resetovanje tajmera T67 P5 Diode Funkcije Opis Svetleća dioda Grejač Dioda uključena Grejač u funkciji L1 Dozator Dioda uključena Dozator u funkciji L2 Pumpa Dioda uključena Pumpa u funkciji L3 Mešni ventil Dioda uključena Mešni ventil u funkciji L4 Izlaz V2 konfigurisan kao sigurnosni ventil peleta ili motor za dopunu peleta ili mot...

Page 22: ...ail radijator radijator rs 8 2 Kratko uputstvo za korisnika automatike Slika 17 Prikaz LCD ekrana na displeju Očitavanje trenutnog stanja kamina Postupak Pritisnuti taster P6 nakon toga na ekranu se pojavljuju informacije Slika 18 Slika 18 Prikaz stanja kamina na displeju NAPOMENA Kod kamina CUBA ne pojavljuju se informacije obeležene zvezdicom ...

Page 23: ...upravljača SYTX Calibration Meni za podešavanje radnog vremena dozatora i brzine ventilatora Load Meni koji omogućava rad dozirnog sistema prvo i ponovno punjenje prilikom početka rada kotla ako je sistem u OFF režimu Summer Winter Meni za odabir zimskog ili letnjeg režima Language Meni za odabir jezika na LCD panelu Keyboard Menu Meni za podešavanje kontrasta i svetla na LCD panelu System Menu Me...

Page 24: ...aju ponovo potvrdite tasterom P3 Vratite se na osnovni prikaz displeja Slika 17 pritiskom na taster P1 Promeniti tačno vreme i datum Postupak Pritisnuti taster P3 nakon toga na ekranu se pojavljuje padajuća lista gde je i odmah markirana prva opcija Chombustion Power Tasterima P4 ili P6 dolazite do opcije Time and Date Ponovo potvrditi tasterom P3 pojavljuje se prikaz na displeju podešavanje vreme...

Page 25: ...i vreme puštanje i gašenja da li će to biti dnevna nedeljna ili vikend opcija Ukoliko se odlučite za jednu od navedenih odabir ćete uraditi na sledeći način Pritisnuti taster P3 nakon toga na ekranu se pojavljuje padajuća lista gde je i odmah markirana prva opcija Chombustion Power Tasterima P4 ili P6 dolazite do opcije Chrono Ponovo potvrditi tasterom P3 pojavljuju se dve opcije Modality i Progra...

Page 26: ...raćanje korak unazad taster P1 Slika 22 Prikaz displeja nakon odabira opcije Daily Slika 23 Prikaz displeja nakon odabira opcije Weekly Slika 24 Prikaz displeja nakon odabira opcije Week end 8 3 Start rada CUBA kamina KORAK 1 Kamin priključen na hidraulički sistem KORAK 2 Sipati pelet u silos KORAK 3 Proveriti da li su svi poklopci dobro zatvoreni i da li su vrata kamina pravilno zatvorena KORAK 4...

Page 27: ...k može se primeniti samo dok je automatika u OFF režimu slika17 stanje sistema Postupak Pritisnuti taster P3 zatim tasterima P4 ili P6 u podmeniju dolazite do funkcije LOAD potvrdite tasterom P3 tasterom P4 ili P6 preći sa OFF na ON potvrditi sa tasterom P3 Potvrdom na taster pokreće se dozer sve dok prva zrna peleta ne počnu da upadaju u šolju za sagorevanje Nakon toga takođe tasterom P4 ili P6 p...

Page 28: ...i premazi protiv korozije ne završe sa finalnim sušenjem odn dogorevanjem Isti postupak koristimo za gašenje kotla dakle dužim pritiskom tastera P2 do zvučnog signala prelazimo u gašenje kotla Na automatiku može biti povezan sobni termostat U ovom slučaju važno je podesiti temperaturu prostorije koja je glavni parametar za rad kamina i temperaturu vode u kaminu 70 C Kada je aktiviran rad sobnog te...

Page 29: ...isok pritisak vode Er11 Greška Sat realnog vremena sistemska greška Er12 Greška Gašenjene zbog neuspele potpale Er15 Greška Nedostatak napona Er17 Greška na regulatoru senzora protoka vazduha Er18 Greška Nedostatak peleta Er39 Greška Pokvaren senzor regulatora protoka vazduha Er41 Greška Nije postignut minimalni protok vazduha Er42 Greška Maksimalni protok vazduha iznad predviđenog Svi mogući prob...

Page 30: ...no manji od 220 230V tako da je i snaga grejača manja Postupak za rešavanje PROBLEMA 3 Podizanje vremena predgrevanja grejača za potpalu t02 na vrednost 30 40 sekundi Ako ova mera ne daje rezultate onda priključiti mrežni ispravljač napona Moguć uzrok 4 PROBLEM 4 Količina peleta u komori za sagorevanje je nedovoljna za kretanje kotla u rad Postupak za rešavanje PROBLEMA 4 Mogući su mehanički probl...

Page 31: ...ermostata i na kraju proveriti ispravnost sobnog termostata Grupa II Najčešća signalizacija na displeju vezana za ovu vrstu grešaka je Er03 Moguć uzrok 1 PROBLEM 1 Kamin je potpalio bio u radnom režimu Run mode ali je došlo do zastoja kad je stao pa ponovo dobio zahtev za radom ili od kotlovskog termostata ili sobnog termostata Komora za sagorevanje je u takvim situacijama puna nesagorelog peleta ...

Page 32: ... povećanjem parametara za odlazak kotla u modulaciju i sigurnosno gašenje zbog dimnih gasova a to su parametri Th07 Th08 8 5 Održavanje i čišćenje CUBA kamina Kamin CUBA zahteva svakodnevno i periodično čišćenje Svakodnevno čišćenje se odnosi na prostor samog ložišta odnosno šolje za sagorevanje gde stalnim izbacivanjem pepela omogućavamo bolji rad elektro grejača za potpalu i bolje sagorevanje tj...

Page 33: ...rikaz elemenata koji se rasklapaju prilikom čišćenja Ukoliko se u kaminu tokom korišćenja javi kondenzacija potrebno je pokupiti kondenz a ceo kamin iznutra premazati baznim sredstvima za čišćenje ili barem vodenim rastvorom građevinskog kreča Na taj način se vrši neutralizacija kiselina usled kondenzacije Pri održavanju i servisiranju kamina kamin isključiti sa napajanja Obavezno vratiti M profil...

Page 34: ...g Serijski broj kotla primer N 170616003 Godina proizvodnje primer 2020 Tip kotla CUBA 15 ili CUBA 20 Stepen korisnosti Nominalna 93 Redukovana 94 Radni pritisak 2 5bar Električni napon 230V Frekvencija 50Hz Nominalna el snaga 500W Gorivo Pelet C1 Cuba 15 Cuba 20 Nominalna toplotna snaga 15 2 kW 20 kW Nominalna snaga u radijatorima 13 8 kW 18 3 kW Nominalna snaga u zračenje 1 4 kW 1 7 kW Redukovan...

Page 35: ...radijator rs e mail radijator radijator rs 8 7 Nalepnica Na kaminu se nalaze nalepnice za označavanje priključaka kao i nalepnice za opasnost od strujnog udara nalepnice za šemu povezivanja i dr Nalepnice koje označavaju priključke za povezivanje instalacije 1 Nalepnica Potisni vod 32mm x 74mm 2 Nalepnica Povratni vod 32mm x 74mm ...

Page 36: ...a br 6 Srbija tel 381 36 399 140 fax 381 36 399 150 http www radijator rs e mail radijator radijator rs 3 Nalepnica Šema povezivanja 148mm x 210mm Nalepnice koje označavaju prisistvo struje visokog napona i opasnosti 1 Nalepnica Ulaz za sniženim naponom 12V 60mm x 80mm ...

Page 37: ...vo Živojina Lazića Solunca br 6 Srbija tel 381 36 399 140 fax 381 36 399 150 http www radijator rs e mail radijator radijator rs 2 Nalepnica Napon opasan po život VEĆA 100mm x 150mm 3 Nalepnica Uzemljenje 20mm x 30mm 4 Nalepnica Prisustvo napona ...

Page 38: ...399 140 fax 381 36 399 150 http www radijator rs e mail radijator radijator rs Nalepnice koje označavaju upozorenje Nalepnica Izloženi pokretni delovi mogu izazvati povrede 30mm x 80mm Nalepnica Obavezno poštanje u rad od strane ovlašćenog servisa 65mm x 247mm Nalepnica Pažnja 4 Nalepnica Otpad ...

Page 39: ...Živojina Lazića Solunca br 6 Srbija tel 381 36 399 140 fax 381 36 399 150 http www radijator rs e mail radijator radijator rs Nalepnice sa tehničkim podacima Proizvođač RADIJATOR Inženjering D O O Živojina Lazića Solunca br 6 36000 Kraljevo Srbija ...

Page 40: ... da se pridržava navedenih uputstava o korišćenju i održavanju videti tačku 8 2 Garancijska izjava Izjavljujemo da proizvod ima propisana i deklarisana kvalitetna svojstva Obavezujemo se da ćemo na zahtev kupca ako pravovremeno u garancijskom roku podnese zahtev za popravku o svakom trošku izvršiti sve popravke kvarova tako da će proizvod raditi u skladu sa deklarisanim svojstvima da će proizvod u...

Page 41: ...za čišćenje ekspanziona posuda ventil sigurnosti odzrašni ventil i ležaj klizni ležaj 5 Garancijski rok ne važi ukoliko se posle svake grejne sezone ne odradi redovan servis za zamenu delova kod redovnog godišnjeg održavanja u skladu sa uputstvima kod kvarova koje je načinio kupac zbog nestručnog rukovanja proizvodom kod mehaničkih kvarova načinjenih prilikom transporta i prilikom korišćenja čvrst...

Page 42: ...o dođe do zamene bilo kojih delova na iste korisnik dobija gore navedenu garanciju kao i garanciju na još 12 meseci na telo kotla izmenjivač Garancija se može produžiti do 5 god od datuma puštanja u rad Servis i produženje servisa može da obavlja lice koje šalje centralni servis Radijator inženjering a Na nezamenjene delove posle odrađenog servisa garancija ne važi Demontaža pelet transportera pro...

Page 43: ...___________________________________ pečat stamp Adresa Address to Telefon Phone Datum prodaje Date of Sale Potrosač ima sva prava na osnovu Zakona o zaštiti potrošača Sl glasnik RS br erbia62 2014 Garancija ne isključuje niti utiče na prava potrošača koja proizilaze iz zakonske odgovornosti prodavca za nesaobzirnost robe u ugovoru The consumer shall exercise all rights under the Consumer Protectio...

Page 44: ...itioning of the CUBA pellet stove 50 3 4 Installing the CUBA pellet stove to a chimney 51 4 Cross section of the CUBA pellet stove with the description of elements 55 5 Diagram on how to connect automatic control system 56 6 Technical information table 57 7 Hydraulic diagram 58 8 Starting the CUBA pellet stove and maintenance 60 8 1 Display of automatic controls 61 8 2 Brief beginner s instruction...

Page 45: ... higher than 2 5 bars and operating temperature higher than 90 C This device is a thermal energy producer through water as well as directly by emitting into the surrounding space Therefore there are surfaces so heated that touching them can cause serious injuries While working with those surfaces use protective equipment Especially pay attention to keep children away from directly coming into cont...

Page 46: ...the materials of low and average flammability should be at least 100mm The minimal distance from the easily flammable materials is 200mm and the same applies to the materials of an unknown flammability rate Fire hazard Storing flammable materials and liquids close to the boiler is forbidden It is mandatory to inform users of the necessary minimal distance between flammable materials and the boiler...

Page 47: ...mblies whose basic components have to be delivered in a standard version The boiler part with turbulators and smoke channels the dosing silo the external plating the door with a glass ceramics component The display the automatic controls panel the electric gear motor of the pellets transporter the flue gas fan the safety pressure switch the stove water temperature sensor the flue gas temperature s...

Page 48: ...d for the installation of a wood water pellet stove with the hot water generator and which apply in the country where the device is installed On the contrary Radiator inzenjering as the manufacturer doesn t take any responsibility for the consequences of such installing In the case of certain construction changes particularly on safety devices lead to unwanted consequences that can impair a person...

Page 49: ...alve if the user wants to install it has to be made from the pipe which has a diameter at least equal to the nominal diameter of the exhausting part of the valve It is also allowed to use no more than a single arch in the radius of r 3d The safety valve has to have a label and the following information on it the manufacturer s name the safety valve s type tag year of inspection tag the nominal flo...

Page 50: ...rnace in case you didn t close well any of the lids while cleaning etc or didn t close the door well and in that case the device initiates stove shutdown sequence and displays an error That is the additional stove safety protocol Picture 6 Flue gas pressure switch These conditions may lead to a worse discharge of the combustion products especially carbon monoxide which can in extreme cases impair ...

Page 51: ...vice mustn t ever be installed in the bedroom neither in the room inseparable from the bedroom by a door In the room where the water pellet stove is installed other furnaces or solid fuel and water pellet stoves mustn t be used The necessary air circulation through one of these devices will probably cause difficulties in supplying air to the other device The room with the stove has to have the pos...

Page 52: ...ustion Connecting to the chimney Installing smoke channels and supplying fresh air for combustion Pictures 9 and 10 To connect the water pellet stove to the chimney special smoke pipes certified for this purpose have to be used Materials used to make these pipes are structural and stainless steel The diameter of the smoke pipe has to correspond to the diameter of a chimney on the external end and ...

Page 53: ...nment must be such that it isn t possible to accidentally stop the air supply by closing doors windows etc Connecting to the chimney Pictures 9 i 10 During the installation of the chimney we differentiate two situations Situation 1 The stove is connected to the standard chimney built or metal which has its foundation and a full cross section from the slab foundation to the top Situation 2 The stov...

Page 54: ...re it exits the stove as well as the possibility to be disassembled in order to be cleaned WARNING Not following the rules while setting up smoke channels and the chimney may lead to improper operation of the stove and endanger human health and even their lives The greatest danger is from poisonous gases which are the products of combustion In these situations where the smoke pipe and chimney as w...

Page 55: ...adijator rs e mail radijator radijator rs Picture 10 The representation on how to connect to a chimney Picture 11 The representation a suggested chimney construction method It is suggested to clean the chimney at least once per year to reduce the risk of fire inside In case of fire shut down the stove and call the fire department ...

Page 56: ...et stove with the description of elemets Picture 12 The cross section of CUBA stove with the description of the elements 1 Exchanger with turbulators 2 Combustion cup 3 Ashpan 4 Doser 5 Silo 6 Smoke channels 7 Door 8 Plating 9 Hob 10 Cup of the exchanger 11 Automatic controls display 12 Automatic controls CPU 13 Flue gas pressure switch 14 Pump 15 Fan 16 Doser motor 17 Heater 18 Expansion vessel 1...

Page 57: ...talled by the technician during the connecting process of external devices to the boiler s automatic controls All connections of additional parts are done by a technician by using three pole connectors located at the back of the boiler The three pole one is used to connect the room thermostat as it is displayed on the label of the connector For room thermostats connected to the three pole connecto...

Page 58: ...8 3 174 9 CO emission at reduced heating power output 165 9 165 9 Water volume in the boiler L cca 40 40 Stove weight kg 227 228 Necessary draft Pa 10 2 10 2 Max operating pressure bar 2 5 2 5 Test pressure 4 5 4 5 Max temperature of hot watter C 85 85 Min temperatura of cold watter 60 60 Degree of utilization 93 93 DIMENSIONS A mm 620 620 B 641 641 B1 726 726 C 144 144 ØD 80 80 E 1115 1115 F 160 ...

Page 59: ...36 399 140 fax 381 36 399 150 http www radijator rs e mail radijator radijator rs 7 The hydraulic diagram Picture 14 Connection diagram 1 Pellet stove 2 Pump 3 Expansion vessel 4 Radiator exchanger NOTICE In a package with the pellet stove the pump and 10 liter expansion vessel are included ...

Page 60: ...e in accordance in accordance with the regulated way For the proper installation a person who installs central heating is held responsible who connects the boiler to the hydraulic system Radiator inzenjering as the boiler manufacturer doesn t take any responsibility for damages caused by improper boiler installing Notice While charging the hydraulic system pay attention to safety elements rendered...

Page 61: ... in the factory while keeping a copy of the initiation report The warranty and user manual are given to the buyer One copy of the warranty is sent to the manufacturer If the warranty isn t followed it isn t valid Only boilers initiated by the licensed technician are subjected to the conditions of the complete 2 year warranty If the boiler user forgets to shut the boiler down e g cleaning he she wi...

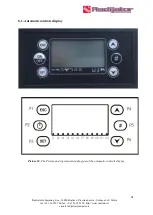
Page 62: ...evo Živojina Lazića Solunca br 6 Srbija tel 381 36 399 140 fax 381 36 399 150 http www radijator rs e mail radijator radijator rs 8 1 Automatic controls display Picture 16 The Picture and representation diagram of the automatic controls display ...

Page 63: ...n the menu Confirm Saves information in the menu Reset 2 function maintenance system Resets timer T67 P5 Diodes Functions Description Key Heater Diode on Heater is functioning L1 Doser Diode on Doser is functioning L2 Pump Diode on Pump is functioning L3 Mixing valve Diode on Mixing valve is functioning L4 V2 port configured as the safety valve for pellets or pellets refill motor or cleaning motor...

Page 64: ...rs 8 2 Brief instruction for the automatic controls user Picture 17 The representation of the LCD screen on the display Reading the current status of the stove Procedure Press the P6 key and after that information appears Picture 18 Picture 18 The representation of the status of the stove on the display NOTICE Information marked with star doesn t appear with CUBA stove ...

Page 65: ... the operating time of doser and fan speed Load This menu enables the operation of the dosing system initial and repeated charging at the boiler s initiation provided that the system is OFF Summer Winter The menu for choosing winter or summer mode Language The menu for choosing a language on the LCD panel Keyboard Menu The menu for adjusting contrast and brightness on the LCD panel System Menu The...

Page 66: ... bring you to the Time and Date option Reconfirm by pressing the P3 key and the setting time and precise date display shows up on the screen in which by using P4 or P6 keys you confirm the command and change its values again by using keys P4 or P6 you confirm the command and change its values again by using keys P4 or P6 Upon choosing the desired value it is confirmed by the P3 key To exit and ret...

Page 67: ...3 key two options appear Modality and Program and then by P4 or P6 keys you reach the desired option Modality and confirm it by the P3 key After that in the sub menu you get to options Daily Weekly Weekend and Disable shown on picture 21 By pressing P4 or P6 keys choose one of them and confirm by pressing the P3 key Picture 21 The representation of the display upon choosing option MODALITY Upon ch...

Page 68: ...tion of the display upon choosing the option Weekly Picture 24 The representation of the display upon choosing option Weekend 8 3 Starting the CUBA pellet stove STEP 1 The stove is connected to the hydraulic system STEP 2 Insert pellets into the silo STEP 3 Inspect if all lids are tightly closed and if the stove door is properly closed STEP 4 Start the stove the switch is located at the back of th...

Page 69: ... controls are in OFF mode picture 17 system status Procedure Press the P3 key and then by pressing P4 or P6 keys in the sub menu you get to the LOAD function confirm by pressing the P3 key by pressing keys P4 or P6 switch from OFF to ON confirm with the P3 key By confirming with the key the doser initiates until the first pellet grains don t start falling into the combustion cup Subsequently by pr...

Page 70: ...tings aren t completely dry more precisely combusted The identical procedure is used to shut down the boiler that is by pressing the P2 key until the sound signal we are entering the shutdown phase The room thermostat can be connected to automatic controls In this case it is important to set the room temperature which is the main parameter for the boiler to operate and for water in the boiler 70 C...

Page 71: ...er This error is related to the bad encoder loading Er09 Error Low water pressure Er10 Error High water pressure Er11 Error Real time sistemska greška Er12 Error Shutting down due to the failed ignition Er15 Error Lack of voltage Er17 Error on the regulator of the airflow sensor Er18 Error Shortage of pellets Er39 Error Malfunctioning regulator of the airflow sensor Er41 Error The minimum airflow ...

Page 72: ...heater s preheating time for ignition t02 to the value of 30 40 seconds Possible cause 3 PROBLEM 3 The mains voltage to which the boiler is connected is significantly lower than 220 230V so the power of the heater is lower The procedure of resolving PROBLEM 3 Increase the heater s preheating time for ignition t02 to the value of 30 40 seconds If this measure doesn t provide results connect the mai...

Page 73: ...ion phase Ignition and the ignition heater isn t activated The procedure of resolving PROBLEM 7 Check if the room temperature is actually lower than the set value Also check the timed programming of the room s thermostat and eventually check the validity of the room s thermostat Group II The most frequent signalization on the display related to this group of errors is Er03 Possible cause 1 PROBLEM...

Page 74: ...owerful chimney excessively powerful fans while running the excessive loading of pellets pellets characteristics etc The failure can be fixed by adjusting some of the parameters or increasing parameters for sending the boiler to modulation and safety shutdown because of flue gases and those are the parameters Th07 Th08 8 5 Maintenance and cleaning the CUBA pellet stove The CUBA pellet stove requir...

Page 75: ...ays Once every two weeks it is necessary to clean layers on the furnace walls This provides a higher transmission rate because one millimeter of tar and soot layers reduces conductivity by 5 Open the upper cleaning lid and clean all reachable spots above the turbulator The frontal inspection lid of smoke channels should also be opened remove the M profile from the smoke channels and clean the enti...

Page 76: ...rs lime That way the neutralization of acid due to condensation is done During service and maintenance of the stove remove it from the power supply Return the M profile inside the smoke channels for the purpose of stable stove operation This way conserve the boiler imperatively at the end of the heating season In that situation close all holes on the stove to avoid air circulation through the stov...

Page 77: ... number of the boiler example N 170616003 Year of manufacture example 2020 Boiler type CUBA 15 or CUBA 20 Degree of efficiency Nominal 93 Reduced 94 Operating pressure 2 5bar Electrical voltage 230V Frequency 50Hz Nominal electric power 500W Fuel Pellets C1 Cuba 15 Cuba 20 Nominal heat power output 15 2 kW 20 kW Nominal radiator power output 13 8 kW 18 3 kW Nominal radiating power output 1 4 kW 1 ...

Page 78: ...fax 381 36 399 150 http www radijator rs e mail radijator radijator rs 8 7 Label On the stove labels showing connection ports as well as electrical shock hazard labels connection diagram labels etc can be found Labels showing connection ports 3 Label hot water 32mm x 74mm 4 Label cold water 32mm x 74mm ...

Page 79: ...zića Solunca br 6 Srbija tel 381 36 399 140 fax 381 36 399 150 http www radijator rs e mail radijator radijator rs 4 Label Connection diagram 148mm x 210mm Labels denoting the presence of electricity high voltage and hazard 5 Label Low voltage 12V 60mm x 80mm ...

Page 80: ...evo Živojina Lazića Solunca br 6 Srbija tel 381 36 399 140 fax 381 36 399 150 http www radijator rs e mail radijator radijator rs 6 Label Hazardous voltage LARGER 100mm x 150mm 7 Label Grounding Earthing 20mm x 30mm 8 Label Presence of voltage ...

Page 81: ...a tel 381 36 399 140 fax 381 36 399 150 http www radijator rs e mail radijator radijator rs Labels denoting hazard Label Exposed moving parts may cause injuries 30mm x 80mm Label Only an authorized installer is approved to start the boiler 65mm x 247mm Label Caution 5 Label Garbage ...

Page 82: ... Živojina Lazića Solunca br 6 Srbija tel 381 36 399 140 fax 381 36 399 150 http www radijator rs e mail radijator radijator rs Technical information labels Manufacturer RADIJATOR Inženjering D O O Živojina Lazića Solunca br 6 36000 Kraljevo Srbija ...

Page 83: ...user must follow the listed instructions on how to use and do maintenance refer to point 8 2 Warranty statement We state that the product has regulated and declared quality properties We oblige to on the request of the buyer if he she timely within warranty period submits the repair request cover all repair costs so that the product will operate according to its declared properties that the produc...

Page 84: ... mechanism expansion vessel safety valve vent valve and bearing slide bearing 5 Warranty period doesn t apply unless the regular maintenance is done after each heating season in case of the replacement of parts on the annual maintenance in accordance with the instructions in case of malfunctions caused during transport and during use solid objects if the product was installed unprofessionally cont...

Page 85: ...o the replacement of any parts the user receives the aforementioned warranty and the additional 12 month warranty for the boiler body exchanger as well The warranty can be extended up to 5 years from the initiation date The warranty and extension can be done by the person sent by the central maintenance department of Radiator inzenjering The warranty isn t valid to unchanged parts upon completing ...

Page 86: ...85 Radijator Inženjering d o o 36000 Kraljevo Živojina Lazića Solunca br 6 Srbija tel 381 36 399 140 fax 381 36 399 150 http www radijator rs e mail radijator radijator rs ...

Reviews: