23
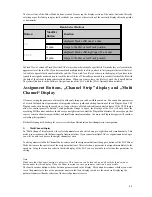
first display you can now see the currently set nudge value as well as the current position of the move object. In the third
mode the selected object will be moved to the selected song position.
1) Moving the object by a fixed value
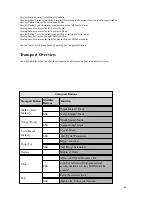
Keep the [nudge] button pushed and use the [FWD] and [RWD] buttons in the transport field. The selected object will
be moved forward or backward by the set nudge value. You can adjust the value using the first encoder under the first
display. It is called Nudge in the display.
2) Direct Moving
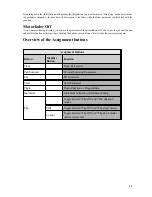
You can move the selected object to you liking with the other assigned encoders. To keep things simple there are
different controls which cover different time formats. You can move objects relative to bar or time. The various possibilities
are shown in the display.
3) Moving to the Song Position
To move an object to current song position use the “pick-up” function, which is assigned to the second encoder button
of the SAC.
Drop-In Programming
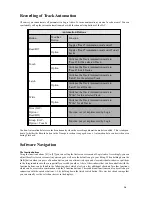
The Drop button [Recall Marker] turns on the Drop-In Editor and activates the Drop-in Function. It is very simply to
determine a Drop-Zone:
1) Determining a Drop In/Drop Out Zone
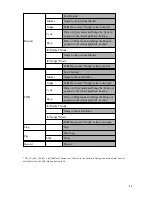
Use the Jog Wheel to select the Drop In Position. Press and hold the Drop button [To] and after selection and push the
[<<] button in the transport field briefly. You have now set the drop in position.
Now use the Job Wheel to select the Drop Out Position. Use and hold the Drop button [To] button and push the [>>]
button briefly. You have now set the drop out position.
2) Editing the Drop Zone
You can also edit the Drop Zone. Use the [Shift] button, keep it pushed and press the Drop [Recall Marker] button. You
will see a Drop Channel Strip in the first and second displays.
In the displays the various functions will be shown. Using the first encoder button you can turn the Drop Mode on and
off.
The third and fourth Encoder allows moving the Drop Zone. The third moves the Zone by Bar and the fourth by Beat –
for instance in a 4/4 bar always by a quarter note to the left or right.
The fifth and sixth Encoder control the position of the Drop In. Here as well you can move the Zone by Bar or Beat.
The seventh and eighth encoder are used for moving the Drop Out Position.
To leave the [Drop] Channel Strip Display press an the Assignment button.
Cycle Mode Editing
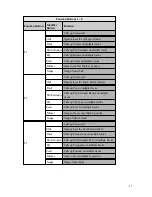
The Cycle button [Recall Marker] activates the Cycle Mode, and turns on as the set value the cycle mode for the sector
between the first two markers (this is the default). If you push the [Recall Marker] button and use the [<<] and [>>]
buttons you can move the cycle region. Of course, this only works if you have programmed markers in the first place!
1) Quickly repositioning the Cycle Locator
You can also determine the Cycle region without existing marker. Use the Jog Wheels to select the Cycle Start Position.
Push and hold down the Cycle button [Recall Marker] and push the [<<] button in the transport field. The Cycle Start
position has now been set.
Now use the Jog Wheel to set the Cycle End Position. Push and hold down the Cycle button [Recall Marker] and push
the [>>] button. You now have set the Cycle End Position.
2) Cycle Editing
The Cycle Mode also has a Channel Strip for additional settings.
Push and hold down the [Shift] Button and push the Marker Button. In the first two display the following parameters are
being offered:


