background image

41

40

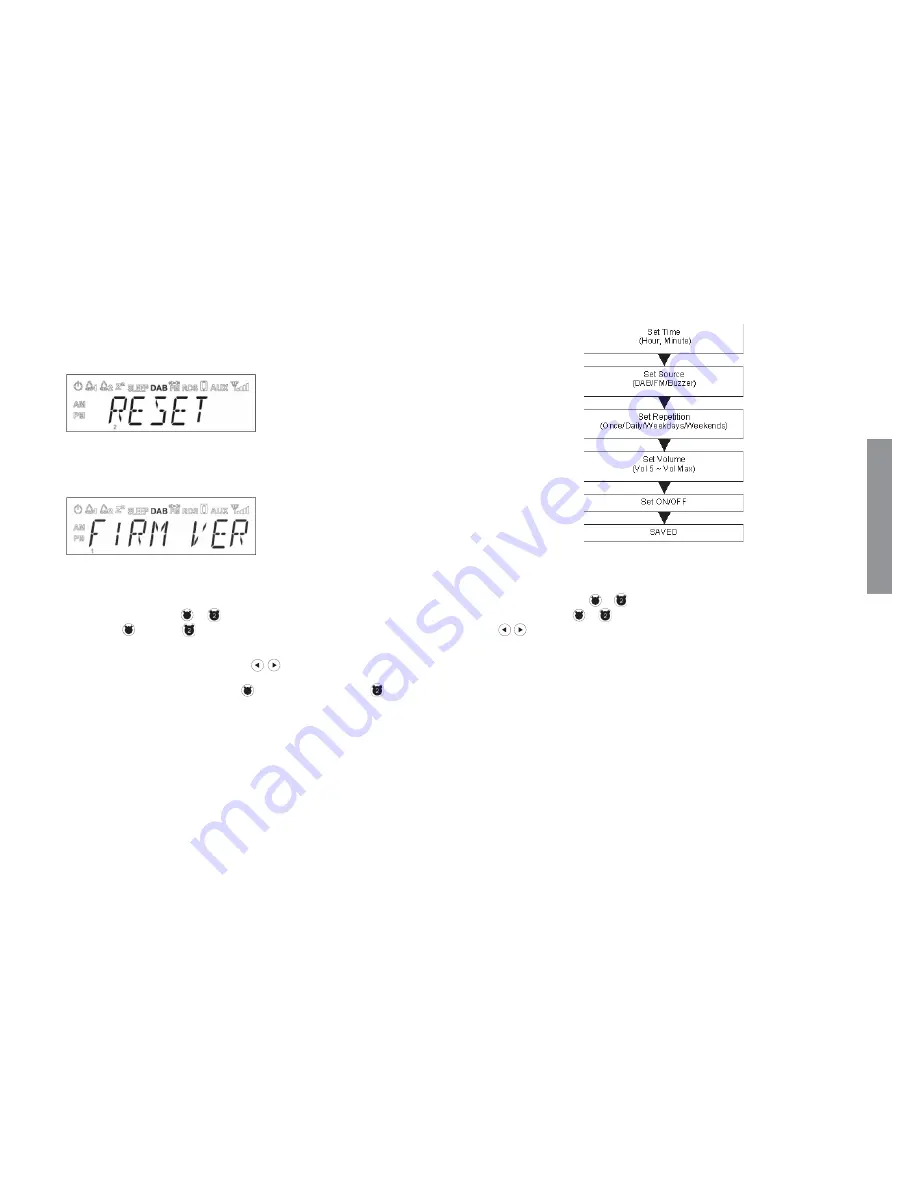
RESET

Allows you to clear all settings and restore the factory confi guration. Select the option YES and 
press the ENTER button on the remote control or the 

MENU/SELECT

 knob on the main unit to 

start the reset to factory settings or NO to cancel the operation.

CAUTION:

 all the date, clock, alarm, equalizer presets, and radio stations settings will be lost.

FIRMWARE VERSION

Allows to view the fi rmware version installed in the unit. 

USING THE ALARM

Setting the alarm

1. 

Turn the radio on, press 

1

 or 

 on the remote control to select alarm 1 or alarm 2. 

The icon  

1

 or the icon  

 will fl ash on the display.

Press 

ENTER

 to enter the Alarm menu, press  


  on the remote or turn the 

MENU/

SELECT

 knob on the main unit to adjust the desired time for the alarm. Press 

ENTER

 or the 

MENU/SELECT

 knob to confi rm your choice 

1

 and move to the next function

, or press 

BACK

 to return to the previous menu item.

After setting of the alarm time, you can select the alarm source (DAB/FM/Buzzer). By setting 
DAB or FM you can set a radio station stored in the preset, to be associated to the alarm or the 
last radio station listened to.

The next option is the repetition frequency of the alarm that may have the following options:

Once – Daily – Weekdays – Weekends. When selecting the option Once you need to confi rm 
the date of the alarm before moving on to the next step. Set the playback volume of the alarm.
When the alarm is set to ON and saved, the icon for alarm 1 and/or 2 will be shown on the 
display to indicate the active status.

ENGLISH

ENABLING OR DISABLING THE ALARM

In standby mode, press 

1

 or 

 on the remote control to enable or disable the alarm, or turn 

on the radio, press 

1

 or 

 to select alarm 1 or 2, on the remote control press the buttons 


 to select ON/OFF and confi rm with 

ENTER

The icons are shown on the display to confi rm that the alarm has been activated.

SNOOZE OPTION AND ALARM SLEEP MODE

While the alarm is enabled, press 

SNOOZE

 on the remote control to repeat the alarm after a 

certain interval (according to the settings entered in the relevant menu - the default value is 5 
minutes) or by pressing the VOL/STANDBY knob on the main unit. 

When the SNOOZE mode is active, the display shows the 

Zz

Zz

  icon that identifi es its active status 

of operation. 
To stop the alarm, press any button on the remote control except for SNOOZE, or any knob on 
the main unit except for VOL/STANDBY.

Summary of Contents for TS522D+

Page 1: ......

Page 2: ...MENU SELECT DOWN UP MODE MIN MAX BT PAIR BACK AUX VOL MODE SCAN INFO SNOOZE 1 6 2 7 3 8 4 9 5 10 SHIFT MENU ENTER EQ BACK SCAN 1 4 5 2 6 7 3 8 9 11 10 1 2 1 2 ...

Page 3: ... DC utilizzare l adattatore CA fornito per connetterlo alla presa di corrente elettrica 12VDC 2A 2 R SPR OUT utilizzare per connettere lo speaker destro per ottenere un sistema stereo venduto separatamente PANNELLO SUPERIORE 1 Maniglia estrarre la maniglia per il trasporto della radio 2 Antenna radio allungare e piegare l antenna per ottenere la posizione migliore per la ricezione PAIR ITALIANO TE...

Page 4: ... qualificato Il punto esclamativo in un triangolo equilatero serve ad avvisare l utilizzatore della presenza di importanti istruzioni di funzionamento e manutenzione nel libretto allegato al prodotto la vecchia spina tagliata dal cavo di alimentazione deve essere adeguatamente eliminata per evitare possibili scosse o folgorazioni dovute all accidentale inserimento della spina stessa in una presa di...

Page 5: ...ione del prodotto Puoi dare il tuo contributo all ambiente seguendo le seguenti semplici norme Quando il tuo dispositivo elettrico o elettronico non ti è più utile portalo presso il gestore locale dello smaltimento dei rifiuti affinché il prodotto possa essere riciclato Il tuo prodotto può essere reso gratuitamente al tuo rivenditore acquistando un apparecchio di tipo equivalente o che svolga le ste...

Page 6: ...getti a vibrazioni o altri movimenti in luoghi estremamente polverosi in luoghi in cui vi siano fumi o oli caldi ad esempio ad una cucina economica ATTENZIONE Se è in uso non appoggiare il dispositivo su di un lato non appoggiarlo e non appenderlo a nulla Non sedere e non stare in piedi sul prodotto Non applicare questa unità ad un muro o al soffitto Esso potrebbe altrimenti cadere e causare ferime...

Page 7: ...minuto 2 Utilizzando il telecomando mediante il pulsante MODE selezionare la modalità DAB Dall unità principale premere la manopola MODE per entrare nelle varie modalità e selezionare DAB 3 Premere il pulsante INFO per visualizzare sul display le informazioni relative alla stazione radio selezionata dipendente dalla disponibilità offerta dell emittente broadcaster 4 Mediante il telecomando premere...

Page 8: ... punto sarà possibile connettere un altro dispositivo ATTENZIONE Per i telefoni cellulari con Bluetooth 2 0 verrà richiesto di inserire una password durante l accoppiamento Premere la seguente stringa 0000 zerozerozerozero RIPRODUZIONE DELLA MUSICA Il dispositivo che intendete associare a TS522D deve supportare il profilo AVRCP Audio Video Remote Control Profile al fine di poter controllare la riprod...

Page 9: ...ante i pulsanti è possibile navigare attraverso le varie voci del menu Premere il pulsante ENTER per entrare all interno della voce del menu selezionata FULL SCAN permette di compiere la scansione completa dei canali DAB MANUAL TUNE permette di impostare la frequenza DAB da sintonizzare Premere i pulsanti per regolare la frequenza e premere ENTER per confermare p e 174 928 MHz Il display mostrerà ...

Page 10: ...erranno perse Quando la radio viene riaccesa andando in modalità DAB essa eseguirà una scansione automatica e riceverà le informazioni di data e orologio dall emittente DAB TIME MODE Permette di impostare il formato dell orologio in 12 o 24 ore SNOOZE Permette di impostare l intervallo di tempo per la ripetizione dell allarme snooze Premere i pulsanti sul telecomando o ruotare la manopola MENU SEL...

Page 11: ...erazione ATTENZIONE tutte le impostazioni riguardanti data orologio allarme equalizzatore e preset delle stazioni radio verranno perse FIRMWARE VERSION Permette di visualizzare la versione firmware installata nell unità UTILIZZARE L ALLARME Impostazione dell allarme 1 Accendere la radio premere il pulsante 1 oppure il pulsante sul telecomando per selezionare l allarme 1 oppure l allarme 2 L icona 1...

Page 12: ...4 3 Turn clockwise or counter clockwise to access the items in the global Menu 4 4 Turn clockwise or counter clockwise to adjust the next or previous station in DAB mode 4 5 Turn clockwise or counter clockwise to adjust the frequency in FM mode 5 MODE press to toggle between the DAB FM Bluetooth BT and AUX modes 6 BT PAIR SCAN 6 1 in BT mode press and hold for pairing the Bluetooth device until th...

Page 13: ...isconnecting device for the unit from the power source the cord should be unplugged from the AC outlet to shut down all current flow Then verify that the unit has been installed so as to easily unplug the power cord from the wall outlet if necessary In addition to avoid fire hazard the power cord should be unplugged from the AC outlet if the unit is not going to be used for relatively long periods o...

Page 14: ...hey cannot be stepped on A damaged power cord can cause fire or electric shock Check the power cord regularly If it is damaged ask your nearest BV Srl authorized service center or your dealer for a replacement power cord ENVIRONMENTAL OPERATING CONDITIONS Ideal range of operating temperature and humidity from 5 C to 35 C relative humidity less than 85 uncovered product Do not install the unit in a ...

Page 15: ...on ENGLISH SAFETY REGULATIONS DANGER Follow the instructions provided Do not throw the unit into fire or expose it to heat Do not throw the device hit it with a hammer or other object and do not pierce it Do not use or store this device near places at very high temperature such as a heater or a closed car in direct sunlight Do not allow the product to be splashed with liquids WARNING Do not use the...

Page 16: ...rollable distance is lower or if it ceases to function properly it is time to replace the battery To perform this simple operation proceed as follows CAUTION Lithium batteries can explode or cause burns if disassembled shorted recharged exposed to water fire or high temperatures Do not leave batteries in your pocket purse or other container with metal objects do not mix them with other types of bat...

Page 17: ...lows 3 Press SHIFT once Press and hold the button 1 6 2 7 3 8 4 9 5 10 corresponding to the number where you want to store that station until the display shows STORED indicates the number where it will be stored e g STORED 6 stored in the preset no 6 ENGLISH 4 You can store up to 10 DAB radio stations and 10 FM radio stations the radio frequency of the FM station saved by default on all presets is...

Page 18: ...es quickly press the PAIR button twice with an interval of about one second between presses until it plays a beep sound At this point the LED indicating the status of the Bluetooth switches off and then it starts to flash again CAUTION After erasing all memory the unit will go immediately into pairing mode and you will need to follow the pairing and connection procedure of a new Bluetooth device Re...

Page 19: ... enter the selected menu item SCAN Allows you to set the quality of the reception of FM stations for the scanning STRONG only the stations with a strong signal will be scanned ALL the stations with both strong and weak signal will be scanned ENGLISH AUDIO Allows you to set the listening to MONO or STEREO in FM mode MENU AVAILABLE IN ALL MODES Press MENU to access features common to all modes of TS...

Page 20: ... mode Normal operating mode ENGLISH Press ENTER on the remote or the MENU SELECT knob on the main unit to access the two operating modes and increase or decrease the brightness of the display with the buttons SET EQ Allows to set the equalization of the radio Press on the remote control or turn the MENU SELECT knob on the main unit to select one of the stored equalization presets NORMAL ROCK POP J...

Page 21: ...radio station listened to The next option is the repetition frequency of the alarm that may have the following options Once Daily Weekdays Weekends When selecting the option Once you need to confirm the date of the alarm before moving on to the next step Set the playback volume of the alarm When the alarm is set to ON and saved the icon for alarm 1 and or 2 will be shown on the display to indicate ...

Page 22: ...r Alarm ausgeschaltet VORDERSEITE 1 Stromanschluss verbindenSiedasGerätüberdasmitgelieferteNetzteilmitderSteckdose 12VDC 2A 2 R SPR OUT verbinden Sie den rechten Lautsprecher um ein Stereo System zu erhalten separat erhältlich OBERSEITE 1 Griff ziehen Sie zum Tragen des Radios den Griff heraus 2 Radioantenne ziehen und biegen Sie die Antenne um die beste Position für den Empfang zu finden DEUTSCH F...

Page 23: ...Endverbraucher gewartet werden Falls nötig kontaktieren Sie qualifizierte Fachkräfte Das von einem Dreieck umgebene Ausrufezeichen weist den Verbraucher auf wichtige Bedienungs und Wartungshinweise innerhalb des Handbuchs hin DEUTSCH Zur Vermeidung eines Brands stellen Sie keine offenen Flammen z B Kerzen o Ä auf das Gerät Bevor Sie das Gerät zum ersten Mal an die Stromversorgung anschließen lesen ...

Page 24: ...Srl stellt die folgenden Informationen zur Entsorgung sowie zum Recycling des Geräts bereit um das Freisetzen gefährdender Materialien in die Umwelt zu verhindern Schützen Sie unsere Umwelt indem Sie die folgenden Punkte beachten Möchten Sie das Gerät nicht länger nutzen bringen Sie es zu Ihrem örtlichen Wertstoffhof Sie können das alte Gerät kostenfrei an Ihren Händler zurückgeben wenn Sie ein ne...

Page 25: ...s oder eines anderen Geräts das von einem Magnetfeld umgeben ist Dies könnte den Klang beeinträchtigen in direktem Sonnenlicht in einer extrem heißen oder kalten Umgebung an vibrierenden oder sich in anderer Form bewegenden Orten an extrem staubigen Orten an Orten wo Rauch entsteht oder sich heiße Öle befinden z B einem Herd DEUTSCH ACHTUNG Wenn Sie das Gerät verwenden stellen Sie es nicht auf die ...

Page 26: ...Verwenden Sie die MODE Taste zum Auswählen des DAB Modus Verwenden Sie den MODE Knopf des Geräts um zu den Menüeinträgen zu gelangen und den DAB Modus auszuwählen 3 Drücken Sie INFO um visuelle Informationen zum gewählten Radiosender anzuzeigen abhängig von den vom Sender zur Verfügung gestellten Informationen 4 Verwenden Sie die Tasten auf der Fernbedienung um durch die Liste der gefundenen DAB S...

Page 27: ...gende Zahlenfolge ein 0000 nullnullnullnull DEUTSCH MUSIKWIEDERGABE Das Gerät das Sie mit dem TS522D verbinden möchten muss AVRCP Audio Video Remote Control Profile unterstützen damit das Abspielen funktioniert Ziehen Sie die Bedienungsanleitung Ihres Geräts zu Rate Wenn Musik abgespielt wird 1 PLAY PAUSE Taste a Einmal drücken zum Pausieren der Wiedergabe b Erneut drücken zum Fortsetzen der Wieder...

Page 28: ... um Zugriff auf die verschiedenen Funktionen des DAB Modus zu erhalten Verwenden Sie die Tasten zum Durchsuchen der Menüeinträge Drücken Sie ENTER um den ausgewählten Menüeintrag aufzurufen FULL SCAN startet einen vollständigen DAB Sendersuchlauf MANUAL TUNE erlaubt das manuelle Einstellen der DAB Frequenz Betätigen Sie die Tasten zum Einstellen der Frequenz und drücken Sie ENTER zum Bestätigen z ...

Page 29: ...hen alle Informationen zu Uhrzeit und Datum verloren wenn Sie es ausschalten Schalten Sie das Gerät erneut im DAB Modus ein sucht und empfängt es automatisch die Informationen zu Datum und Uhrzeit vom DAB Sender TIME MODE Ermöglicht das Einstellen des Uhrenformats auf 12 Stunden oder 24 Stunden SNOOZE Ermöglicht das Einstellen des Intervalls bis zum Wiederholen des Alarms schlumern Drücken Sie die...

Page 30: ...tionYES JA unddrückenSiedieENTER TasteaufderFernbedienungoderdenMENU SELECT Knopf am Radio zum Zurücksetzen auf die Werkseinstellungen Wählen Sie NO NEIN um den Vorgang abzubrechen ACHTUNG alle Datumsangaben Uhrzeitangaben Alarme Equalizer Voreinstellungen und Radiosender werden gelöscht FIRMWARE VERSION Zeigt die auf dem Gerät installierte Firmware Version an DEN ALARM NUTZEN Den Alarm einstellen...

Page 31: ...antihoraire pour régler la fréquence en mode FM 5 MODE appuyer sur cette touche pour naviguer entre les modes DAB FM Bluetooth BT et AUX 6 BT PAIR SCAN 6 1 En mode BT maintenir cette touche enfoncée pour connecter le dispositif Bluetooth jusqu à ce que le voyant bleu commence à clignoter rapidement 6 2 Lorsque le dispositif Bluetooth est connecté appuyer brièvement sur cette touche pour activer la...

Page 32: ...ectrocution dus à l insertion accidentelle de cette prise dans une prise de Afin d éviter tout risque de choc électrique ne pas retirer les vis situées à l arrière de l appareil L appareil ne contient pas de parties internes susceptibles d être réparées par l utilisateur Si nécessaire contacter un technicien qualifié Le point d exclamation dans un triangle équilatéral est un symbole d alerte destiné...

Page 33: ...u le connecter à d autres câbles Les cordons d alimentation doivent être positionnés de façon à ne pas être piétinés Un cordon d alimentation endommagé peut être source d incendie ou de choc électrique Vérifier régulièrement l état du cordon d alimentation Si le cordon d alimentation est endommagé contacter un centre technique BV agréé ou votre revendeur pour obtenir un cordon d alimentation de rem...

Page 34: ... récupération et le recyclage des appareils usagés se référer aux points de collecte conformément à la législation nationale FRANCAIS CONSIGNES DE SÉCURITÉ DANGER Suivre les instructions fournies Ne pas jeter l appareil au feu ou l exposer à la chaleur Ne pas lancer l appareil ne pas appliquer de coups avec un marteau ou autre objet et ne pas y enfoncer de clous Ne pas utiliser ni laisser l appare...

Page 35: ...teur FRANCAIS INSTALLATION ET REMPLACEMENT DE LA PILE DE LA TÉLÉCOMMANDE La télécommande est fournie avec une batterie de type CR2025 laquelle doit être installée Lorsque la portée de la télécommande diminue ou si elle cesse de fonctionner correctement la pile doit alors être remplacée Pour effectuer cette opération simple procéder comme suit ATTENTION Les piles au lithium peuvent exploser ou caus...

Page 36: ...otées de 6 à 10 procéder comme suit FRANCAIS 3 Appuyer une fois sur la touche SHIFT Appuyer et maintenir la touche numérotée 1 6 2 7 3 8 4 9 5 10 enfoncée correspondant à la case de mémoire dans laquelle mémoriser la station actuellement affichée à l écran jusqu à ce que le message STORED indiquant que la radio est mémorisée s affiche à l écran indique le numéro de la case mémoire dans laquelle la r...

Page 37: ...seconde entre chaque pression jusqu à l émission d un bip sonore Le voyant indiquant l état du mode Bluetooth s arrêtera de clignoter et s éteindra puis se remettra à clignoter ATTENTION Après avoir complètement effacé la mémoire l appareil entrera immédiatement en mode d association et il sera nécessaire de réassocier et connecter un nouveau dispositif Bluetooth Ne pas oublier de supprimer le nom...

Page 38: ...layage STRONG FORT seules les stations avec fort signal de réception seront recherchées ALL TOUTES toutes les stations de radio disponibles seront recherchées sans tenir compte de la force du signal FRANCAIS AUDIO Cette fonction permet de configurer le mode d écoute sur MONO ou STEREO en mode FM MENU DISPONIBLE DANS TOUS LES MODES Appuyer sur la touche MENU pour accéder aux fonctions communes à tou...

Page 39: ...le Mode normal de fonctionnement FRANCAIS Appuyer sur la touche ENTER de la télécommande ou sur la molette MENU SELECT de l unité principale pour accéder aux deux modes de fonctionnement Puis utiliser les touches pour augmenter ou diminuer la luminosité de l écran SET EQ CONFIGURATION DE L ÉGALISATION Cette fonction permet de configurer l égalisation de la radio Appuyer sur les touches de la téléco...

Page 40: ...e radio écoutée L option suivante consiste à configurer la fréquence de répétition de l alarme parmi les propositions suivantes Once une fois Daily quotidien Weekdays du lundi au vendredi Weekends samedi dimanche Usi l option Once est sélectionnée il est nécessaire de confirmer la date de l alarme avant de passer à l étape suivante Configurer le volume de l alarme FRANCAIS Lorsque l alarme est activé...

Reviews: