background image

3

Features

ˆ

Features

Your RadioShack Flat-Face Car CD Player
has many practical, easy-to-use features,
and you can install it in almost any vehicle
using the supplied mounting bracket, hard-
ware, and cables. Your CD player is easy to
operate, so you can concentrate on driving
safely.

Your CD player’s features include:

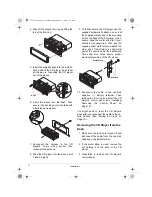
Detachable Flat-Face Front Panel — lets
you quickly remove and store the CD play-
er’s control panel in the supplied carry case.
This discourages theft because the CD play-
er cannot operate without the control panel.

Audio Mute — lets you silence the CD play-
er by pressing a single button.

Bass, Treble, Fader, and Balance Con-
trols
 — let you easily adjust the high and low
sounds and the balance between the left/
right and front/rear speakers, so you can tai-
lor the sound to your preferences.

Loudness Button — lets you boost the vol-
ume of sounds at very high and low ranges,
so you do not lose these sounds when the
CD player's volume is set very low.

Line-Out Jacks — make it easy to connect
an equalizer/amplifier.

Built-In Noise Suppression Choke — re-
duces the noise caused by your vehicle's
electrical system.

Liquid Crystal Display With Clock  —
shows the current operation of the CD and
tuner with bar spectrum signal level display.

Buzzer Alarm — alerts you when the speak-
er wires are connected in such a way that cir-
cuit damage could result.

Audible Search — lets you rapidly play a
CD forward or backward to locate a desired
track or section of a track.

Random Play — randomly selects and plays
tracks.

Repeat Play — automatically repeats the
current track.

Intro Scan — scans and plays the first 10
seconds of each track so you can find a spe-
cific track.

Local/Distance Tuning Control — lets you
set the radio to stop on only strong local sta-
tions or both local and weaker, distant sta-
tions.

This CD player is made and tested to meet
exacting safety standards. It meets FCC re-
quirements and complies with safety perfor-
mance standards of the U.S. Department of
Health and Human Services.

Warnings:

• This system employs a laser light beam.

Only a qualified service person should
remove the cover or attempt to service
this device, due to possible eye injury.

• The use of controls, adjustments, or pro-

cedures other than those specified
herein might result in hazardous radia-
tion exposure.

12-2158.fm  Page 3  Wednesday, September 13, 2000  1:50 PM

Summary of Contents for 12-2158

Page 1: ...Owner s Manual Please read before using this equipment Flat Face Car CD Player with Signal Level Meter Display 12 2158 fm Page 1 Wednesday September 13 2000 1 50 PM...

Page 2: ...Toyota Nissan and Suzuki Vehicles 9 Installing Removing the Control Panel 10 Operation 10 Setting the Clock 10 Adjusting the Sound 11 Resetting the Display 11 Radio Operation 11 CD Player Operation 12...

Page 3: ...oise caused by your vehicle s electrical system Liquid Crystal Display With Clock shows the current operation of the CD and tuner with bar spectrum signal level display Buzzer Alarm alerts you when th...

Page 4: ...This auto sound CD player system is a DIN E size unit that requires a 21 24 inch high by 71 24 inch wide by 71 220inch deep 57 184 190 mm mounting area Cautions Make sure your vehicle s mounting area...

Page 5: ...u must connect a separate wire to each speaker terminal as described in the following procedure Do not use a common wire or chassis ground for any speaker connection The CD player s buzzer alarm sound...

Page 6: ...the CD player works properly remove the CD player s control panel and disconnect your vehicle battery s negative cable the harness from the CD player s 14 pin wiring socket Then proceed with the insta...

Page 7: ...nnections Reset your CD player s display see Reset ting the Display on Page 11 then install your CD player s control panel see Install ing Removing the Control Panel on Page 10 The display should ligh...

Page 8: ...nting area Then use the supplied sheet metal screw to attach the other end of the strap to a solid metal part of the vehicle under the dashboard This strap also helps ensure proper electrical groundin...

Page 9: ...san or S Suzuki located on both sides of the CD player to fasten the CD player to the factory radio mounting brackets supplied with your ve hicle 1 Use a Phillips screwdriver to loosen and remove the...

Page 10: ...clean do not touch the connecting pins in the recess or on the back of the control panel Operation Caution Do not change your CD player s settings in heavy traffic or during hazardous driving conditi...

Page 11: ...r appears 6 To increase bass output press LOUD LOUD appears To return bass output to normal press LOUD again and LOUD disappears To temporarily silence the CD player press MUTE MUTE appears To resume...

Page 12: ...OAdcd appears then CdP CD play then TRACK 01 and the CD plays from Track 1 If a CD is already in the CD player simply press MODE to play the CD The CD player displays the number of the last track you...

Page 13: ...ct the CD and check it for scratches and condensation see CD Care Tips on Page 14 Reload the CD and try again to play it or try a different CD If the CD player still does not operate properly take it...

Page 14: ...If you park your vehicle in the sun tem peratures inside the vehicle can easily reach levels that could damage your CDs To prevent heat damage avoid leaving your CDs in your vehicle If a CD skips whe...

Page 15: ...tion Ref 0 3 CD Used diameter 5 inch 120 mm Signal Format D A Conversion 1Bit Linear Transmission Bit Rate 1 4 Mbit Sec Sampling Frequency 8 Times Pick Up System Optical Pick Up Optical Source Laser N...

Page 16: ...ations on how long an implied warranty lasts or the exclusion or limitation of incidental or consequential damages so the above limitations or exclusions may not apply to you In the event of a product...

Reviews: