background image

16

O

pe

ra

ti

on

Checking the Sound

1.

  Select an input source to play.

2.

  Adjust its volume (

CHANNEL

 volume control) to its preset signal level (see 

“Presetting Input Signal Levels” 

on page 14). The mixer’s LED meters should read 0 

dB or less.

3.

  Adjust your receiver/amplifier’s volume to an appropriate level for the location.

4.

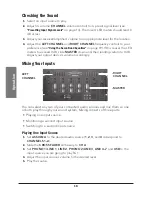
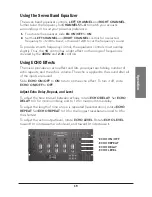
  Adjust the

 LEFT CHANNEL

 and 

RIGHT CHANNEL

 frequency controls to your 

preference (see 

“Using the Seven Band Equalizer” 

on page 19). If this causes the LED 

meters to exceed 0 dB, slide 

MASTER

 down until their readings return to 0 dB. 

Adjust your output device’s volume accordingly.

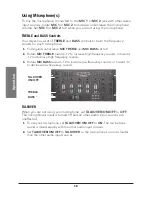
Mixing Your Inputs

You can select any two of your connected audio sources and mix them so one 
or both play through your sound system. Mixing consists of three parts:

•   Playing one input source
•   Monitoring a second input source
•   Switching to a second input source

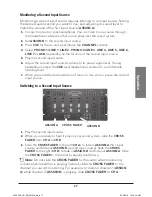
Playing One Input Source

1.

  Set 

ASSIGN A

 to the desired audio source (

1

2

3

, and 

4

 correspond to 

CHANNELS 1–4

).

2.

  Slide the 

CROSS FADER

 all the way to 

CH A

.

3. 

Set 

PHONO 1/LINE 1

LINE 2

PHONO 2/LINE 3

LINE 4–7 

and 

USB 

to the 

input source you are going to play first.

4.

  Adjust the input source’s volume to the desired level.

5.

  Play the source.

RIGHT 

CHANNEL

LEFT 

CHANNEL

MASTER

Summary of Contents for 3200026

Page 1: ...ide Thank you for purchasing your Stereo 4 Channel Mixer with Sound Effects from RadioShack Please read this user s guide before installing setting up and using your new Mixer Stereo 4 Channel Mixer w...

Page 2: ...the Sound 16 Mixing Your Inputs 16 Playing One Input Source 16 Monitoring a Second Input Source 17 Switching to a Second Input Source 17 Using Microphone s 18 TREBLE and BASS Controls 18 TALKOVER 18 U...

Page 3: ...ous voltage within the product s enclosure that might be of sufficient magnitude to constitute a risk of electric shock Do not open the product s case CAUTION TO REDUCE THE RISK OF ELECTRIC SHOCK DO N...

Page 4: ...registers stoves or other appliances including amplifiers that produce heat 9 Operate this appliance using only the power source indicated on its marking label If you are not sure of your home s powe...

Page 5: ...the appliance has been dropped or damaged in any way When the appliance exhibits a distinct change in performance 19 Do not attempt to service this appliance yourself as opening or removing covers ma...

Page 6: ...OFF MIC CUE Monitor and prepare for mixing when wearing headphones MIC 1 MIC 2 Level Controls MIC TREBLE MIC BASS CHANNELS 1 4 Select the input source and adjust the volume of each channel Channel CU...

Page 7: ...adphones volume PHONES Echo Controls Compensate for environmental conditions or adjust for personal preference encies RIGHT CHANNEL EQ SOUND EFFECT SPEED Control the pitch of the selected effect F X C...

Page 8: ...ced in 6 35 mm audio cable not supplied AMP Connect the mixer s output to your receiver or amplifier BOOTH Connect to another receiver or amplifier or connect to powered speakers REC Connect to the li...

Page 9: ...ct low level audio sources such as turntables In LINE 1 and LINE 3 settings connect high level audio sources INPUT SELECT Set switches based on what is plugged into PHONO 1 LINE 1 and PHONO 2 LINE 3 i...

Page 10: ...r amplifier s L and R input jacks matching L to L and R to R If your amplifier or receiver is not equipped with RCA jacks connect one end of a in 6 35 mm audio cable to the mixer s BALANCE OUTPUT L R...

Page 11: ...w level PHONO 1 or PHONO 2 audio input jacks 1 Connect the line level outputs from up to seven audio sources to the LINE 1 7 input jacks matching left to left and right to right nNote PHONO 1 and LINE...

Page 12: ...e top panel Connect a microphone with a in 6 35 mm plug to MIC 2 on the lower right corner of the back panel Connecting Power Connect the mixer s power cord to a standard AC outlet wCaution The power...

Page 13: ...hones not supplied with a in 6 35 mm plug to the PHONES jack Do not listen at extremely high volume levels Extended high volume listening can lead to permanent hearing loss To protect your hearing whe...

Page 14: ...To mix audio input sources see Mixing Your Inputs on page 16 5 When finished turn off all connected audio sources and press POWER to turn off the mixer Presetting Input Signal Levels To avoid overdriv...

Page 15: ...NO 2 LINE 3 and LINE 4 to CHANNEL 2 LINE 5 and LINE 6 to CHANNEL 3 LINE 7 and USB to CHANNEL 4 nNote Write down the channel volume control s setting for each audio source so each time you want to mix...

Page 16: ...til their readings return to 0 dB Adjust your output device s volume accordingly Mixing Your Inputs You can select any two of your connected audio sources and mix them so one or both play through your...

Page 17: ...s adjust the CUE level headphones volume to a comfortable listening level 7 When you reach the desired section of music to mix stop or pause the second input source Switching to a Second Input Source...

Page 18: ...2 Rotate MIC TREBLE toward 12 to increase high frequency sounds or toward 12 to decrease high frequency sounds 3 Rotate MIC BASS toward 12 to increase low frequency sounds or toward 12 to decrease low...

Page 19: ...rols Using ECHO Effects The mixer provides an echo effect and lets you adjust each delay number of echo repeats and the echo s volume The echo is applied to the sound after all of the inputs are mixed...

Page 20: ...rol to control the mixer s overall booth volume level Monitoring Cuing Inputs 1 Press in the CUE button for the input source you wish to monitor MIC CHANNEL 1 CHANNEL 2 CHANNEL 3 and CHANNEL 4 2 Rotat...

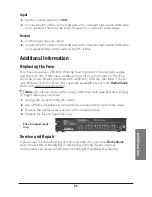
Page 21: ...the fuse could be blown Replace the fuse with a 250 Volt 0 5 Amp fast blow 1 x inch 32 mm x 6 35 mm fuse not supplied available at your local RadioShack store or at www radioshack com nNote Do not us...

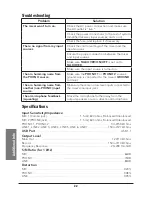
Page 22: ...ONO 1 or PHONO 2 source s ground wire is connected to the mixer s GROUND terminal I hear a humming noise from another non PHONO input source Make sure there are no low level inputs connected to the mi...

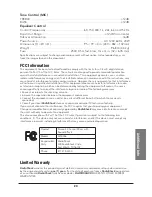
Page 23: ...the user is encouraged to try to correct the interference by one or more of the following measures Reorient or relocate the receiving antenna Increase the separation between the equipment and receive...

Page 24: ...e the property of RadioShack New or reconditioned parts and products may be used in the performance of warranty service Repaired or replaced parts and products are warranted for the remainder of the o...

Reviews: