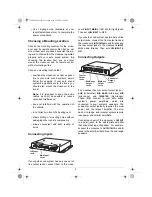
background image

3

Connecting Power

1. Disconnect the cable from your vehicle

battery’s negative (–) terminal. This
reduces the possibility of damage to your
crossover or auto sound system during
installation.

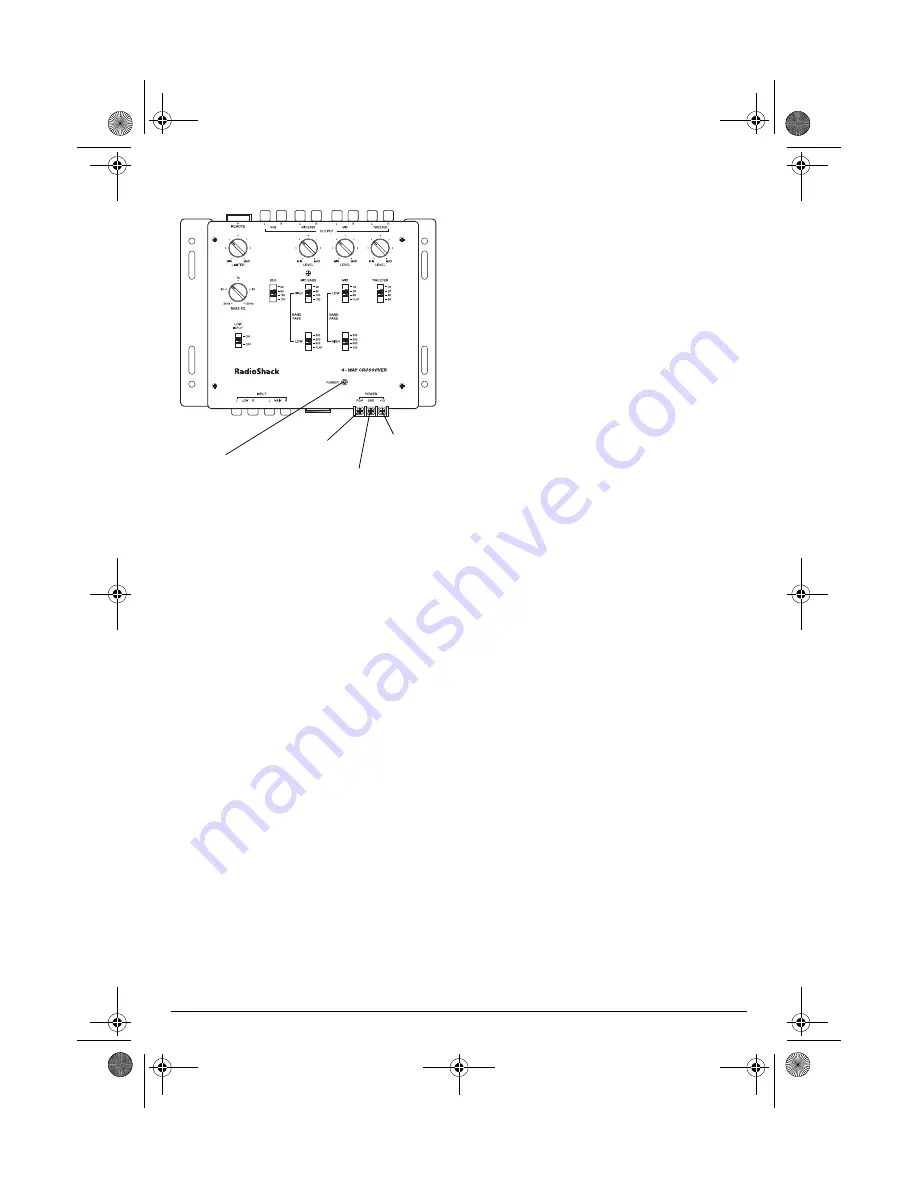
2. Connect the crossover's 

GND

 (ground)

terminal to a metal part of the vehicle's
frame.

Caution: Do not connect the ground wire
to a non-metallic (plastic) part, or to any
part insulated from the vehicle's frame by
a non-metallic part.

3. Connect the crossover's 

+12

 (12-volt)

POWER

 terminal directly to the vehicle

battery's positive (+) terminal.

4. Connect the crossover's 

REM

 (remote)

POWER

 terminal to your auto sound sys-

tem's switched power lead. When you
turn on the auto sound system, the
POWER indicator lights and the cross-
over turns on.

If your auto sound system does not have
a switched power lead, connect the 

REM

POWER

 terminal to a point in your vehi-

cle's fuse box that provides 12-volt bat-

tery power only when you set the
vehicle’s ignition switch to ON or ACC.
With this type of connection, the cross-
over turns on when you set the ignition
switch to ON or ACC.

5. Reconnect the cable to your vehicle bat-

tery's negative terminal.

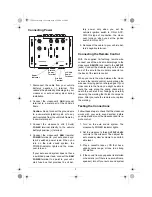
Connecting the Remote Control

With the supplied 16-foot-long remote wire,
connect one of the wire’s modular plugs to the
crossover’s 

REMOTE

 jack (next to the 

OUTPUT

jacks). Connect the modular plug on the other
end of the wire to the modular connector on
the back of the remote control.

When you route the wire between the cross-
over and the remote control, avoid placing the
wire near moving parts or sharp edges. If your
crossover is in the trunk, you might be able to
route the wire along the wiring channel be-
neath the vehicle’s door facings by carefully
removing the molding that holds the carpet in
place. After you route the remote wire, replace
the molding.

Testing the Connections

Follow these steps to check that the crossover
works with your auto sound system before
you adjust and mount the crossover and its re-
mote control.

1. Turn on the auto sound system. The

crossover's POWER indicator lights.

2. Set the crossover’s three 

OUTPUT LEVEL

controls to the midpoint. Then adjust the
auto sound system's volume to a comfort-
able level.

3. Play a cassette tape or CD that has a

wide dynamic range, or tune to a strong
FM station.

4. If the sound from any speaker is distorted

or has static (or if there is no sound from a
speaker), turn off your auto sound system

Ground 
Terminal

Power 
Indicator

Remote 
Power 
Terminal

+12-Volt 
Power 
Terminal

12-2020.fm  Page 3  Tuesday, May 23, 2000  6:56 PM

Summary of Contents for 4-Way Electronic Crossover

Page 1: ...fer mid bass mid range and tweeter Automatic Power On the crossover turns on when you turn on the vehicle s auto sound system when it is connected to a switched power lead Low Input Selector lets you select one line or two line input to match your auto sound system s line output A complete auto sound system using this crossover should also include a receiver CD player cassette deck that has line l...

Page 2: ...cting Inputs If your auto sound system has only one set of line output jacks connect them to the cross over s INPUT MAIN L left and R right jacks Then set LOW INPUT to OFF If your auto sound system has two sets of line output jacks connect the front output jacks to the crossover s INPUT MAIN L and R jacks and the rear output jacks to the crossover s INPUT LOW L and R jacks Then set LOW INPUT to ON...

Page 3: ...ith the supplied 16 foot long remote wire connect one of the wire s modular plugs to the crossover s REMOTE jack next to the OUTPUT jacks Connect the modular plug on the other end of the wire to the modular connector on the back of the remote control When you route the wire between the cross over and the remote control avoid placing the wire near moving parts or sharp edges If your crossover is in...

Page 4: ...or to a setting that matches or is less than your sub woofer s upper cutoff frequency You can find this frequency listed in the subwoofer s speci fications as F c F cutoff the cutoff frequen cy or the highest frequency shown in the speaker s frequency response range Setting the TWEETER Crossover Point The TWEETER crossover point selector lets you set the lower frequency limit for tweeter output Ch...

Page 5: ...ed crossover point go to your mid range speakers The MID BANDPASS LOW crossover point se lector lets you select the upper frequency limit for mid range output To set the crossover point slide the switch to 1K kHz 2K or 4K All signals above the selected crossover point are blocked all signals at or below the select ed crossover point go to your mid range speakers If you do not want to set an upper ...

Page 6: ...oise generated by the ignition system alter nator and accessory systems High fidelity audio systems are susceptible to picking up these noises Most noise problems are due to improper installation and not the equipment The following suggestions will help eliminate noise problems in most installations Recom mended cables and parts are available at your local RadioShack store Most noise problems are ...

Page 7: ... Be sure the power source is off 2 Firmly grasp the fuse s plastic end and pull it out 3 Holding the new fuse s plastic end push it firmly into place SPECIFICATIONS Frequency Response 10 Hz 40 kHz Channel Separation at 1 kHz 50 dB Distortion at 1 kHz and 1 Volt 0 1 S N Ratio 70 dB Crossover Slope 18 dB Octave Power Requirements 12V DC Negative Ground Dimensions HWD 8 27 6 30 1 22 Inches 210 160 31...

Page 8: ... the warranty period take the product and the RadioShack sales receipt as proof of purchase date to any RadioShack store RadioShack will at its option un less otherwise provided by law a correct the defect by product repair without charge for parts and labor b replace the product with one of the same or similar design or c refund the purchase price All replaced parts and products and products on w...

Reviews: