background image

7

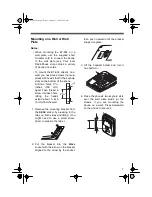
Mounting on a Wall or Wall 
Plate

Notes:

• When mounting the ET-652 on a

wall plate, use the supplied short
modular cord to connect the phone
to the wall plate jack. Your local
RadioShack store carries a variety
of phone line cords.

• To mount the ET-652 directly on a

wall, you need two screws (not sup-
plied) with heads that fit the keyhole
slots on the bottom of the phone.
Drill two holes 3

15

/

16

inches (100 mm)
apart. Then thread a
screw into each hole,
letting the heads
extend about 

1

/

inch

(3 mm) from the wall.

1. Remove the mounting bracket from

the 

DESK

 socket by pressing in the

tabs on both sides and lifting. (You
might need to use a small screw-
driver to press in the tabs.)

2. Put the bracket into the 

WALL

socket with the arrow on the bracket
aligned to the arrow by the socket,

then push upward until the bracket
snaps into place.

3. Lift the handset holder and turn it

one half turn.

4. Place the phone's two keyhole slots

over the wall plate studs (or the
screws, if you are mounting the
phone on a wall). Press downward
on the phone to secure it.

1

/

8

"

3

15

/

16

"

D

E

S

K

®

Custom

M

anufactured

in

C

hina

for

R

adioShack,

A

D

ivisio

n

o

f

T

andy Co

rporatio

n,

Fort

Worth,

T

X

7

6102

Ser

ial

No

.

C

O

M

P

LI

E

S

WI

T

H

P

A

R

T

68,

FC

C

R

U

L

ES

U

S

E

J

A

C

K

U

S

O

C

R

J

1

4

C

CA

T

.

NO

.

43-652

HAC

FC

C R

E

G

IS

TR

A

TIO

N N

O

.

A

AO

C

H

N

-XXXXX-XX-X

RI

N

G

E

R

EQ

UI

V

A

L

E

NCE

:

0

.9

B

ET

-652

CLASS 2

P

O

WER

SUPPL

Y

TW

O-

L

IN

E

SPEAKERPHO

N

E

TELEPHONE

EQUIPMENT

PO

WER

:

DC 9V

300m

A

®

L

I

S

T

E
D

T

O

190G

D

P

00C

VOLUME

MIN

MAX

LI

NE

1-

RINGE

R

- LI

NE

2

OFF

LO HI

OFF

LO HI

MODE

PULSE -

TONE

NORM -

STORE

DE

SK

®

Custom

M

anufactured

in

China

for

RadioShack,

A

Div

isio

n

of

Ta

nd

y C

orpo

ratio

n,

Fo

rt

W

orth,

TX

76

10

2

Ser

ial

No

.

CO

M

PLI

ES

WI

TH

PA

RT

68,

FC

C

RU

LES

US

E

JA

CK

US

OC

RJ

14

C

CA

T. NO

. 43-652

HAC

FC

C R

EGIS

TR

AT

IO

N N

O.

AA

OCHN-

XX

XXX-XX

-X

RI

NG

ER

EQ

UI

VA

LE

NCE

: 0

.9B

ET

-6

52

CLA

SS

 2

PO

W

ER

SU

PP

LY

TW

O-

LIN

E

SPEAKERPHO

NE

TELEPHO

NE

EQUIPM

ENT

PO

W

ER

: D

C 9V

300m

A

®

L


S T E D

TO

190G

DP

00C

43-652.fm  Page 7  Friday, August 13, 1999  11:00 AM

Summary of Contents for 43-652

Page 1: ...Cat No 43 652 OWNER S MANUAL Please read before using this equipment ET 652 Two Line Speakerphone 43 652 fm Page 1 Friday August 13 1999 11 00 AM ...

Page 2: ...se Dialing lets you use your phone with tone or pulse rotary di aling and lets you switch from pulse to tone dialing for long distance bank by phone or other special services Hearing Aid Compatibility lets you use your phone with hearing aids that have a T telephone switch Your ET 652 has been tested and found to comply with all applicable standards This symbol is intended to alert you to the pres...

Page 3: ...not ring In rural areas a total REN of three might impair ringer operation If ringer operation is impaired remove a device from the line FCC STATEMENT This telephone complies with Part 68 of FCC Rules You must upon request provide the FCC registration number and the REN to your telephone compa ny Both numbers are on the bottom of the telephone Note You must not connect your phone to any of the fol...

Page 4: ...9 Checking Adjusting the Line Status Indicators 9 Operation 11 Making and Answering Calls 11 Setting the Volume 11 Switching Between the Handset and the Speakerphone 11 Using HOLD 12 Using REDIAL 12 Using FLASH 12 Using Tone Services on a Pulse Line 13 Memory Dialing 13 Entering a Pause 14 Dialing a Memory Number 14 Chain Dialing Service Numbers 14 Troubleshooting 15 Care and Maintenance 16 The FC...

Page 5: ... of the phone TEL LINE ADJUST LINE 1 LINE 2 DEFEAT LINE 2 OFF ON DC 9V 2 Plug the adapter into a standard AC outlet 3 Route the adapter s cord through the strain relief slot on the bottom of the phone Connecting to the Phone Lines To take full advantage of the ET 652 s capabilities you must have two phone lines with separate phone numbers If you have only one line you can order a second from your ...

Page 6: ...EFEAT on the back of the phone to OFF This turns off Line 2 s status indicator Connecting the Handset Plug the supplied coiled handset cord into the jacks on the handset and the left side of the phone Note Your local RadioShack store sells a variety of longer coiled handset cords which are especially useful when you mount the phone on the wall LIN E 1 RIN GER LIN E 2 OFF LO HI OFF LO HI MODE PULS ...

Page 7: ...wall plate studs or the screws if you are mounting the phone on a wall Press downward on the phone to secure it 1 8 315 16 D E S K Cu sto m Ma nu fa ctu re d in Ch ina fo r Ra dio Sh ac k A Di vis ion of Ta nd y Co rpo rat ion Fo rt W ort h TX 76 10 2 Se ria l N o CO M PL IE S W IT H PA RT 68 FC C RU LE S US E JA CK US OC RJ 14 C C AT N O 43 6 52 HA C FC C RE GI ST RA TI ON NO AA OC HN X XX XX X X...

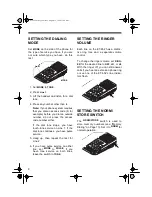
Page 8: ...ice on both lines leave the switch to TONE SETTING THE RINGER VOLUME Each line on the ET 652 has a distinc tive ring tone and a separate volume control To change the ringer volume set RING ER for the desired line to OFF LO or HI With the ringer off you can still answer calls if you hear an extension phone ring or see one of the ET 652 s line indica tors flash SETTING THE NORM STORE SWITCH The NORM...

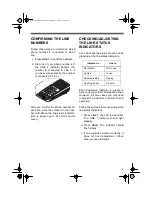
Page 9: ...line by glancing at the line status indicators Each line status indicator is preset to work correctly with most telephone lines However in some cases you may need to adjust the indicators to ensure correct operation Follow these steps to test and adjust the line status indicators 1 Press LINE 1 then lift the handset The LINE 1 indicator should light steadily 2 Press HOLD The indicator should flash...

Page 10: ...es slowly 6 Press LINE 1 If the indicator still flashes slowly turn ADJUST until it lights steadily 7 Press HOLD again and repeat Steps 5 and 6 until the indicator works cor rectly with the line on and off hold Repeat this procedure for Line 2 then replace the adjustment tool in its brack et DESK TEL LINE ADJUST LINE 1 LINE 2 DEFEAT LINE 2 OFF ON DC 9V 43 652 fm Page 10 Friday August 13 1999 11 00...

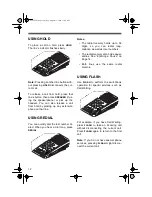
Page 11: ... Slide VOLUME on the right side of the phone toward MIN or MAX to set the speakerphone s volume Note The ET 652 uses voice operated keying so both parties cannot speak at the same time when you use the speak erphone SWITCHING BETWEEN THE HANDSET AND THE SPEAKERPHONE To switch from the handset to the speakerphone during a call press SPEAKER then place the handset on the base To switch from the spea...

Page 12: ...edial memory also holds pause entries See Entering a Pause on Page 14 Both lines use the same redial memory USING FLASH Use FLASH to perform the switchhook operation for special services such as Call Waiting For example if you have Call Waiting press FLASH to take an incoming call without disconnecting the current call Press FLASH again to return to the first call Note If you do not have special p...

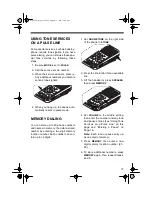
Page 13: ...the right side of the phone to STORE 2 Press the line button for an available line 3 Lift the handset or press SPEAKER then press MEMORY 4 Set VOLUME to the middle setting then enter the number and any tone and pause entries see Using Tone Services on a Pulse Line on this page and Entering a Pause on Page 14 Note Each tone or pause entry us es one digit of memory 5 Press MEMORY then enter a two di...

Page 14: ...e pause entries for a longer pause Dialing a Memory Number 1 Press LINE 1 or LINE 2 2 Lift the handset or press SPEAKER 3 Press MEMORY 4 Enter the memory location number 01 20 for the telephone number you want to dial Chain Dialing Service Numbers For quick recall of numbers for special services store each group of numbers in its own memory location When calling special services such as alternate ...

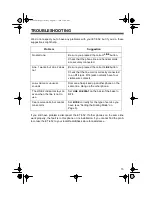
Page 15: ... the phone line and handset cords are securely connected Line 1 works but Line 2 does not Be sure you pressed the correct LINE button Check that the line cord is correctly connected to an R14 jack R14 jacks normally have four visible wire contacts Low volume or unusual sounds Someone has picked up another phone on the same line Hang up the other phone The LINE 2 indicator stays on even when the li...

Page 16: ...ause premature wear of parts Handle the ET 652 gently and carefully Dropping it can damage circuit boards and cases and can cause the ET 652 to work improperly Wipe the ET 652 with a damp cloth occasionally to keep it looking new Do not use harsh chemicals cleaning solvents or strong detergents to clean the ET 652 Modifying or tampering with the ET 652 s internal components can cause a malfunc tio...

Page 17: ...t the operation of this telephone The tele phone company notifies you of these changes in advance so you can take the necessary steps to prevent interruption of your telephone service LIGHTNING Your telephone has built in protection circuits to reduce the risk of damage from surges in telephone line current These protection circuits meet or ex ceed the FCC requirements However lightning striking t...

Page 18: ...18 NOTES 43 652 fm Page 18 Friday August 13 1999 11 00 AM ...

Page 19: ...19 43 652 fm Page 19 Friday August 13 1999 11 00 AM ...

Page 20: ...g the warranty period take the product and the RadioShack sales receipt as proof of purchase date to any RadioShack store RadioShack will at its option un less otherwise provided by law a correct the defect by product repair without charge for parts and labor b replace the product with one of the same or similar design or c refund the purchase price All replaced parts and products and products on ...

Reviews: