background image

8

• The INTERCOM and HOLD indi-

cators on the corded phone stop
flashing after the headset charger
and wireless headset are con-
nected, even when there is no
battery pack in the headset. If
they flash, move the headset and
charger closer to the corded
phone.

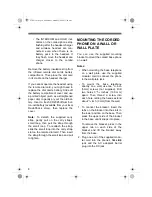
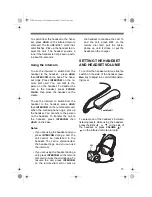
Remove the battery insulation strip from
the infrared remote dial card’s battery
compartment. Then place the dial card
in its cradle on the headset charger.

If you cannot operate the headset using
the remote dial card, you might need to
replace the dial card’s battery. Slide off
the battery compartment cover and use
a pointed object (such as a straightened
paper clip) to gently pry out the old bat-
tery. Insert a fresh CR2025 lithium but-
ton-cell battery (available from your local
RadioShack store), then replace the
cover.

Note: To detach the supplied carry
strap, gently pull on the carry strap’s
small loop, then pull the strap through
the small loop. To reattach the strap,
slide the small loop into the carry strap
slot on the remote dial card. Then insert
the strap through the small loop and pull
to tighten.

MOUNTING THE CORDED 
PHONE ON A WALL OR 
WALL PLATE

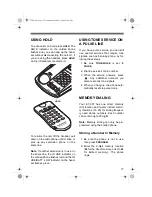
You can use the supplied mounting
bracket to mount the corded base phone
on a wall.

Notes:

• When mounting the base telephone

on a wall plate, use the supplied
modular cord to connect the phone
to the wall plate jack.

• To mount the base telephone

directly on a wall, use two 

3

/

16

-inch

(5mm) screws (not supplied). Drill
two holes 3

15

/

16

 inches (100 mm)

apart. Then thread a screw into
each hole, letting the heads extend
about 

1

/

8

 inch (3 mm) from the wall.

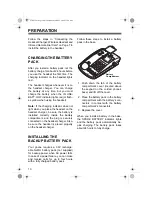
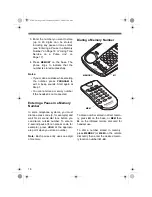
1. To connect the bracket, insert the

tabs on the bracket into the slots in
the lower position on the base. Then
press the upper side of the bracket
to the base until it snaps into place.

To remove the bracket, press in the
upper tab on each side of the
bracket and lift the bracket away
from the base.

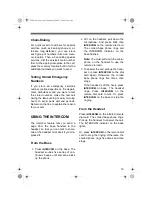
2. Plug one end of the supplied modu-

lar cord into the phone’s 

TEL.LINE

jack and the AC adapter's barrel
plug into the DC jack.

43-007.fm  Page 8  Wednesday, March 22, 2000  11:24 AM

Summary of Contents for ET-007

Page 1: ...Cat No 43 007 OWNER S MANUAL Please read before using this equipment ET 007 900 MHz Handsfree Cordless Headset System 43 007 fm Page 1 Wednesday March 22 2000 11 24 AM...

Page 2: ...n on the corded base phone 20 Number Memory Dialing lets you store 20 frequently called numbers up to 20 digits in memory for easy dialing Ample Talk and Standby Time the supplied battery for the head...

Page 3: ...FCC Rules Upon request you must provide the phone s FCC registration number and REN to your telephone company These numbers are shown on the bottom of the phone Note You must not connect your ET 007 t...

Page 4: ...n where coin operated or credit card telephones are found Elevators highways and tunnels automobiles subway railroad or pedestrian where a person with impaired hearing might be isolated in an emergenc...

Page 5: ...13 Operation 14 Making and Answering Calls 14 Using the Handset 14 Using the Wireless Headset 14 Switching Between the Handset and the Headset 14 Using Hold 14 Using the Intercom 15 Setting the Hands...

Page 6: ...specifica tions Using an adapter that does not meet these specifications could damage the ET 007 or the adapter Always connect the AC adapter to the ET 007 before you connect it to AC power When you...

Page 7: ...able nickel metal hydride Ni MH battery pack in the headset s battery com partment with the battery contact points down Important You must install the bat tery pack and fully charge it before you can...

Page 8: ...the strap slide the small loop into the carry strap slot on the remote dial card Then insert the strap through the small loop and pull to tighten MOUNTING THE CORDED PHONE ON A WALL OR WALL PLATE You...

Page 9: ...into its slot 5 Place the phone s two keyhole slots over the wall plate studs or the screws if you are mounting the phone on a wall Press downward on the phone to secure it 6 Plug the other end of th...

Page 10: ...ecurely connected on the headset charger Also be sure the headset is placed properly on the headset charger INSTALLING THE BACKUP BATTERY PACK Your phone requires a 3 6V recharge able Ni MH battery pa...

Page 11: ...se service 4 If you have pulse service set TONE PULSE to PULSE CHANGING THE RINGER TONE There are four different ringer tones you can choose or you can turn off the ring er The ringer system is separa...

Page 12: ...to set the volume to the lowest level then place the headset on your head with the microphone in the front 2 If necessary adjust the headset band on both sides by pulling down or pushing up on each e...

Page 13: ...ng adjust the volume to a comfortable level Do not listen at extremely high vol ume levels Extended high volume listening can lead to permanent hearing loss Once you set the volume do not increase it...

Page 14: ...ss PHONE FLASH on the infrared remote dial card to answer a call The headset only receives a sig nal from the remote dial card if the microphone is pulled down The dial card does not work if the micro...

Page 15: ...to the handset press INTERCOM then HOLD on the base Notes If you are using the handset and you press INTERCOM during a call the call cannot be transferred to the headset The call is disconnected the h...

Page 16: ...Flash performs the switchhook opera tion for special services such as Call Waiting For example if you have Call Waiting press FLASH on the headset PHONE FLASH on the remote dial card or the switchhook...

Page 17: ...pecial services that require tone signals such as bank by phone by fol lowing these steps 1 Be sure TONE PULSE is set to PULSE 2 Dial the service s main number 3 When the service answers press Any add...

Page 18: ...ing a Pause in a Memory Number In some telephone systems you must dial an access code 9 for example and wait for a second dial tone before you can dial an outside number To enter a 2 second pause for...

Page 19: ...ced it From the Base 1 Press INTERCOM on the base The headset sounds five series of con tinuous beeps until someone picks up the phone 2 Put on the headset pull down the microphone and press OFF then...

Page 20: ...s and electrical appli ances Turn off the interfering device Hang up and redial the number The range decreases Raise the base s antenna to a vertical position Make sure the antenna on the base and hea...

Page 21: ...ake sure the modular tele phone and handset cords are securely connected Low volume or unusual sounds Someone has picked up another phone on the same line Hang up the other phone Trouble transmitting...

Page 22: ...can temporarily discon tinue your service If this happens the phone company attempts to notify you in advance If advance notice is not practi cal the phone company notifies you as soon as possible an...

Page 23: ...23 NOTES 43 007 fm Page 23 Wednesday March 22 2000 11 24 AM...

Page 24: ...ing the warranty period take the product and the RadioShack sales receipt as proof of purchase date to any RadioShack store RadioShack will at its option un less otherwise provided by law a correct th...

Reviews: