background image

13

OPERATION

MAKING AND RECEIVING 
CALLS

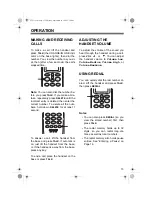
To make a call, lift the handset and
press 

TALK

 (the CHARGE/IN USE indi-

cator on the base lights), then dial the
number. You view the number as you di-
al, then (after a few seconds) the call’s
elapsed time.

Note: You can also dial the number be-
fore you press 

TALK

. If you make a mis-

take, repeatedly press 

DELETE

 until the

incorrect entry is deleted, then enter the
correct number. To delete all the num-
bers, hold down 

DELETE

 for at least 1

second.

To answer a call, lift the handset from
the base and press 

TALK

. If auto talk is

on, just lift the handset from the base,
or, if the handset is away from the base,
press any key.

To end a call, place the handset on the
base or press 

TALK

.

ADJUSTING THE 
HANDSET VOLUME

To adjust the volume of the sound you
hear through the handset during a call,
press 

VOL


or


. You can adjust

the handset volume to 

Volume


Low

,

Volume


Medium

Volume


High

, or

Volume


Maximum

.

USING REDIAL

You can quickly dial the last number di-
aled. Lift the handset and press 

TALK

,

then press 

REDIAL

.

Notes:

• You can also press 

REDIAL

 (so you

view the stored number) first, then
press 

TALK

.

• The redial memory holds up to 32

digits, so you can redial long-dis-
tance as well as local numbers.

• The redial memory also holds pause

entries. See “Entering a Pause” on
Page 16.

43-1119.fm  Page 13  Thursday, September 16, 1999  1:58 PM

Summary of Contents for ET-1119

Page 1: ...t No 43 1119 OWNER S MANUAL Please read before using this equipment ET 1119 2 4 GHz Digital Spread Spectrum Cordless with Caller ID and Call Waiting 43 1119 fm Page 1 Thursday September 16 1999 1 58 P...

Page 2: ...can charge one battery pack in the base unit while you operate the handset with the other The battery pack in the charger slot also supplies power to the base unit in case of power failure Headset Ja...

Page 3: ...D Information To use the phone s Caller ID and Caller ID with Call Waiting features you must be in an area where those services are available and you must subscribe to those services through your loca...

Page 4: ...Your telephone complies with Part 68 of FCC Rules You must upon request provide the FCC registration number and the REN to your phone company These numbers are on the bottom of the base You must not c...

Page 5: ...ine 14 Paging 14 Memory Dialing 14 Storing a Name and Number in Memory 15 Editing or Deleting a Number in Memory 16 Entering a Pause 16 Reviewing Memory Numbers 17 Dialing a Memory Number 17 Chain Dia...

Page 6: ...at does not meet these specifications could damage the ET 1119 or the adapter Always connect the AC adapter to the ET 1119 before you connect it to AC power If you should ever need to disconnect the p...

Page 7: ...the base s antenna to a vertical position On a Wall Plate or Wall 1 Insert the bracket s tabs into the base s lower tab slots as shown then press down on the bracket s clips and insert them into the c...

Page 8: ...base Follow the steps under On a Wall Plate or Wall on Page 7 then apply these ad ditional instructions for placement on a wall 1 Drill two holes 315 16 inches 100 mm apart Then thread a screw into e...

Page 9: ...the battery pack the phone might not work and you might hear an error tone when you press TALK If this happens return the handset to the base for about 5 seconds This resets the security access prote...

Page 10: ...the battery pack so the side with the contacts faces up and insert it into the charging slot until it clicks into place Charge the battery pack for 24 hours When charging is complete pull up on the la...

Page 11: ...the handset is away from the base by pressing any key Follow these steps to turn auto talk on or off 1 Lift the handset and press FUNC TION A menu appears with Auto Talk selected 2 Press SELECT to ch...

Page 12: ...119 s memory Then when you dial from a Caller ID record the ET 1119 skips the area code if it matches the one you stored Follow these steps to store your area code 1 Lift the handset and press FUNC TI...

Page 13: ...the handset from the base or if the handset is away from the base press any key To end a call place the handset on the base or press TALK ADJUSTING THE HANDSET VOLUME To adjust the volume of the sound...

Page 14: ...cial tone services by following these steps 1 Be sure PULSE TONE is set to PULSE 2 Dial the service s main number 3 When the service answers press TONE Any additional numbers you dial are sent as tone...

Page 15: ...r to select the characters and REDIAL or FLASH to move the cursor Repeatedly press to view the characters in alphabetical order The display shows uppercase let ters first then lowercase letters number...

Page 16: ...llow the instructions listed then press SELECT Edit Memory n Edit the record as described in Steps 5 through 8 of Storing a Name and Number in Memory on Page 15 Delete Memory n The display prompts you...

Page 17: ...irst then pressing MEM and entering a memory location number Chain Dialing Service Numbers For quick recall of numbers for special services such as bank by phone store each group of numbers in its own...

Page 18: ...sure the handset seats properly With a headset connected you can make or answer calls as usual using the keys on the handset You can use a handset holder available from your lo cal RadioShack store t...

Page 19: ...If the ET 1119 s Caller ID memory be comes full any new call replaces the oldest call s record REVIEWING CALLER ID RECORDS To review the Caller ID records lift the handset and press CALL ID The num be...

Page 20: ...to move the cursor to Yes or No then press SELECT Display Description New xx Total XX Shows the number of new Caller ID records records you have not reviewed and the total number of records Private Na...

Page 21: ...record DELETING CALLER ID RECORDS You can delete Caller ID records individ ually or all at once To delete a single record recall it then press DELETE Delete Message appears prompt ing you to confirm...

Page 22: ...s working or works poorly during a call Move the handset closer to the base Lift the base s antenna to a fully vertical posi tion Be sure the handset s battery pack is charged If the battery pack powe...

Page 23: ...ndset and base If they are dirty clean them with a pencil eraser Be sure the battery pack is properly con nected Be sure the handset is properly seated on the base Replace the battery pack see Replaci...

Page 24: ...d carefully Dropping it can damage cir cuit boards and cases and can cause the ET 1119 to work improperly Use only fresh batteries of the required size and recommended type Batteries can leak chemical...

Page 25: ...lode Cautions You must use a replacement battery pack of the same size and type Do not open or mutilate the battery pack Be careful not to short the battery pack by touching the connector s pins with...

Page 26: ...sing it Try to eliminate the interference by moving your phone away from the receiver connecting your phone to an AC outlet that is on a different electrical circuit from the receiver contacting your...

Page 27: ...27 NOTES 43 1119 fm Page 27 Thursday September 16 1999 1 58 PM...

Page 28: ...ng the warranty period take the product and the RadioShack sales receipt as proof of purchase date to any RadioShack store RadioShack will at its option un less otherwise provided by law a correct the...

Reviews: