background image

15

Connecting Inputs

3. Repeat Steps 1–2 to connect the front

right speaker’s positive (+) and negative
(–) wires to the amplifier’s 

CH2 (+) 

and

CH2 (–) 

terminals.

4. Use a screwdriver to connect the sub-

woofer’s positive (+) wire to the ampli-
fier’s 

CH3 (+) 

or 

CH4 (+)

 terminal.

5. Repeat Step 4 to connect the sub-

woofer’s negative (–) wire to the ampli-
fier’s negative (–) terminal for the same
channel you connected in Step 4. For
example, if you connected the sub-
woofer’s positive (+) wire to the ampli-
fier’s 

CH3 (+)

 terminal, connect the

subwoofer’s negative (–) wire to the
amplifier’s 

CH3 (–)

 terminal.

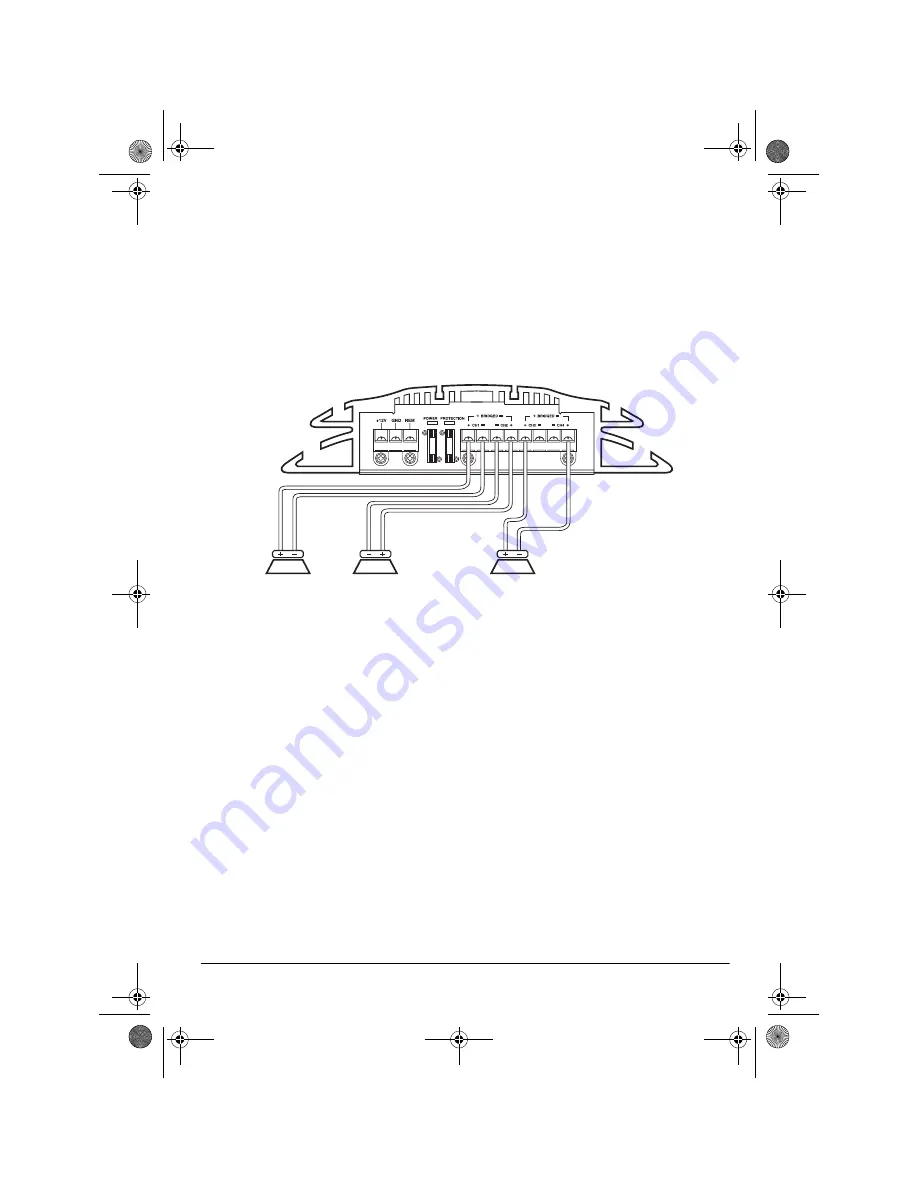
Connecting Two Unbridged Speakers and One Bridged Subwoofer

Note: 

CH4 (+) 

is used as a negative (–) termi-

nal for a bridged connection.

1. Use a screwdriver to connect the left

front speaker’s positive (+) wire to the
amplifier’s 

CH1 (+)

 terminal.

2. Use a screwdriver to connect the left

front speaker’s negative (–) wire to the
amplifier’s 

CH1 (–)

 terminal.

3. Repeat Steps 1–2 to connect the right

front speaker’s positive (+) and negative
(–) wires to the amplifier’s 

CH2 (+)

  and

CH2 (–)

 terminals.

4. Use a screwdriver to connect the sub-

woofer’s positive (+) wire to the ampli-
fier’s 

CH3 (+)

 terminal.

5. Repeat Step 4 to connect the sub-

woofer’s negative (–) wire to the ampli-
fier’s 

CH4 (+)

 terminal.

6. Make sure the 

BRG/ST

 switch on the

right side of the amplifier is set to 

ST

,

then set the 

BRG/ST

 switch on the left

side of the amplifier to 

BRG

.

 Subwoofer

CH2 Front 
Right Speaker

CH1 Front 
Left Speaker

12-2017.fm  Page 15  Tuesday, May 9, 2000  10:02 AM

Summary of Contents for XL-260

Page 1: ...Owner s Manual Please read before using this equipment XL 260 High Power 4 3 2 Channel Bridgeable Amplifier 12 2017 fm Page 1 Tuesday May 9 2000 10 02 AM...

Page 2: ...bridged Connection 13 Connecting Two Speakers Bridged Connection 14 Connecting Two Speakers and One Subwoofer Unbridged Connection 14 Connecting Two Unbridged Speakers and One Bridged Subwoofer 15 Com...

Page 3: ...nnels so you can use the amplifier with only two channels that produce a total of 130 watts from each chan nel Mute Turn On Circuit eliminates the thump you hear when you turn on some am plifiers Powe...

Page 4: ...e Which of the auto sound system s termi nals are low level outputs and which are high level speaker outputs Also be aware that installation in your vehi cle might require cutting or modifying your ve...

Page 5: ...uts Your speakers Then test the connections When you verify that everything works as expected discon nect the amplifier mount it in your vehicle and reconnect it Caution If you do not make the connect...

Page 6: ...to one pair of speakers and bridge the amplifier s outputs or 65 watts per channel if you connect your auto sound system to two pairs of speakers or one pair of speakers and a subwoofer Each speaker...

Page 7: ...em s switched power lead using one of the supplied twist on termi nal connectors This connection turns on the amplifier when you turn on the auto sound sys tem and turns off the amplifier when you tur...

Page 8: ...attery cable yet Connecting Inputs LOW LEVEL INPUTS You can connect your auto sound system s low level line out jacks to the amplifier s low level line in jacks If your auto sound system does not have...

Page 9: ...fier using either a floating or common ground connection If your auto sound system has two speaker outputs see Two Speaker Out puts on Page 11 to connect your sys tem s speaker outputs to the amplifi...

Page 10: ...en Black Violet Green Left Rear Speaker Right Rear Speaker Right Front Speaker Left Front Speaker Left Front Speaker Right Front Speaker Auto Sound System Gray Black White Black Gray White Right Rear...

Page 11: ...er Left Speaker Violet Black Green Black Violet Green Left Speaker Right Speaker Auto Sound System Gray Gray Black White Black White Right Speaker Left Speaker Violet Black Green Black Violet Green Au...

Page 12: ...p you correctly connect the speakers to your amplifier Color coded wires have a stripe running down one of the conductors or different colored insulation for each conductor Your local RadioShack store...

Page 13: ...the amplifier s CH3 CH3 CH4 and CH4 ter minals Connecting Two Speakers Unbridged Connection If you do not have high power speakers use this connection This connection produces 65 watts per channel 1 U...

Page 14: ...the ampli fier s CH2 terminal 3 Repeat Steps 1 2 to connect the right speaker s positive and negative wires to the amplifier s CH3 and CH4 terminals 4 Set both BRG ST switches on the left and right s...

Page 15: ...is used as a negative termi nal for a bridged connection 1 Use a screwdriver to connect the left front speaker s positive wire to the amplifier s CH1 terminal 2 Use a screwdriver to connect the left f...

Page 16: ...he auto sound system and amplifier and verify that everything is proper ly connected and working follow the instruc tions in Mounting the Amplifier MOUNTING THE AMPLIFIER Once you verify that the ampl...

Page 17: ...ng the supplied sheet metal screws and washers 6 Reconnect the wiring 7 Reconnect the cable to the vehicle bat tery s negative terminal 8 Reset your vehicle s clock your auto sound system s tuner memo...

Page 18: ...the level of the audio signals that enter the amplifier 1 Use a screwdriver to turn LEVEL MIN MAX on the left and right sides of the amplifier fully counterclockwise to MIN 2 Turn the auto sound syst...

Page 19: ...ed Subwoofer on Page 15 set X OVER FREQ ON OFF to ON then adjust X OVER FREQ for your particular vehicle s acoustics The amplifier passes through all frequencies at or below that setting 45 400 Hz Not...

Page 20: ...volume set to minimum Turn the auto sound system on or adjust its volume Amplifier s LEVEL MIN MAX controls set to minimum Adjust LEVEL MIN MAX Amplifier not connected to auto sound system vehicle co...

Page 21: ...cooled An output channel might have shorted Take the amplifier to your local RadioShack store The amplifier s PROTECTION indicator lights Amplifier not connected to auto sound system correctly Check...

Page 22: ...laced Caution Do not use a fuse with ratings other than those specified Doing so might damage your amplifier Replacing the SFE Type Fuse 1 Disconnect the cable from the vehicle s negative battery term...

Page 23: ...Ohms 1 kHz 10 THD Frequency Response 20 20 000 Hz 3 dB Power Supply Voltage 14 4 V DC Negative Ground Maximum Current Draw 40 A Dimensions HWD 2 5 8 101 4 141 2 Inches 6 0 26 37 cm Net Weight 7 0 lbs...

Page 24: ...ct during the warranty period take the product and the RadioShack sales receipt as proof of purchase date to any RadioShack store RadioShack will at its option un less otherwise provided by law a corr...

Reviews: