background image

10


www.xmodsRC.com

www.xmodsRC.com 

11

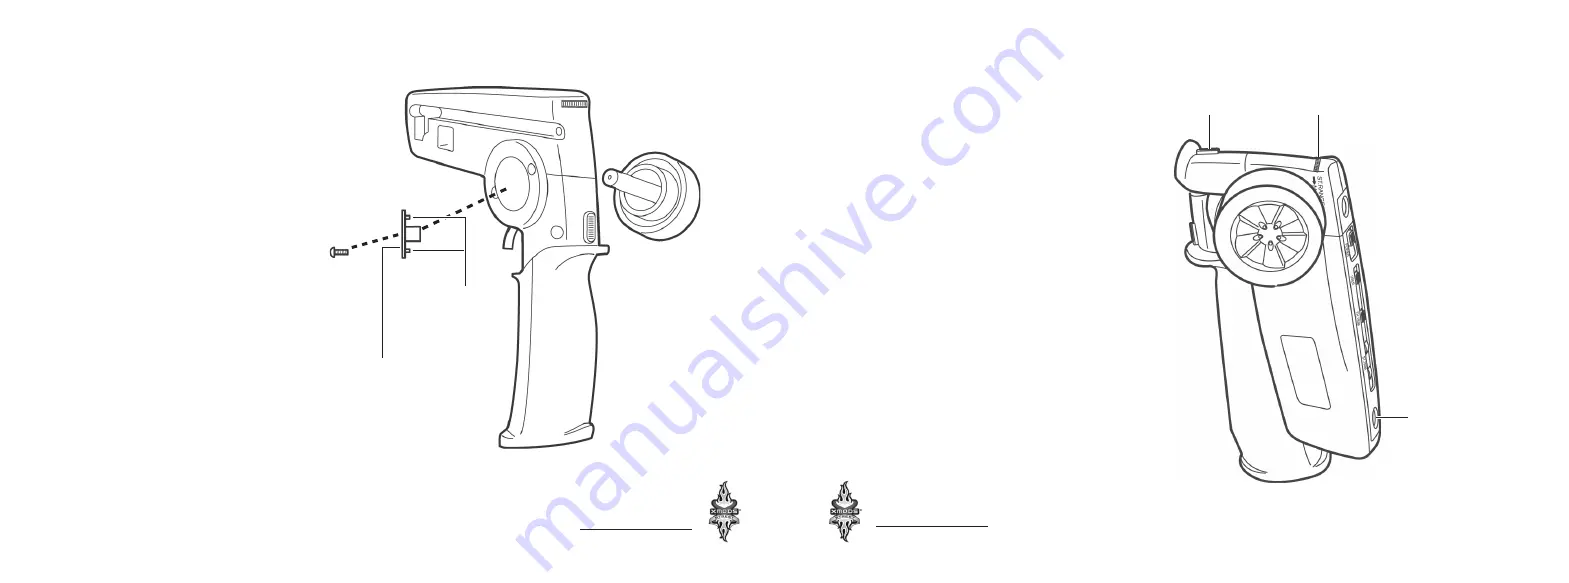
Changing the Steering Control for the Left Hand

1)  Unscrew the screw on the opposite 

side of the controller from the 
steering wheel.

2)  Pull out the steering wheel and 

insert it on the other side, keeping 
the widest channel on the shaft in 
the bottom position.

3)  Align the three tabs (two small, 

one larger) on the inside of the 
locking plate with the controller, 
and tighten the screw.

4)  Set 

USER

 on top of the controller 

to 

L

 for left-handed steering.

Preparing to Drive

  Unfold the controller until it clicks.

  Remove the antenna from the 

storage channel on the side of the 
controller. 

  

Thread your antenna into the 
antenna connector on top of the 
controller, and turn until snug.
Note:

 Fully extend the antenna before 

driving.

To store after use:

  Unscrew the antenna and place it 

back in the storage channel.

  Slide the 

Lock

 switch to fold the 

controller.

Tabs

Locking Plate

Lock Switch

Antenna Storage Channel 

(on opposite side)

Antenna 

Connector Hole

Summary of Contents for Xmods 60-391

Page 1: ...XMODS Street RC Starter Kit Thank you for purchasing your XMODS Street RC Starter Kit Please read this user s guide before installing setting up and using your new product User s Guide...

Page 2: ...ast generation and has some new features Your starter kit includes the following features A full set of factory parts to assemble your car Hard plastic storage case to protect and carry your XMODS A d...

Page 3: ...ently press the tire onto the chassis Using the supplied Lug Wrench screw the supplied wheel nut onto the axle and tighten gently Do not overtighten Repeat steps 1 3 for each wheel Controller with Ant...

Page 4: ...ce the screw from step 2 Pick up an optional battery charger kit with rechargeable AAA batteries at RadioShack Assembling the Car Antenna Remove the antenna screw on the right side of the chassis Thre...

Page 5: ...rmance 1 Make sure the power switch is in the OFF position 2 Place your finger in the battery compartment cover and slide in the direction shown until the cover unlatches 3 Place one 9V battery in the...

Page 6: ...ntroller and tighten the screw 4 Set USER on top of the controller to L for left handed steering Preparing to Drive Unfold the controller until it clicks Remove the antenna from the storage channel on...

Page 7: ...your car is not in motion Pull the trigger to move forward Push the trigger to drive in reverse While your car is in forward motion Push and release the trigger to brake Push the trigger twice to driv...

Page 8: ...ctronic parts Care Keep your XMODS car and controller dry if they get wet wipe them dry immediately Use and store only in normal temperature environments Running your XMODS continuously for long perio...

Page 9: ...lp keep the motors running at top efficiency This kit also includes pitch gears for various speed settings All Wheel Drive Upgrade 60 390 Increase the agility and handling of your XMODS car with this...

Page 10: ...radiate radio frequency energy and if not installed and used in accordance with the instructions may cause harmful interference to radio communications However there is no guarantee that interference...

Page 11: ...ke the product and the RadioShack sales receipt as proof of purchase date to any RadioShack store RadioShack will at its option un less otherwise provided by law a correct the defect by product repair...

Reviews: