© 2015 Radiodetection Ltd
36
Section 9 - Fault-finding
9.1 About fault-finding
RD8100PDL and PTL locators are capable of locating
cable to ground faults caused by damaged cable
sheaths and can also be used to locate damage to
insulation on pipelines. This process is known as Fault-
Finding and uses specific fault find signals applied to the
target.
Fault find signals can only be applied using Direct
Connection method.
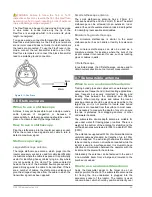
The A-frame accessory is used to locate cable sheath
faults on power and telecom cables or insulation faults
on pipelines. To use Fault-Find you will need the
following equipment:
RD8100 locator
Tx-5 or Tx-10 transmitter
Accessory A-frame with connecting lead
Direct connection lead and earth stake
There are 2 types of signals that can be used for fault
finding:
8K Fault Find
– useful for sheath faults on cables
but can also be used on pipelines over shorter
distances.
CD Fault Find (only available on Tx-10)
– this
low frequency signal is very useful on pipelines
and particularly useful on long distance
pipelines. CD can also be used for locating
sheath faults on cables.
9.2 Preparation
Using RD8100 standard locating techniques locate the
cable or pipe for a short distance and trace and mark its
route. Remove all earth bonds from the line to be traced
during the fault-finding survey. If there are any earth
bonds along the path the fault find signal may direct the
user to this location as this will be the preferred path for
the fault find signal to leak away into the ground and may
result in the fault not being located.
Connecting the transmitter
1 With the transmitter switched off connect the Direct
Connection lead into the transmitter accessory
socket
2 Clip the red connection lead to the cable, cable
sheath or pipe ensuring that the area around the
connection is clean and that a positive connection is
achieved
3 Extend the black connection lead as far away as
possible at 90° to the probable route of the target
cable and clip the connector to the ground stake
ensuring that a positive connection is achieved
NOTE: Always connect the black connection lead to a
ground stake and not a water pipe or buried cable, as
these may carry the signal.
Reference readings
It is good practice to obtain a reference reading from the
ground stake before you attempt to locate a fault on a
target line. Reference readings help to provide the
following information:
Severity of fault
Survey interval
Before taking the reference reading set up the
transmitter and locator as follow:
On the transmitter
:
1 Select a fault-finding frequency using the
key
2 Use the
or
keys to increase or decrease the
output signal level
3 If required you can use the BOOST setting if the fault
is located on a high resistance cable or if the cable
is long
WARNING! By selecting 8KFF the transmitter will
have the ability to output high voltages and a high
voltage warning icon will appear on the transmitter’s
LCD.
On the locator:
4 Connect one end of the connection lead to the A-
frame socket
5 Connect the other end to the locator accessory
socket
6 The locator will automatically recognize the A-frame
and display the A-frame icon on the LCD
7 Select a fault-finding frequency using the
key
NOTE: If the locator and transmitter are iLOC enabled
then you can remotely control the transmitter using the
locator. See Section 13 for more information.
Obtaining a reference reading:
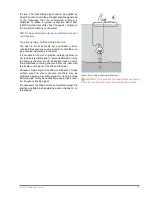
Position the locator approximately 2m (6 feet) from the
ground stake and push the A-frame spikes into the
ground with the green spike towards the ground stake
Attach the locator to the A-frame by the retention hook.
(If you are holding the locator separately, make sure that
the locator is in line with the A-frame and is pointing
towards the green spike.) The fault direction arrow

