background image

i

T8 PRO

Instruction manual

Version:1.0

Summary of Contents for T8 Pro

Page 1: ...i T8 PRO Instruction manual Version 1 0 ...

Page 2: ...ty and Repair Error Bookmark not defined 1 10 Firmware Update and OpenTX Information Error Bookmark not defined 1 11 Disclaimer 9 1 12 Legal status and copyright Error Bookmark not defined 2 OpenTX Companion software OpenTX companion 10 2 1 Software Download and Installation Error Bookmark not defined 2 2 Use Companion software to update radio firmware 13 3 First boot 16 3 1 Battery voltage calibr...

Page 3: ...26 4 4 3 Global Variables 29 4 4 4 Inputs 30 4 4 5 Mix control 33 4 4 6 Output 36 4 4 7 Curves 37 4 4 8 Logic switches 39 4 4 9 Special Functions 42 4 4 10 Custom Scripts 45 4 4 11 Digital Transmission and Telemetry 46 4 4 12 Customized Display 47 ...

Page 4: ...d with powerful motors and sharp propellers Use caution when working on or operating models When performing assembly or maintenance make sure that the model is powered off and the propellers are removed Do not operate the T8 Pro radio control system under the following conditions Under severe weather or strong wind conditions such as rain hail snow storm or harsh electromagnetic environmental cond...

Page 5: ... your T8 Pro radio control visit the OpenTX website https www open tx org 1 4 Important note on firmware The T8 Pro comes pre installed with the most stable firmware at time of manufacture Please only update firmware if you are experienced and confident in updating your system firmware update only the firmware intended for your radio Incorrect updates may render the radio control inoperable which ...

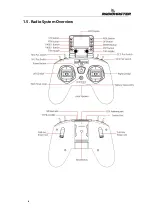
Page 6: ...6 1 5 Radio System Overview ...

Page 7: ...t the T8 Pro is charging Each LED indicates 20 charge when all 5 LEDs are illuminated the transmitter is fully charged When the transmitter needs recharging all 5 LEDs will flash please land your aircraft immediately and charge the transmitter battery Status LED indication Charge state The 5 LEDs signify 0 100 charge state with each representing 20 charge 20 40 60 80 100 Charging The LEDs will fla...

Page 8: ...v2 LBT Transmit power Maximum 20dbm Antenna gain 2db Effective distance 1km 22dbm Open sourced firmware OpenTX T8 Pro version DIY Multiprotocol TX Module RF Channels Maximum 8 Receiver dependent Display 128 64 Monochrome LCD removable Gimbal Potentiometer 1 9 Warranty and Repair If you experience any problems with your radio control hardware please keep proof of purchase and contact the retailer w...

Page 9: ...ght This project is free software you can redistribute and or modify it in accordance with the GNU General Public License Agreement V3 version agreement or optionally an updated version agreement issued by the International Free Software Association You should receive a copy of the GNU General Public License Agreement for the OpenTX project If not see www gnu org licenses OpenTX is open source fir...

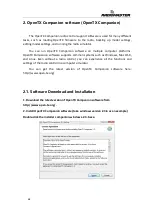
Page 10: ...panion software supports common systems such as Windows Mac OS X and Linux Even without a radio control you can experience all the functions and settings of the radio control in a computer simulator You can get the latest version of OpenTX Companion software here http www open tx org 2 1 Software Download and Installation 1 Download the latest version of OpenTX Companion software from http www ope...

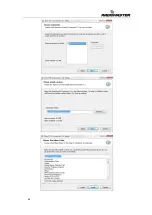
Page 11: ...11 ...

Page 12: ...12 At this point the OpenTX Companion software installation is complete Please continue to follow the instructions below to continue setting the software to match the RadioMaster T8 Pro radio controller ...

Page 13: ... understanding and ability to do so If you are required to update the firmware to for functional upgrades please carefully follow the instructions below Before updating the firmware make sure that all steps are correct and operate carefully to ensure that your radio control is successfully updated If not required please skip this section Before writing the firmware please make sure that the radio ...

Page 14: ...dig 2 4 exe and select Run as administrator B In the Zadig software select Options List All Devices to view the device list C Drop down list and find STM32 BOOTLOADER device D Click the Replace Driver button if the driver has been installed before Reinstall Driver will be displayed to replace install the driver After the driver installation is completed you can use OpenTX Companion to write the fi...

Page 15: ...15 At this point the firmware of the radio control is successfully written Unplug the USB C TYPE C and proceed to the first boot procedures ...

Page 16: ...ottle warning This is a warning that the throttle is not at the lowest position when the radio is turned on You can set the throttle stick to the lowest position or press any key to skip You can also turn off the throttle state option in the MODEL SETUP menu Throttle alarm Switch warning This is a warning that a switch on the radio control is not in the default position The default setting is that...

Page 17: ...ller firmware version this warning will appear The figure requires 2 3V0026 version the SD card content needs to be updated when upgrading the firmware First page Below is an example of the default first page of the system you can customize the display elements in the page as required ...

Page 18: ...the settings B Follow the text prompts at the top for calibration The first step prompts press the confirmation key to start C In the second step place all the gimbals knobs and side sliders in the middle position The system obtains the midpoint value and then press the confirmation key to continue to the next step D For the third step move all the gimbals knobs and side sliders of to their respec...

Page 19: ...19 and minimum values After all the above steps are completed press Enter key to complete the calibration and the system automatically returns to the previous page ...

Page 20: ...io control is AETR in the Default channel order option be sure to select the AETR order The Mode gimbal mode can be selected according to your personal preferences Mode 1 right hand throttle Common in Asian and some European markets or Mode 2 left hand throttle Common in North American markets The icons on the right from left to right indicate the names of the gimbals corresponding to the position...

Page 21: ...nterface can display the following information Model name TX voltage gimbal switch position and trim location Scroll to show the channel position values and channel monitor 4 1 1 Reset Statistics and About Press and hold the ENT key to show the Reset Statistics and About information The Reset menu allows for the reset of flight data timers and telemetry information ...

Page 22: ...rossfire Frsky specific receiver settings and Graupner s receiver HoTT protocol settings SD CARD SD card page In this page you can view the contents of the SD card and quickly set the startup screen model pictures and the function of flashing the built in external module firmware from firmware files loaded on to the SD Card RADIO SETUP The radio control setup page this page is the basic functions ...

Page 23: ...urrent model TRAINER Trainer aka Coach function page In this page you can set the control ratio of each channel from the student mode radio control in the coach mode and the intervention ratio of the radio control in the coach mode HARDWARE Hardware setting page In this page you can calibrate the gimbal and voltage set the name of the gimbal set the functions and names of switches and knobs and vi...

Page 24: ...urrent firmware 4 3 Model selection 4 3 1 Create model and model selection In the main interface press and hold the ENT key to show the menu Select to enter the model selection page which is used to select create switch delete and copy models Note The model currently in use cannot be deleted only models that are not in use can be deleted ...

Page 25: ...25 4 4 Model settings Model Setup 4 4 1 Model settings Model setup ...

Page 26: ...er speed proportional the throttle THR 100 Timer 1 second intervals THR 50 Timer 2 second interval Time Value Setting the timer to a value above 00 00 puts it into count down mode Name Name the timer Persistent Timer retains its value when the Tx is powered of and on or the model is changed Minute call Required SD card with sound pack installed At each minute the value spoken Countdown Countdown b...

Page 27: ... not match the following model settings the system will pop up a security warning page Display checklist Show checklist Throttle state Throttle status warning when the radio control is powered on or the model is loaded if the throttle stick is not at the lowest position a warning will be issued Switch positions Switch position check defines whether the radio control checks whether the switch is in...

Page 28: ...rnal Bluetooth module Master Multi 4in1 multi protocol module coach host mode This function needs to add an external 4in1 multi protocol module as coach input receiver RX mode 4 4 2 Flight Mode Flight Modes The flight mode allows you to set the corresponding fine tuning value for a specific mission or flight behavior This item is mainly used for fixed wing gliders to use different fine tuning valu...

Page 29: ...ons for conditional judgment or any other purpose Global Variables can be used as input or output real time adjustment parameters and can also be used as parameters in flight mode and curve definition Global variables can be used in any place where numerical values can be entered to achieve some automated control They are also specific flight modes which avoids having to use separate mixing lines ...

Page 30: ...ax Maximum value which can be limited when using dynamic change values FM0 FM8 You can specify a value for each flight mode or set it to be the same as the other flight modes Press and hold the ENT key to switch the input value and select the flight mode in this field When editing a value it will increment decrement by 1 or 0 1 depending on the Precision setting above 4 4 4 Input Source Inputs The...

Page 31: ...s and hold the ENT key to switch between upper and lower case Press the ENT key to switch to the next character Line name Because each entry can have multiple lines of configuration you can give each line a name to avoid confusion in the future Source Press and hold the ENT key to enter the input source selection menu Scroll up or down to the desired category and press ENT to select the correspond...

Page 32: ... operations below the midpoint are all fixed to the midpoint value of 0 X The opposite of the previous one f 0 Absolute values negative values less than the midpoint will always become positive values and the actual performance is a V shaped curve f 0 Below the midpoint 0 is fixed at midpoint 0 above the midpoint is fixed at 100 the actual performance is that the gimbal becomes 0 and 100 to switch...

Page 33: ...e You have complete flexibility in controlling the mixing from any input to any output channel A mix puts one input into one channel The inputs are configured in the Inputs page which defines any input type The mixing control page can also use other channels as the source of the current channel and output from the current channel after re mixing It can also mix one or more channels to another or m...

Page 34: ...ayed in a bold font making it easy to recognize the item currently in use at a glance The CH1 channel shown in the figure is input by the Ail gimbal and the three states of the SA switch are used to switch three stroke amounts To edit a mixing control use the scroll wheel to select the mixing control item up and down and press and hold the ENT key to enter the editing submenu Select Edit and press...

Page 35: ...o curve setting Increasing a positive value will make the gimbal smoother and smoother when approaching the midpoint while increasing a negative value will make the gimbal more acute when approaching the midpoint Func Preset function X 0 Positions above 0 midpoint follow the gimbal output operations below the midpoint are all fixed to the midpoint value of 0 X 0 The opposite of the previous one X ...

Page 36: ...e value of the previous line and output Multiply multiplication the current value is multiplied by the value of the previous line and output Replace direct replacement the value of the previous line is directly replaced by the value of this line The combination of these operations allows the creation of complex mathematical operations and is often considered one of the biggest benefits of using Op...

Page 37: ...es 4 4 7 Curves The curve can be used to modify the control response in the Inputs Mixes or Outputs page Standard curves containing Expo and Differential can be used directly in these sections This page is used to customize any kind of curve Can set up to 32 curves The curve can be between 2 and 17 points and can have a fixed or user definable x coordinate ...

Page 38: ...m 100 to 100 Count The number of points on the curve between 2 and 17 Smooth If checked create a smooth curve through all points When customizing move the cursor to X and Y coordinates and change the position of each coordinate point according to your needs Depending on the type selected above this allows writing the X coordinate of a standard curve or the X and Y coordinates of a custom curve Lon...

Page 39: ... has the same function as the physical switch You can define the corresponding function for L01 on or off In this way a switch is automatically executed according to the parameters that change in real time The radio control system provides 64 logic switches each of which has three judgment methods 1 Compare the values of parameters a and b a corresponds to V1 b corresponds to V2 a and b can be any...

Page 40: ...1 and v2 meets the conditions or when all the conditions are met XOR Exclusive OR operation triggered when one of the parameters v1 and v2 meets the conditions not triggered when all the conditions are met or all the conditions are not met Edge Is a momentary switch very short duration about 30 ms it will be triggered when V1 meets the conditions V1 Can be physical switch logic switch trim button ...

Page 41: ...comes positive a change from v1 to v or from v1 to trigger the current logic switch Timer The switch that automatically loops all the time V1 is the on time and v2 is the off time It can be defined by v1 and v2 to automatically cycle at constant intervals Sticky v1 can only switch on v2 can only switch off AND Switch With the arithmetic switch this item can set any physical switch and logic switch...

Page 42: ...ced custom functions Use the knob to adjust the volume Use the switch to adjust the backlight brightness In addition to a few of the commonly used methods listed above the ever changing features allow you to realize your imagination The three examples in the picture are represented as SF1 When the SF switch position is the CH3 channel will be covered by 100 Usually this setting is used to lock the...

Page 43: ... SH rebound switch this switch is used to activate or stop the operation of the student machine Inst Trim One touch saves the current gimbal position as a fine tuning value Reset Reset you can choose to reset all or reset one way individually The content of the reset option is the same as that in the main interface Set Time Used to set the timer set the timer time and turn on when the switch is tu...

Page 44: ...ll the specified script and the script file should be placed in the SCRIPTS FUNCTIONS folder of the SD card BgMusic Background music loop play wav files take effect immediately after power on BgMusic II Pause background music Vario Broadcast Vario value Haptic shock SD Logs Start recording logs save on SD card can set time interval 0 2 25 5 seconds Backlight To control the brightness of the backli...

Page 45: ...lled in Special Functions This script is only allowed to execute when the switch in the special function is turned on and closed when the switch is turned off There are some caveats if the script stops executing you should never use Lua model scripts to control any aspect of the model that might cause a crash The reason is that if the script tries to use too much CPU time or memory it will be clos...

Page 46: ...ength of the received signal The warning can be set to warn when it is below the minimum indicating that you are in danger beyond the flight range Factors affecting signal quality include external interference long distances poor steering or antenna damage etc It is not an absolute measurement but a number that represents the ratio of the signal to some initial good value The number is relative bu...

Page 47: ...display options are available here Num Values shown numerically each page shows up to 8 items Bar Values shown graphically each page shows up to 4 bar graphs Script Able to load third party display scripts or customized display scripts ...

Reviews: