background image

07

Ins

tallation

Oper

ation

Configur

ation

Tapacul

o 365

Maint

enanc

e

Cus
tomer Servic

Inf

ormation

HT

TP R
adionode 


Pr

ot

oc

ol V2

Or

der Lis

t

About this Manual

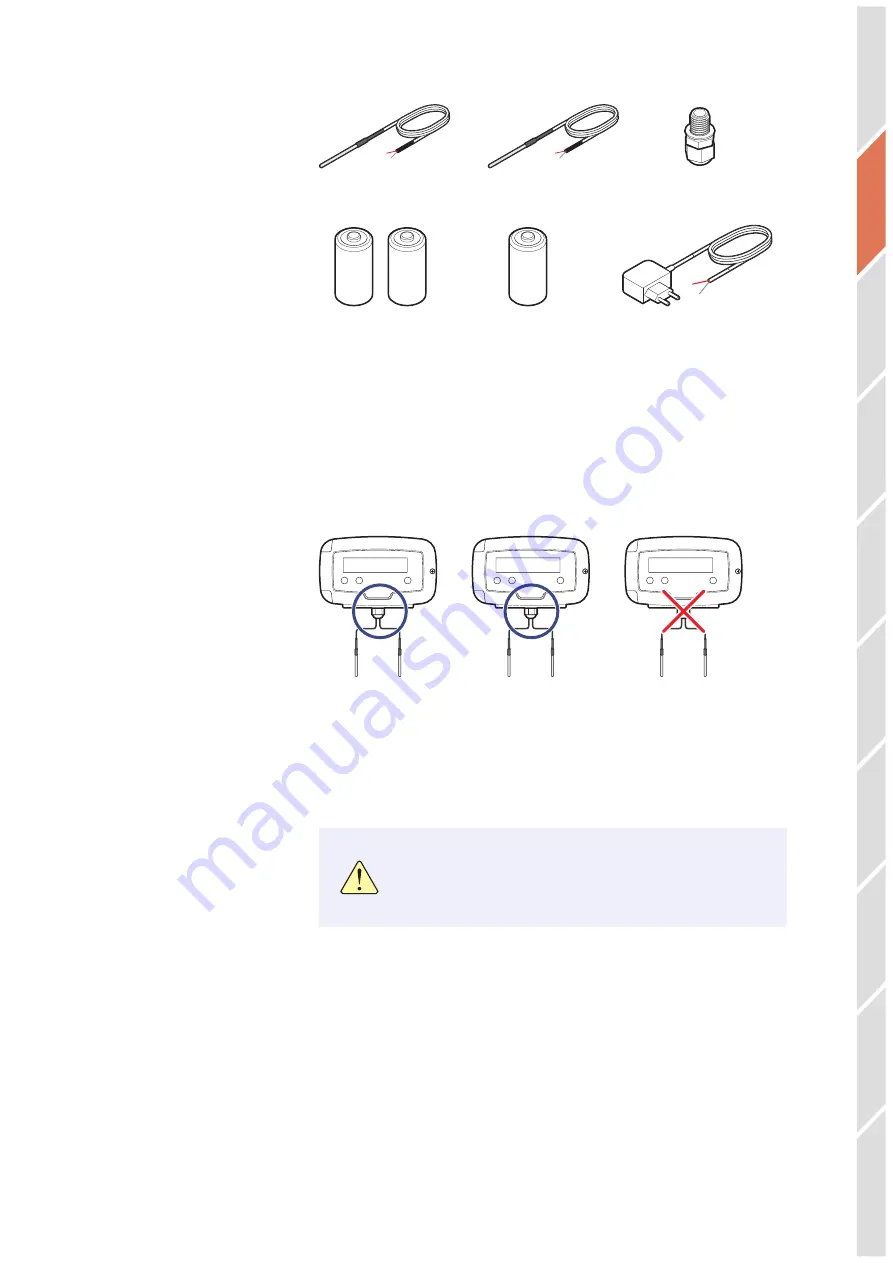
Accessories

All accessories, except for cable glands, are sold separately.

TC-K Temp Sensor

1.5 V Battery × 2

Cable Gland

3.6 V Battery

DC Adapter (12 V, 500 mA)

TC-T Temp Sensor

In the event of power failure, two C-type 1.5 V batteries or one 3.6 V 

battery must be placed in the Data Logger. RADIONODE Data Logger 

is designed to not operate without a battery, even when external 

power is connected.Use the same type of external temperature 

sensor for one device. Type K Thermocouple (TC-K) and Type T 

Thermocouple (TC-T) Sensor cannot be used together.

S

W

POWER

ON/OFF

5$,

5$,

S

W

POWER

ON/OFF

5$5

5$5

S

W

POWER

ON/OFF

5$,

5$5

In the event of power failure, two C-type 1.5 V batteries or one 3.6 V 

battery must be placed in the Data Logger. RADIONODE Data Logger 

is designed to not operate without a battery, even when external 

power is connected.

Only use Energizer

®

 batteries. The Data Logger’s power 

consumption varies significantly depending on operation 
functions. Only Energizer batteries can keep performance 
stable despite extreme battery usage fluctuations.

Intr
oduction

Summary of Contents for RN400-T2TS

Page 1: ...User Manual IoT Temp Data Logger RN400 T2TS Keep this document nearby so that it may be referred to when needed 2021 Rev 1 ...

Page 2: ...y Features 05 Exterior 06 Accessories 07 Specifications 08 Installation 09 Terminal Block 10 Data Logger Installation 11 Connecting Terminal Block 13 Operation 17 Viewing Channel Information 18 Viewing Device Information 19 Resetting Data Logger 20 Memory Card for Data Logging 21 Configuration 22 Device Information 24 Server 25 Measurement 26 Wi Fi Network 28 Display 31 Commands 31 Memory Card Usa...

Page 3: ...apaculo 365 34 Adding Devices from Your Smartphone 35 Adding Devices from Your Computer 38 Maintenance 41 Cleaning 41 Batteries 41 Firmware Update 42 Customer Service Information 43 Manufacturer Contact Information 43 Warranty 43 Limit of Liability 43 Certifications 44 HTTP Radionode Protocol V2 45 Check in 45 Data in 48 Order List 49 Data Logger 49 Accessories 50 ...

Page 4: ...er from your system depending on installation conditions Software screenshots may change after software updates Intellectual Property Rights 2021 DEKIST Co Ltd All contents and figures herein are property of DEKIST Co Ltd Reproduction or redistribution of all or part of this document in any way is not permitted without prior consent from DEKIST Notational Conventions Failure to follow instructions...

Page 5: ...l 1 External Temp sensor Channel 2 External Temp sensor Channel 3 External Temp Sensor Channel4 External Temp sensor Key Features Key features of the RN400 T2TS include S W POWER ON OF F 5BQBDVMPm Data Logger can be used with additional temp sensors Use Wi Fi connection to easily configure your Data Logger Built in buzzer that activates alarm when measurement is outside the margin of error Measure...

Page 6: ... List About this Manual Exterior S W POWER ON OFF 2 3 4 1 5 Display Power button Menu button Cable gland Display button Power cables and cables of other devices such as external sensors are connected via cable glands to the internal terminal block For instructions on how to use the buttons see Operation on page 17 Introduction ...

Page 7: ... even when external power is connected Use the same type of external temperature sensor for one device Type K Thermocouple TC K and Type T Thermocouple TC T Sensor cannot be used together S W POWER ON OFF 5 5 S W POWER ON OFF 5 5 5 5 S W POWER ON OFF 5 5 5 In the event of power failure two C type 1 5 V batteries or one 3 6 V battery must be placed in the Data Logger RADIONODE Data Logger is design...

Page 8: ... T N S E B R Ch 2 TC K J T N S E B R Ch 3 TC K J T N S E B R Ch 4 TC K J T N S E B R Communication 2 4 GHz IEEE 802 11 b g n WPA2 Enterprise HTTP Get Post RS485 MODBUS RTU Cable Gland PG 9 Water Resistance Rating IP65 IP67 is optional External DC power 5 30 V Size 165 50 115mm Operating conditions 20 60 C 0 95 RH non condensed Note that the performance of the external temperature sensor separately...

Page 9: ...out this Manual Specifications TC K Temp Sensor M Range 20 300 C accuracy 0 8 C Cable 3 m or 15 m Size 55 mm 3 0 TC T Temp Sensor M Range 100 200 C accuracy 0 8 C Cable 3 m or 15 m Size 55 mm 3 0 Note that the performance of the external temperature sensor separately may differ from when it is connected to the Data Logger Introduction ...

Page 10: ...o configure the Data Logger See Configuration on page 22 4 Now that the Data Logger has been installed it must be registered to Tapaculo 365 See Tapaculo 365 on page 34 Depending on your installation circumstances and conditions your installation process may vary For example if you are installing multiple Data Loggers you might find it easier to 1 Insert batteries into all Data Loggers before runn...

Page 11: ...ot FPC FFC Connection RS485 OUTPUT Battery Holder USB for Calibration DC POWER 5 30V OLED Connection 4 20mA INPUT Select Battery Type Micro SD card is used to log measurement data See Memory Card for Data Logging on page 21 The micro USB port is used for sensor calibration As RN400 Series sensors are shipped after calibration no further calibration is required However if the sensor malfunctions co...

Page 12: ...installing a Data Logger is as follows 1 Loosen the screw on the right side of the front panel and open the front panel S W PO WER ON O FF 2 Loosen the cable gland 3 Route the cables of the device that will be connected through the gland and connect to the terminal block Then connect external DC power and insert the battery For more information on terminal block connection see Connecting Terminal ...

Page 13: ...2 Order List About this Manual Installation 4 Tighten the gland firmly 5 Cover the front panel and tighten the screws S W PO WER ON O FF 6 There Data Logger is equipped with a magnet at the rear Place the Data Logger on a steel panel If necessary use screws to secure There are three screw holes on the back of the device ...

Page 14: ...ting cables to the terminal block ensure that the flat cable does not get disconnected from the front connector Cable Gland If Data Logger cable gland cannot sufficiently receive all cables install additional cable glands There are two more gland slots at the bottom of the Data Logger 1 Loosen and remove the cap bolt from the left or right gland slot 2 Insert the cable gland into the nut and tight...

Page 15: ... the A terminal and the remaining cables to the B terminal POWER 5 30V RS485 TEMP 1CH TEMP 1CH TEMP 1CH TEMP 1CH K T J E Install the external temperature sensor away from the wall and the floor The sensor may not touch anything other than the ambient air DC Power Connect the Power cable to the POWER terminal Connect the red cable to the terminal and the remaining cables to the terminal A B TEMP CH...

Page 16: ...t this Manual Installation Batteries Insert two C type 1 5 V batteries into the battery holder or one 3 6 V battery into the left hand battery holder Be careful not to connect batteries with opposite polarities Doing so may damage the device If you are using a 3 6 V battery move the BAT jumper to the B position A BAT 1 5V x 2 3 6V x 1 B ...

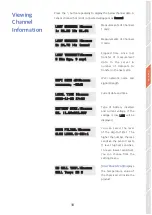
Page 17: ...eep mode S W POWER ON OFF Viewing Channel Information To view channel information including measurements on sleep mode press the button Press the button repeatedly to display different status information Selecting a Menu Press the button then press the button Press the button repeatedly to display different menu items Press the button to open the displayed menu Press the button to exit the menu Tu...

Page 18: ...ID dB S menu WIFI SSID dB S menu xxxxxxxx 50dB xxxxxxxx 50dB Wi Fi network name and signal strength LOCAL TIME S menu LOCAL TIME S menu 2020 11 30 17 00 2020 11 30 17 00 Current date and time BATTERY STAT S menu BATTERY STAT S menu OK 1 5Vx2 2 88V OK 1 5Vx2 2 88V Type of battery inserted and current voltage If the voltage is low LOW LOW will be displayed DATA FILTER S menu DATA FILTER S menu SLOW ...

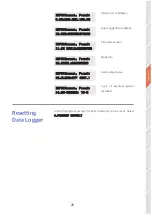
Page 19: ...er fails datasets accumulate until successful INFO S next P exit INFO S next P exit 2 POWER External DC 2 POWER External DC If no external power is connected or power failure occurs Bat Bat will appear INFO S next P exit INFO S next P exit 3 SENSING 1 Min 3 SENSING 1 Min Measurement interval INFO S next P exit INFO S next P exit 4 SENDING 5 Min 4 SENDING 5 Min M e a s u r e m e n t d a t a transmi...

Page 20: ...16FA1B3 Data Logger MAC address INFO S next P exit INFO S next P exit 11 SW BUILD 20200720 11 SW BUILD 20200720 Firmware version INFO S next P exit INFO S next P exit 12 MODEL RN400T2TS 12 MODEL RN400T2TS Model No INFO S next P exit INFO S next P exit 13 ALARM OFF BAT 13 ALARM OFF BAT Alarm relay status INFO S next P exit INFO S next P exit 14 EX SENSOR TC K 14 EX SENSOR TC K Type of external sens...

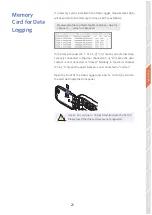
Page 21: ...urement date timestamp Mac address value for Channel 1 value for Channel 4 In the temp channel Ch 1 or Ch 2 n a means no external temp sensor is connected In the door channel Ch 3 0 means the door contact is not connected or closed Similarly in the alarm channel Ch 4 0 means the alarm beacon is not connected or normal Open the front of the Data Logger and insert a micro SD card into the card slot ...

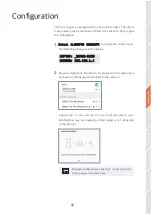
Page 22: ...ation 1 Select 2 CONFIG MODE AP Select 2 CONFIG MODE AP to enable the virtual router The following will appear in the display SOFTAP _RN400 A1B3 SOFTAP _RN400 A1B3 ACCESS 192 168 1 1 ACCESS 192 168 1 1 2 On your smartphone find the Wi Fi network with the same name as shown on the display and connect to the network Depending on the version of your Android phone user identification may be required a...

Page 23: ...formation HTTP Radionode Protocol V2 Order List About this Manual Configuration 3 Open your smartphone s web browser and type 192 168 1 1 192 168 1 1 in the address bar The Settings page wiill appear 4 Change the settings on each page then tap Save 5 To finish configuration tap Reboot ...

Page 24: ...o365 Owner Tapaculo 365 account ID Mac ADDRESS Data Logger MAC address Model Name Data Logger model number Firmware version Firmware version OTA Release Version OTA Release Version SDCARD Inserted If a memory card is not inserted No SDCard will appear WIFI SSID The Wi Fi network used by the Data Logger IP Address Data Logger IP Address Gateway Address The gateway IP address to which the Data Logge...

Page 25: ...gger to operate Data Logger independently without a server Host Server IP address Port Server port number Checkin URL URL of the server program that processes check in requests Datain URL URL of the server program that processes data in requests For check in and data in request formats see HTTP Radionode Protocol V2 on page 45 This item will appear if Destination is set to SDCard Logger SD Card Da...

Page 26: ...1Min Sending 5Min is selected sensor measures every 1 minute and measurement data is sent to the server every 5 minutes or written on a memory card Temperature Scale Select the unit of measurement to use when measuring temperature External Temperature Probe Type Select the type of external temperature sensor installed Temp Enter the calibration value to add to the temperature RH Enter the calibrat...

Page 27: ...the lower the sensitivity CH info Displays a list of I O channels Target Channel Select the input channel that will trigger the alarm relay and specify the normal range For example if you select CH1 Temp and the normal range is set to 20 25 the alarm relay will turn on when the temperature measured by Channel 1 s temp sensor is lower than 20 degrees or higher than 25 degrees Buzzer When BUZZER SOU...

Page 28: ...closer the signal strength is to 0 dBM the stronger the connection If possible use a Wi Fi network with a signal strength of 70 dBm or higher SSID The selected SSD will appear Security Type Select the type of security that your Wi Fi network uses Personal Security Type If Security Type is set to Personal select the current security type Security KEY PIN Enter your Wi Fi password DHCP Static Auto M...

Page 29: ...rvice Information HTTP Radionode Protocol V2 Order List About this Manual Configuration If a static IP address is needed select Static and configure additional settings as follows IP Data Logger IP Address Gateway Gateway IP address Subnet Subnet mask DNS DNS server IP address ...

Page 30: ...he RADIUS server access to the network is granted To connect to a network that uses enterprise security adhere to the following procedure 1 Copy the RADIUS server certificate to a micro SD card with the following path and filename cert ca pem cert ca pem Ask your network administrator for a certificate in a PEM format Certificates in other formats are not supported 2 On the WIFI NETWORK SETUP page...

Page 31: ...on Timezone Select which timezone to use Copy Now See Memory Card Usage Configuration on page 32 Debug Code Enter a command to perform a specific function See the following section for a detailed explanation Commands On the DISPLAY OTHERS page the following commands can be entered in Debug Code Enter a command in uppercase then tap Execute ATVMAC ATVMAC xxxx0000xxxx xxxx0000xxxx Enter the address ...

Page 32: ... into the Data Logger b On the DISPLAY OTHERS page tap Copy to SD Card Copy Now c Remove the SD card 2 Copy the setup data from the SD card to another Data Logger a Insert the SD card into the Data Logger b Use the button to turn the Data Logger off c Press both the and buttons simultaneously and hold the button to turn the Data Logger on S W PO WER ON O FF If NEW CONFIG FILE IS LOADED NEW CONFIG ...

Page 33: ... 1 From the Data Logger select 3 USB CALIBRATION 3 USB CALIBRATION 2 Connect the Data Logger to your computer using a USB cable 3 Run UA Calibrator on your computer When the Data Logger is successfully recognized the following will appear on the monitor 4 Change Modbus settings accordingly 5 Press the button to finish From the Data Logger select 6 CHECK SYSTEM 6 CHECK SYSTEM to ensure that data ar...

Page 34: ...ines how to add new devices and channels to Tapaculo 365 For more information on Tapaculo 365 see the information provided on the web page below https help radionode365 com article categories https help radionode365 com article categories tp365 manual tp365 manual Key features of Tapaculo 365 include Measurement data displayed in real time View measurement data records via charts Create and email ...

Page 35: ...QR code allows you to easily add devices and channels to your smartphone Scan the QR code with your smartphone Alternatively copy the link address from the QR code image and send it to your smartphone 1 Your smartphone s default web browser will open with your user information Tap Add Device When the RN400 Series Data Logger first connects to Tapaculo 365 its identification code i code is displaye...

Page 36: ...TP Radionode Protocol V2 Order List About this Manual Tapaculo 365 2 Enter the i code on the device display If you do not see an i code on the display tap Search by MAC address and enter your MAC address 3 If the i code or MAC address is correct the device information will appear as below Tap Next ...

Page 37: ...Maintenance Customer Service Information HTTP Radionode Protocol V2 Order List About this Manual Tapaculo 365 4 Enter your device name check the box of the channel that will be used then enter the channel name and unit that will be used Tap Next to finish ...

Page 38: ...re If you do not see your device in the list you can add it using its i code When RN400 Series first connects to Tapaculo 365 its i code is displayed as follows Enter iCode on TP365 Enter iCode on TP365 iCode 2024 iCode 2024 Enter the i code above the device list and click Search Devices can also be searched via MAC address instead of their i code The device will be then be added to the list To ad...

Page 39: ...etup New Data Channel All added device channels will be listed This list also includes channels not associated with external sensors or other devices Adding a channel essentially means selecting a channel to monitor To add a channel click the Add Channel button in the last column Enter the channel name in the window select enter a unit to use then click Save To view the list of added channels clic...

Page 40: ... Information HTTP Radionode Protocol V2 Order List About this Manual Tapaculo 365 Adding Widgets A widget contains one or several channels You can add a widget to the dashboard by clicking Dashboard then Add widget Enter the widget name in the window select channels then click Save ...

Page 41: ...or abrasives Not only do these substances damage the surface of the Data Logger but they may also affect sensor performance Batteries Replace the battery when the battery status on the Tapaculo 365 web page is Bad or if it appears as follows WARNING S menu WARNING S menu Low Battery Low Battery When the measurement interval and transfer interval are set to the lowest frequency the battery is expec...

Page 42: ...are file to a micro SD card to the following path and insert it into Data Logger The file name is the same as the model number img T2TS bin img T2TS bin 2 Insert a micro SD card into the Data Logger 3 Use the button to turn the Data Logger off 4 Press both the and buttons simultaneously and hold the button to turn the Data Logger on S W PO WER ON O FF If NEW IMAGE FILE IS LOADED NEW IMAGE FILE IS ...

Page 43: ...conditions within one year of the product installation date Limit of Liability Warranty repairs are not provided in the event of Failure caused by unapproved installation methods Failure caused by user negligence Failure caused after alteration disassembly or repair of the product by a person unauthorized by DEKIST Failure caused by corrosion falling submersion or other improper storage methods Fa...

Page 44: ...o frequency energy and if not installed and used in accordance with the instruction manual may cause harmful interference to radio communications Operation of this equipment in a residential area is likely to cause harmful interference in which case the user will be required to correct the interference at his own expense Changes or modifications not expressly approved by the manufacturer responsib...

Page 45: ...sts The radionode device requests transmission of device information from the server at the start of operation and every six hours thereafter This request is called check in The device requests transmission of measurement data from the server at the set time This request is called data in Check in Check in requests are in the following format POST HTTP 1 1 POST HTTP 1 1 Host 192 168 10 1 checkin H...

Page 46: ...fo This parameter is separated by vertical lines and indicates the nature of each channel tags TEMP RH NTC_TEMP NULL NULL NULL tags TEMP RH NTC_TEMP NULL NULL NULL In this example there are a total of six channels with Channel 1 indicating temperature Channel 2 indicating RH and Channel 3 indicating the temperature measured by NTC external temperature sensor The remaining channels are not associat...

Page 47: ...ch1 Calibration Value of Channel 1 offset ch2 offset ch2 Calibration Value of Channel 2 sample mode sample mode Measurement and Transfer Intervals If this tag s value is 3 the measurement interval changes to 5 minutes and the transfer interval to 20 minutes See the following table 1 2 3 4 5 6 7 8 9 10 11 12 13 Measurement interval 1 m 1 m 5 m 5 m 10 m 10 m 10 m 10 m 20 m 30 m 10 s 10 s 10 s Transf...

Page 48: ...1542 23 19 12 40 121 96 123 P001 1505910942 23 18 12 52 122 04 123 P001 1505910942 23 18 12 52 122 04 123 mac mac MAC address of the device sig sig Strength of wireless signal bat bat Battery status The value ranges from 0 to 255 The battery must be replaced when the value is 5 or less 1 is displayed when DC power is connected volt volt Battery type and current voltage 0 indicates two 1 5 V batter...

Page 49: ...tible External Sensors Temp RH RN400 H2PS PR P1 3 PR P1 15 PR K1 3 PR K1 15 Temp RH Door RN400 H2EX PR P1 3 PR P1 15 PR K1 3 PR K1 15 AP D1 AP W1 Temp RN400 T2TS PR N1 20 PR N1 150 RG20 Temp Door RN400 T2EX PR P1 3 PR P1 15 PR K1 3 PR K1 15 PR T1 3 PR T1 15 AP D1 AP W1 Temp RN400 T2TS PR K1 3 PR K1 15 PR T1 3 PR T1 15 4 20mA RN400 T2CS Gas RN400 T2GS RG10 NH3 RG10 H2S PM2 5 Particulate matter RN40...

Page 50: ...T100 PR P1 3 3 m PT100 PR P1 15 15 m Type K Thermocouple TC K PR K1 3 3 m Type K Thermocouple TC K PR K1 15 15 m Type T Thermocouple TC T PR T1 3 3 m Type T Thermocouple TC T PR T1 15 15 m NTC PR N1 20 20 cm NTC PR N1 150 150 cm Temp RH RG20 Gas Sensor Type Model No Cable Ammonia RG10 NH3 Hydrogen Sulfide RG10 H2S Misc Type Model No Cable Door Contact AP D1 1 m Alarm Beacon AP W1 25 cm DC Adapter ...

Page 51: ...Telephone 1566 4359 Fax 82 31 8039 4400 Email master dekist com A1801 13 Heungdeok 1 ro Giheung gu Yongin si Gyeonggi do Korea 16954 ⓒ 2021 DEKIST Co Ltd ...

Reviews: