Service
18
6200
plus
Series
Service Manual
Drives and Media (continued)
3½” Drives
The media drawer contains a removable bay for 3½” drives. The following media can
be installed in this bay:
•
One (1) user-accessible 3½” x 1” drive, typically a floppy disk drive
•
Two (2) 3½” x 1” drives, or one (1) 3½” x 1.6” drive
The procedure for removing the 3½” drive bay and installing drives is outlined in the
following table (
Figure 11
and
Figure 12
):
5¼” Drives
The media drawer contains two (2) 5¼” drive bays. Two (2) user-accessible 5¼” x 1.72”
drives can be installed in each bay.
The procedure for installing 5¼” drives is outlined in the following table (
Figure 12
):
Step
Action
1
Remove the four (4) nuts securing the 3½” drive bay in the media drawer.
Note:
Two (2) nuts secure the bay to the front panel of the media drawer, and
two (2) nuts secure the bay to the floor of the media drawer.
2
Slide the 3½” drive bay approximately ¼” (6.35 mm) away from the front panel
of the media drawer. This will free the bay from the posts on the front panel.
3
Lift the 3½” drive bay from the posts on the floor of the media drawer.
4
Install drives in the bay.
Note:
Orient the controller and power connectors for each drive toward the
rear of the media drawer (the
interior
of the chassis).
5
Attach controller and power cables to each drive.
6
Replace the 3½” drive bay.
Note:
If 5¼” drives are to be installed, do not replace the 3½” drive bay.
Step
Action
1
Remove the 3½” drive bay to access the mounting holes in the 5¼” drive bays.
2
Remove the blank panel from the drive bay (if required).
4
Install drives in the bay.
Note:
Orient the controller and power connectors for each drive toward the
rear of the media drawer (the
interior
of the chassis).
5
Attach controller and power cables to each drive.
6
Replace the 3½” drive bay.
Consult the instructions provided by the manufacturer of the drive for proper
configuration and cable connections.
If a 5¼” drive is not used, a blank panel should be installed to close the
access opening in the media drawer.
Summary of Contents for 6200plus Series
Page 17: ...Service Service Manual 6200plus Series 9 Figure 4 Removing the Top Cover ...
Page 25: ...Service Service Manual 6200plus Series 17 Figure 10 Removing the Media Drawer ...
Page 27: ...Service Service Manual 6200plus Series 19 Figure 11 Removing the 3 Drive Bay ...
Page 28: ...Service 20 6200plus Series Service Manual Figure 12 Installing Drives ...
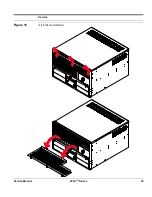
Page 33: ...Service Service Manual 6200plus Series 25 Figure 16 Air Filter Installation ...
Page 40: ...Service 32 6200plus Series Service Manual Notes ...


