Page 8 of 22
IN052 Rev. K 0613
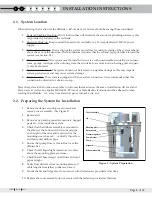
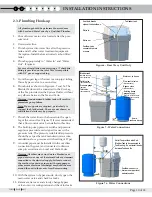
2.2. Preparing the System for Installation
1.
Remove fasteners securing cover to tank and
remove cover assembly. (See Figure 3)
2.
Remove lid
3.
Remove any packing materials, manuals, bagged
parts etc., from inside the system.
4.
Check that the diffuser assembly is mounted in
the elbow at the bottom of the front most pipe
on the right of the tank and is secured via the
mounting screw located vertically thru elbow
and horizontal diffuser pipe.
5.
Ensure that pump float, is free to float over the
diffuser bar.
6.
Check that all liquid tight connectors on cables
above the mounting plate are secure.
7.
Check that all hose clamps on all floats and vent
pipe are tight.
8.
Verify float distances from mounting plate and
cable lengths from tether to float are correct.
9.
Mount the lid and lid gasket, do not secure with the fasteners provided at this time.
10.
Replace the cover assembly, do not secure with the fasteners provided at this time.
2.1. System Location
When selecting the location for the AIRaider
™
EZ
95
System, six factors should be among those considered:
1.
System Plumbing Hook-up. Find a location that will minimize the amount of plumbing necessary, this
is typically in proximity to the well tank.
2.
Electrical Hook-up. Keep in mind the need for accessibility to a 20 Amp dedicated 120VAC power
supply.
3.
Exhaust Line Venting. The location of the system must allow for outside venting of the system exhaust
above the eave of the structure. The Manufacturer requires that the exhaust pipe pitch-back toward the
system (see Section 2.5).
4.
Remote Air Intake. If the system must be installed in an area with questionable air quality (i.e. furnace
room, garage, crawlspace) then ducting from the air intake to a remote location having good air quali-
ty may be required.
5.
System must be Level. The system should not be located on a significant slope as this may impede
system performance and may cause system damage.
6.
Drain Location. The system is equipped with an overflow connection, it is recommended that this
connection be directed to a drain or sump.
Place the system in the location acceptable to customer that maximizes the ease of installation. All Local and
State codes as well as any applicable AARST, EPA and/or State Radon standards must be adhered to when
locating the AIRaider
™
(i.e. away from electrical panel, furnace, exits, etc.).
INSTALLATION INSTRUCTIONS
1
2
Cover assembly
Lid
Mounting plate
Spray nozzle
Pressure regulator
Pump bracket
Pump
Airguard
Diffuser assembly
Figure 3 - System Preparation


