background image

Page 6 of 8 


                          IN006 Rev G 

 
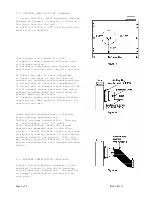
2.2  OUTDOOR (BAND JOIST OR SIDEWALL) 
 
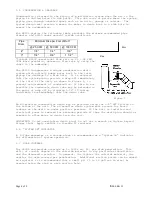
1) Locate site for  GP500 mounting. Use the 
diagram in Figure 4 to assist in locating 
the inlet hole for the unit. 
2) Drill a 5.25" or 5.50" hole through the 
band joist or sidewall. 


(Use Figure 5 as a Guide for 3-6): 
3) Apply a liberal bead of silicone caulk 
to the sealing ring. 
4) Carefully feed power cord through hole 
and install the unit into the hole drilled. 
  
5) Insure the unit is level and plumb. 
6) Insure the inlet of the fan does not 
contact any building surface when mounting 
to avoid noise or vibration transmission. 
7) Secure unit to sidewall with four (4) #6 
x 2.0" drywall screws provided. Use nylon 
washers provided under the screw heads to 
prevent marring the finish. 
8) Complete piping run, providing flexible 
couplings or other means of disconnect for 
servicing the unit. 


Under certain circumstances, a flexible 
pipe coupling, RadonAway p/n  
79019-1, may ease installation.  This may 
be  particularly  true  of  gable 
side  installations  where the system 
piping runs perpendicular to the floor 
joists.  Install the pipe coupling as shown 
in Figure 6, making certain to avoid sharp 
bends or kinks in the piping.  (TIP: You 
may connect the pipe coupling to the GP500 
before installing the unit through the band 
joist.) 


2.3  MUFFLER INSTALLATION (Optional) 
 
Install the vent muffler assembly in the 
selected location in the outlet ducting.  
Solvent weld all connections.  The muffler 
is normally installed at the end of the 
vent pipe. 

Summary of Contents for GP500

Page 1: ...Page 1 of 8 IN006 Rev G ...

Page 2: ...tion of this device may affect the combustion airflow needed for safe operation of fuel burning equipment Check for possible backdraft conditions on all combustion devices after installation 5 NOTICE There are no user serviceable parts located inside the fan unit Do NOT attempt to open Return unit to the factory for service 6 All wiring must be performed in accordance with the National Fire Protec...

Page 3: ...re the temperature is never less than 32 degrees F or more than 100 degrees F When the unit is turned off for extended periods of time the drain plug should be removed from the bottom of the unit 1 3 ACOUSTICS The GP500 when installed properly operates with little or no noticeable noise to the building occupants Insure a solid mounting for the GP500 to avoid structure borne vibration or noise The ...

Page 4: ... possible the condensate drain tube may be extended to the point of drop off by slipping 5 16 ID tubing available from RadonAway over the drain tube Figure 1 An alternative condensation drain may be provided using the 3 8 NPT fitting on the bottom of the unit The alternative drain system must account for Radon leakage as the drain is under positive pressure If the unit is installed and electrical ...

Page 5: ...TALLATION 2 1 A C POWER CONNECTION The GP500 requires an 18 gauge 3 wire SJ power cord RadonAway p n 27003 or equivalent For proper seal the cord diameter should be 5 16 To install 1 Prepare the power cord by stripping jacket and insulation as shown in Figure 2 2 Loosen sealing nut on electrical inlet by turning counterclockwise 3 Insert power cord and route as shown in Figure 3 4 Fasten power cor...

Page 6: ...crews provided Use nylon washers provided under the screw heads to prevent marring the finish 8 Complete piping run providing flexible couplings or other means of disconnect for servicing the unit Under certain circumstances a flexible pipe coupling RadonAway p n 79019 1 may ease installation This may be particularly true of gable side installations where the system piping runs perpendicular to th...

Page 7: ... following chart shows fan performance for the GP500 Typical CFM vs Static Suction WC 1 0 1 5 2 0 2 5 3 0 3 5 4 0 GP500 88 80 74 65 54 28 14 Power 70 130 watts varies with actual load conditions 115 VAC Inlet Outlet 3 PVC Mounting Brackets for vertical mount on bandjoist or sidewall 16 Mounting Centers Outdoor installations GP500 mounts flush to wall projecting only 4 with inlet duct passing throu...

Page 8: ... This Warranty is contingent on installation of the Fan in accordance with the instructions provided This Warranty does not apply where any repairs or alterations have been made or attempted by others or if the unit has been abused or misused Warranty does not include damage in shipment unless the damage is due to the negligence of RadonAway RadonAway is not responsible for installation removal or...

Reviews: