background image

- 62 - 


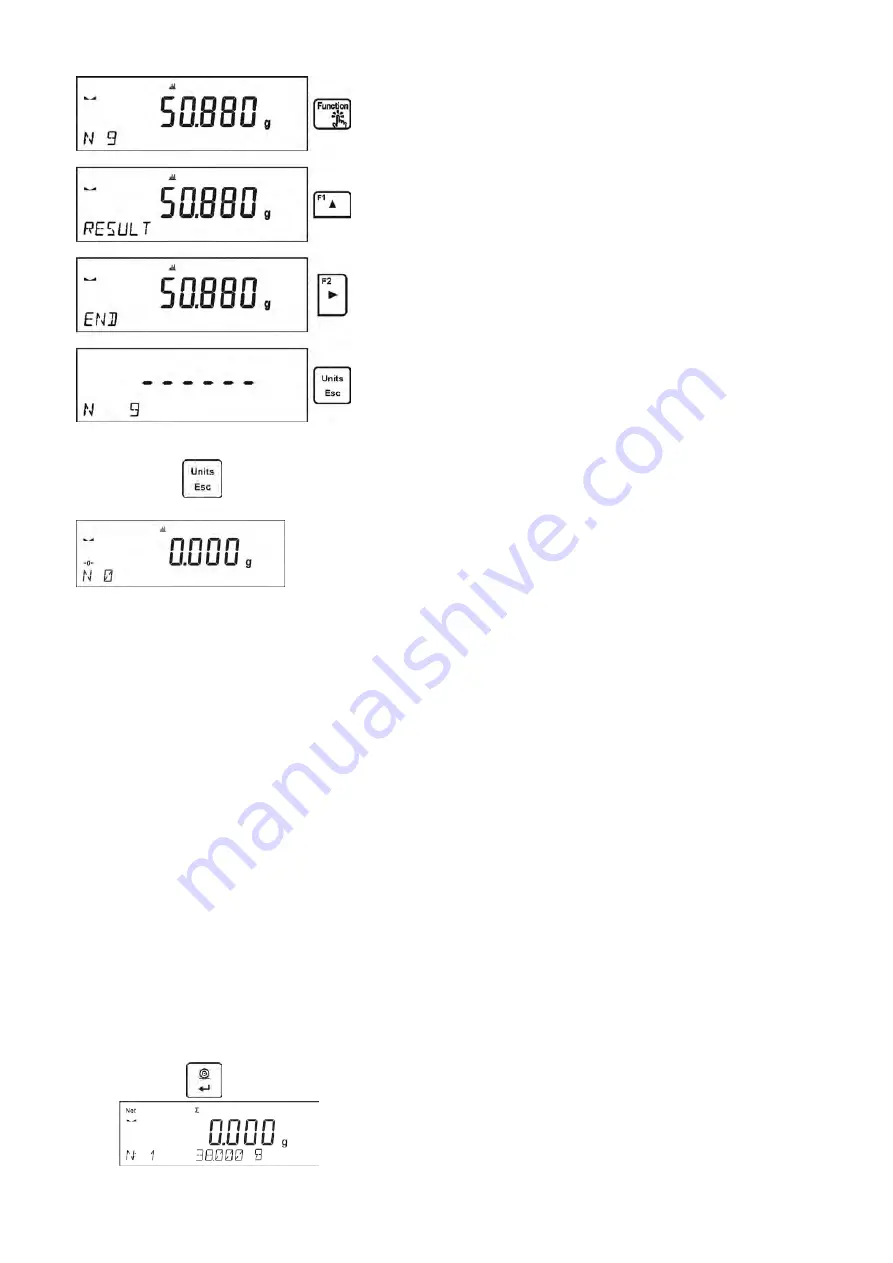
Activating <FINISH> option  results in printing out the statistics data and moving to a <RESULT> 
window, using this window it is possible to check the data and print it out again, if necessary.  

To exit, press 

 button. This leads to returning to the main window of <STATISTICS> mode and 

zeroing the data related to carried out measurements. 


You can begin another series of measurements or return to the weighing mode. 
 

11.11.  TOTALISING 

Totalising function allows you to weigh individual ingredients of a mixture and totalise its total mass. 
The software enables adding up approximately 30 ingredients for one mixture.  
 

F Shortcut Keys 

You can declare which particular weighing function is to be launched using F1, F2, F3 or F4 keys.  
For procedure informing you how to declare the particular function, read 

F Shortcut Keys

 section. 


11.11.1. Additional settings 

Apart from standard settings for this mode (i.e. weighing mode settings) additional parameter has 
been designed to describe operation of the mode: 


REP. PRNT. T.

 – allows to turn off printing the tare value on a report. 


11.11.2. Means of Operation  


Enter <TOTALISING> mode 
The bottom line shows total sum and data relating to the number of ingredients which are 
added to the total sum (if such information is selected in the settings for totalising mode). 


On the weighing pan place a container in which the ingredients are to be weighed, tare its 
mass. Next, place the first ingredient in the container and confirm its mass when stable by 

pressing 

 button 


Summary of Contents for AS R2.PLUS

Page 1: ...R Series Balances AS R2 PLUS Analytical Balances PS R1 Precision Balances PS R2 Precision Balances PS R2 H Precision Balances USER MANUAL IMMU 03 39 02 20 EN www radwag com...

Page 2: ...ng this it means that you are bound to achieve success You have purchased a device that was designed and manufactured to give you years of service Congratulations and thank you for selecting RADWAG pr...

Page 3: ...s 12 3 6 Powering the Device 14 3 7 Connecting Additional Hardware 15 3 8 Information on the Balance 15 4 Keyboard Buttons Function 15 5 Start Up 16 5 1 Temperature Stabilization Period 16 5 2 Ambient...

Page 4: ...3 Counting Parts of the Same Mass 48 11 3 1 PARTS COUNTING Mode Settings 48 11 3 2 Setting the Reference Mass Mass Determination from the Sample of Known Quantity 48 11 3 3 Setting the Reference Mass...

Page 5: ...PERIPHERAL DEVICES 75 13 1 Computer 75 13 1 1 Computer Connection Port 75 13 1 2 Continuous Transmission 76 13 1 3 Printouts Interval for Continuous Transmission 77 13 1 4 Cooperation with E2R 77 13...

Page 6: ...6 1 GENERAL INFORMATION 1 1 DIMENSIONS AS PLUS series PS 200 2000 PS 1000 PS 2100 PS 10100...

Page 7: ...n adverse operating conditions condensed dust drops of water falling down at different angles typical for IP 54 PS R2 H balances are offered with round pans of two possible sizes 115mm and 195x195mm B...

Page 8: ...to the port of interfaces housing plug the power supplier into the mains CAUTION While cleaning it is advisable to follow below precautions Additionally it is a must to disconnect the device from main...

Page 9: ...here must not be any modification made to the balance 1 7 WARRANTY Warranty is invalid for the following non observation of the guidelines of this user manual use of the balance other than specified i...

Page 10: ...stable wall console desk or a stable working table which is not affected by vibrations and distant from heat sources take special precaution when weighing magnetic objects as part of the balance is a...

Page 11: ...be transported in the future Install components following the above diagram bottom insert 2 centring ring embossment side up 3 draft shield 4 weighing pan 5 PS 200 2000 PS 1000 PS 2100 PS 10100 remov...

Page 12: ...ocess if needed In the case when contamination is hard to remove e g adhesive rubber resin polyurethane foam residues etc you can use a special cleaning agents based on a mixture of aliphatic hydrocar...

Page 13: ...et sponge featuring large wholes this will help you to remove loose heavy dirt Do not use cleansers containning abrasive substances Next using cloth and cleanser water solution soap dishwashing liquid...

Page 14: ...construction through this opening which might negatively influence the balance parameters 3 6 POWERING THE DEVICE Balance can be connected to the mains only with a power adapter that comes standard wi...

Page 15: ...nce ON OFF If switched off balance components other than the display are powered and balance is in stand by mode F9 button of the computer keyboard Press to access data stored in a database user produ...

Page 16: ...ts operation If the variation is greater than set limit values temperature changes speed then a blinking thermometer pictogram is displayed on the screen The blinking thermometer pictogram means that...

Page 17: ...port P4 4 ADD DISPLAY additional display port P4 5 EXT BUTTONS P5 PRINTOUT P5 1 CAL REPORT contents of the adjustment report P5 2 HEADER contents of the header printout P5 3 GLP PRNT contents of the...

Page 18: ...or press button enter users database and select ADMIN user Press button for confirmation wait to be asked for a password Enter the password 1111 next press for confirmation Home screen of the softwar...

Page 19: ...r kg ct For non verified balances you can select from the following g mg kg ct lb oz ozt dwt tlh tls tlt tlc mom gr ti N 5 7 UNITS ACCESSIBILITY By pressing button the user may declare units to be ava...

Page 20: ...anguages POLISH ENGLISH GERMAN SPANISH FRENCH TURKISH CZECH ITALIAN HUNGARIAN Permissions Permissions parameter enables choosing access level for a particular user one that is not logged in Available...

Page 21: ...immediately inactive backlight function no indication on the display clock displayed To start up the balance it is necessary to press button located on the balance keypad The balance will automatical...

Page 22: ...Software ver v 0 4 9 Date 2013 07 16 Time 09 17 16 Number of measurements 10 Reading unit 0 001 0 01 g Internal weight mass 1402 094 g Filter Average Value release Fast Reliable Deviation for Max 0 1...

Page 23: ...ent will carry out the process fully automatically and will inform the user on successive process stages Cycle of automatic adjustment process Balance software detects the necessity of carrying out ad...

Page 24: ...t saved in balance factory parameters The process is carried out automatically and its result is shown on the display if the balance is connected via communication port with a computer or a printer th...

Page 25: ...to declare the mass of a weight that is to be used for adjustment The mass must be 30 Max capacity Once the mass of the weight is entered and confirmed the message prompting the user to remove the we...

Page 26: ...ing an area for the signature of a user performing the adjustment For the parameters described above one of these values must be selected NO do not print YES print An exemplary report 8 2 HEADER FOOTE...

Page 27: ...s printing out a report from the last adjustment according to the settings declared for the adjustment report printout see sec 14 1 of this user manual Header GLP printout Footer DASHES Option enables...

Page 28: ...M Current time I Balance number R Program number P Project number U User number F Name of a current function working mode C Date and time of the last adjustment K Type of the last adjustment S Current...

Page 29: ...OOTER Example settings P5 4 14 STANDARD PRINTOUT NSD PRN 1 P5 5 NSD PRN 1 E The way of inserting texts By means of balance keyboard Selecting a character to be replaced Moving a cursor or an active bl...

Page 30: ...surements ALIBI 100 000 consecutive measurements 9 1 USERS Each user is characterized by the following data NAME 30 characters CODE 6 characters PASSWORD 8 characters digits only ACCESS USER ADVANCED...

Page 31: ...0 different products The following data can be inserted for each product NAME 30 characters CODE 6 characters EAN 16 characters MASS with the accuracy of a reading unit TARE mass of the packaging rela...

Page 32: ...nge is needed Additional data is saved along with the measurement Date of the measurement Time of the measurement Measurement result mass Tare value Name of the product that has been weighed Person ca...

Page 33: ...Date 16 07 2013 Time 13 27 09 Balance ID 10353870 Cal diff 0 004 g Signature The data that is to be printed out depends on the settings of parameter P5 3 GLP PRINTOUT Parameters selected for the prin...

Page 34: ...saved measurement In the bottom line the date and time are displayed for every single measurement Operations for ALIBI database and WEIGHINGS database are likewise for detailed information read the pr...

Page 35: ...terized by special extensions saved data is encoded in a way that the files cannot be read or viewed by standard computer programs Special computer software manufactured by RADWAG company is used to r...

Page 36: ...is printout txt Press button to switch the balance off next remove the pendrive from the port and read the data on a computer Keeping to this sequence of actions you are guaranteed that the data is sa...

Page 37: ...ce is launched with the most recently operated working mode For settings of this function read later sections of this user manual 11 1 WORKING MODES ACCESSIBILITY Group of parameters enabling the user...

Page 38: ...of weighing procedure it is recommended to load the weighing pan a few times with mass close to balance max capacity Check if unloaded balance indicates precise zero and whether measurement is stable...

Page 39: ...loads data on tare value for a particular product upon its selection from the database CAUTION Taring negative values is impossible On taring negative values the balance responds with an error message...

Page 40: ...he first time this profile is started automatically For this profile the parameters are selected in a way enabling obtaining the measurement result as fast as it is possible Fast dosing the profile is...

Page 41: ...slow option SLOW or V SLOW value for Filter parameter The effectiveness of the filter is different throughout the weighing range The filter works slower when approaching the weighed mass it works mor...

Page 42: ...are unstable it is recommended to use UNSTABLE mode By default the parameter is set to STABLE option 11 2 6 AUTOTARE Autotare is used for quick determination of net weight for loads with different ta...

Page 43: ...he printing frame This function applies to non verified balances exclusively AUTO select this option to enable automatic printing of measurements If this option has been selected remember to set AUTO...

Page 44: ...ter next measurement does not require zero value Procedure For automatic operation adjust the threshold value 11 2 8 Information Function enables displaying additional information in the bottom line D...

Page 45: ...enables declaring non standard information which is to be displayed in the bottom line of the display You can insert any text consisting of 19 characters maximum If you want the declared non standard...

Page 46: ...ER All modes VARIABLE 1 All modes VARIABLE 2 All modes ON OFF LAST DIGIT All modes ENTER SAMPLE Parts Counting Dosing Percent Weighing DETERMINE SAMPLE Parts Counting Percent Weighing SET HI_LO Checkw...

Page 47: ...the indication returns to zero and pictograms 0 and are lit press button The balance returns to weighing with the accuracy of the I weighing range and II weighing range pictogram and marker of the las...

Page 48: ...described in section relating to WEIGHING mode This section covers only settings for PARTS COUNTING mode F Shortcut Keys You can declare which particular weighing function is to be launched using F1...

Page 49: ...INFORMATION function CAUTION Remember that The total mass of all the pieces put on the weighing pan must not be greater than the balance maximum weighing range The mass of a single piece cannot be lo...

Page 50: ...ASSIGN THRESHOLDS is assigned the editing window is displayed and the value of MIN low threshold can be ascribed The ascribed value must be given in a current unit Use arrow buttons to enter low thre...

Page 51: ...ue within the following thresholds from 97 500g to 102 500g F Shortcut Keys You can declare which particular weighing function is to be launched using F1 F2 F3 or F4 keys For procedure informing you h...

Page 52: ...of control of deviation in percentage between weighed loads mass and specified reference mass The reference mass can be determined by means of a weighing process or it can be entered into memory by th...

Page 53: ...Additional settings list AVERAGING TIME Amount of time during which recorded measurement results are analysed Obtained data is used to determine average measurement result THRESHOLD It is a value exp...

Page 54: ...e After altering the settings return to the main window by pressing button repeatedly Next set the averaging time in seconds It is the time during which the balance software acquires measurements and...

Page 55: ...place the object that is being weighed in the container The balance automatically begins the process of measurement after exceeding the set mass threshold After weighing process completion the measure...

Page 56: ...ometer holder 12 Additional sinker 6 Thermometer 13 Additional stand for a set of pans or a sinker 7 Flexible connector for sinker 14 Additional set of weighing pans for density determination of solid...

Page 57: ...the air top weighing pan 4 of the density kit and then weighing the same sample in liquid on the bottom weighing pan 2 of the density kit As the same sample is weighed in liquid the result of density...

Page 58: ...utton In order to finish press button The software returns to the main window of the mode and a next measurement can be performed The balance operates with previously set parameter values liquid tempe...

Page 59: ...etermination kit 2 Enter LIQUIDS DENSITY function 3 Prepare a sample 4 Initiate the process 5 Set the process following the displayed messages 6 Set volume of the sinker used for measuring 7 On enteri...

Page 60: ...be launched using F1 F2 F3 or F4 keys For procedure informing you how to declare the particular function read F Shortcut Keys section Info field provides the following information N number of samples...

Page 61: ...ottom line On pressing or the type of displayed information changes Selecting an option PRINT and pressing button initiates printing out the statistics data in a form of a report An exemplary report S...

Page 62: ...hich particular weighing function is to be launched using F1 F2 F3 or F4 keys For procedure informing you how to declare the particular function read F Shortcut Keys section 11 11 1 Additional setting...

Page 63: ...value it is possible for the user to add this mass to the total sum In such a case follow this procedure When all the ingredients have been weighed finish the procedure of totalising Procedure The me...

Page 64: ...ys section 11 12 1 Means of Operation Enter PEAK HOLD mode Once you select the mode the function is active and information about the net mass is displayed in a bottom line only if a different informat...

Page 65: ...mber of ingredients which are added to the total sum and the total mass if such information is selected in the settings for totalising mode Load the weighing pan with the first sample Confirm its mass...

Page 66: ...n Press button to exit the window You return to ADDING mode home screen and the data on carried out measurements is automatically zeroed You can print an intermediate sum of saved samples In such case...

Page 67: ...d be kept between 20 C 25 C with change rate during testing within 0 5 C Relative humidity 50 75 and Use distilled water for pipettes calibration processes Make sure that a pipette tips and distilled...

Page 68: ...o be launched using F1 F2 F3 or F4 keys For procedure informing you how to declare the particular function read F Shortcut Keys section 11 14 2 Means of Operation Enter PIPETTES CALIBRATION mode Start...

Page 69: ...he indication before dosing another portion of water Upon completion of series of measurements summary is displayed Press ENTER to continue measuring process press Esc to stop it Upon pressing Esc but...

Page 70: ...nication with peripheral devices is established via the following ports COM 1 RS232 COM 2 RS232 USB type A USB type B WIFI Parameters of USB ports are not configurable The port type B is designed to c...

Page 71: ...twork that has been selected P3 3 3 3 PASSWORD password stars are displayed P3 3 3 4 IP balance ID number make sure that the number is not engaged by a different device using this network P3 3 3 5 MAS...

Page 72: ...eters have been incorrectly entered Ensure that the settings are correctly entered and repeat the connecting process If this fails contact your RADWAG service representative Selected network and param...

Page 73: ...ERIES RADWAG USB DRIVER x x x exe Steps 1 Run driver installer Startup dialog window Select language version In order to continue press Next button Window for target folder selection Select a respecti...

Page 74: ...matically starts searching a respective driver 4 Go to Device Manager and check number assigned to virtual COM port For this very case it is STMicroelectronics Virtual COM Port COM3 5 Set balance para...

Page 75: ...connected COM 1 or COM 2 RS 232 port for connecting a computer USB 2 type B USB port for connecting a computer USB FREE LINK USB port type B for connecting a computer Tool for entering data it functi...

Page 76: ...ropean Latin 1 The following German diacritical signs are added The keyboard layout changes from QWERTY to QWERTZ The characteristic feature of such keyboard is sign located on the right side of the z...

Page 77: ...may be carried out by the device manufacturer or authorized persons exclusively Rememeber to switch continuous transmission on to provide correct coperation with the E2R system 13 1 5 Printout Type o...

Page 78: ...ameter value must be higher The value ranges between 0 quick data transfer and 9 slow data transfer around 10 characters per second In case of Free Link printout keyboard emulator all languages withou...

Page 79: ...the control code from the balance which automatically sets the right code page of the printer code page accordant with the one of a balance prior to printout of data taken from the balance this possib...

Page 80: ...ional display Procedure press button enter P4 DEVICES menu enter menu group P4 4 ADDITIONAL DISP select port to which the additional display is to be connected NONE COM 1 COM 2 CAUTION The balance coo...

Page 81: ...connected to the electrical outlet CPU socket Set of external buttons TARE and PRINT Standard balance equipment does not include the set of external buttons 14 COOPERATION WITH PERIPHERALS CAUTION A p...

Page 82: ...rintout format for unverified balances 1 2 3 4 12 13 14 16 17 18 stability marker space character mass space unit CR LF Stability marker space if stable if unstable if high limit is out of range v if...

Page 83: ...f low limit is out of range Character space for positive values for negative values Mass 9 characters with right justification Unit 3 characters with left justification 15 COMMUNICATION PROTOCOL Gener...

Page 84: ...IC1 Disable automatic internal adjustment of the balance IC0 Enable automatic internal adjustment of the balance K1 Lock balance keypad K0 Unlock balance keypad OMI Give available working modes OMS Se...

Page 85: ...ress T_v CR LF command understood but taring range exceeded T_A CR LF command understood and in progress T_E CR LF time limit exceeded while waiting for stable measurement result T_I CR LF command und...

Page 86: ...g unit where _ space Send stable measurement result in a current measuring unit Format SU CR LF Response options SU_A CR LF command understood and in progress SU_E CR LF time limit exceeded while wait...

Page 87: ...derstood and in progress MASS FRAME response mass value in a current measuring unit Response format 1 2 3 4 5 6 7 15 16 17 18 19 20 21 S U I stability marker space character mass space unit CR LF Swit...

Page 88: ...command understood but not accessible at this moment e g mode other than PERCENT WEIGHING ES CR LF command not recognised mass format incorrect Value release Format SS CR LF Response options SS_OK CR...

Page 89: ...R LF command carried out Give available working modes Command overview Command returns accessible working modes Format OMI CR LF Response options OMI CR LF n_ Nazwa modu CR LF n_ Nazwa modu CR LF OK C...

Page 90: ...ode number To see detailed description go to OMI command An example Command OMG CR LF return current working mode Response OMG_13_OK CR LF balance operates in Statistics working mode Give accessible u...

Page 91: ...permissible amount of time An example Command BP_350 CR LF activate BEEP for 350 ms Response BP_OK CR LF BEEP activated CAUTION BEEP sound activated via BP command is inhibited if in course of its ac...

Page 92: ...ns state Format EV_n CR LF Response options EV_OK CR LF command carried out EV_E CR LF error in course of command execution no parameter or incorrect format EV_I CR LF command understood but not acces...

Page 93: ...n on currently set filter Format FIG CR LF Response options FIG_x_OK CR LF command carried out returns set filter FIG_I CR LF command understood but not accessible at this moment x parameter filter sy...

Page 94: ...settings n 1 always 2 never 3 when stable CAUTION The numbering is assigned to a particular last digit option and it is identical for all balance types The command changes settings for a current work...

Page 95: ...s marker 4 four digits marker 5 five digits marker Mass 10 characters for net mass given in adjustment unit with dot and a floating point sign Mass unit 3 characters left justification Tare 9 characte...

Page 96: ...asuring absorptiveness of substances e g foamed polystyrene The rack is made of mild steel Rack height is 330mm Density determination kit for solids and liquids It is applicable with balance with reso...

Page 97: ...97...

Page 98: ...98...

Reviews: