background image


31

Cycle of automatic calibration proceeds as follows:


-

  balance software detects necessity of calibration and signalizes it by marker of 

Celsius degree or by black marker


-

 from this moment time of 5 minutes is counted in which weighings can be 

performed


-

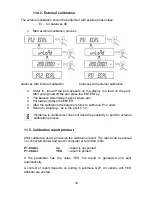
  when this time elapses display indicates CAL_30 message and starts count 

down  30..29..28 do 0 (indicated value is the counter)


-

  user has 30 seconds to make a decision: 


ƒ

  if calibration is to be performed, does not take any actions


ƒ

  if one wants to finish measurements presses 

TARE

 key, after its pressing 

balance returns to weighing showing previous result of weighing (possibility 
of finishing series of measurements) in 5 minutes balance will indicate 
CAL_30 message again


-

  process of calibration can be postponed frequently, but fact that long postponing 

of calibration can be cause of bigger error during weighing should be noticed. 
These errors are effect of changes of temperatures and as consequence 
changes of balance sensitivity.


Automatic system includes 3 possibilities: 


-


calibration with regard to changes of temperature


balance is provided with precise system of controlling temperature 
changes, temperature of calibration is registered every time, next is started 
if temperature of surrounding changes 0,8

o

C  


-


calibration with regard to passage of time


user can declare 4 spaces of time that makes criterion for calibration, 
following option are accessible: calibration every 1 - 12 hours. 


Summary of Contents for AS series

Page 1: ...cal balances AS series M A N U F A C T U R E R O F E L E C T R O N I C W E I G H I N G I N S T R U M E N T S RADWAG 26 600 Radom Bracka 28 Street POLAND phone 48 48 38 48 800 phone fax 48 48 385 00 10...

Page 2: ...2 MARCH 2009...

Page 3: ...ains 12 4 7 Connection of additional equipment 12 5 BASIC FUNCTIONS OF THE INSTRUMENT 12 6 KEYBOARD 14 7 USER MENU 15 7 1 Moving in user menu 17 7 1 1 Balance keyboard 17 7 1 2 Return to weighing func...

Page 4: ...lance memory by user 53 13 4 Defining thickness of solids and liquids 54 13 4 1 Testing thickness solids 55 13 4 2 Testing thickness of liquid 55 13 5 Pipettes calibration 55 13 5 1 Data introduction...

Page 5: ...computer 71 16 WEIGHING LOADS UNDER BALANCE 72 17 LIST OF ORDERS IN RADWAG BALANCES 72 18 ERROR MESSAGES 73 19 ADDITIONAL EQUIPMENT 74 19 1 Vibration damping table 74 19 2 Rack for weighing load under...

Page 6: ...ower supply 230V 50Hz AC 11V AC Calibration Internal automatic Display LCD with backlight balance not verified Type AS 140 C 1 CT AS 140 C 2 CT AS 240 C 1 CT AS 240 C 2 CT AS 320 C 1 CT AS 320 C 2 CT...

Page 7: ...7 Dimensions of balance AS series AS 60 C 2 AS 60 220 C 2 AS 110 C 2 AS 160 C 2 AS 220 C 2 AS 310 C 2 AS series AS 140 C 1 CT AS 140 C 2 CT AS 240 C 1 CT AS 240 C 2 CT AS 320 C 1 CT AS 320 C 2 CT...

Page 8: ...n excess of the prescribed maximum load rating minus any possible tare weight that has been applied Never use the balance in an environment endangered by an explosion This balance has not been adjuste...

Page 9: ...operation place Balance should be stored and used in locations free of vibrations and shakes free of wind and dust Air temperature should not exceed range between 10 o C 45 o C Humidity of air should...

Page 10: ...e balance with 70 mm pan open side doors of weighing chamber inside the chamber place lower shield of weighing chamber 1 put anti breeze shield 2 on the lower shield put centering ring 3 on the lower...

Page 11: ...hield 3 put the balance pan inside the ring 4 close side doors of weighing chamber turn on balance supply pin of power adaptor should be connected to socket in the back of balance casing 4 3 Positioni...

Page 12: ...test after which balance will display 0 0000g if indication is different from zero please press ESC TARA button 4 7 Connection of additional equipment The balance must be disconnected from the mains b...

Page 13: ...ding on usage conditions Turn off on system of autozero AUTO Average result of weighing AvE Back light function bl Beep signal bEEP 9 Function for using RS 232 Esc TARE key print key Choose speed of t...

Page 14: ...ON OFF key Function key F key Selects the work mode MODE key Changes measure units UNITS key Sends information to external instrument PRINT or confirms parameter value or function ENTER PRINT ENTER Ke...

Page 15: ...nt date P2 5 PUSr YES no printout of user name P2 6 PPrJ YES no printout of project name P2 7 PId YES no printout of factory number of balance P2 8 PFr YES no printout of frames P3 rEAd Main user para...

Page 16: ...ctions P6 1 FFun ALL PcS HiLo PrcA Prcb d_Co d_Li choice of balance function P6 2 PcS YES no counting pieces P6 3 HiLo YES no check weighing P6 4 PrcA YES no deviation with reference to weighed standa...

Page 17: ...UNITS key Choice of parameters group which should be activated After pressing the key display will indicate first from parameters of chosen group F key Exit to level higher e g to main menu On Off ke...

Page 18: ...taking measurements Check if not load balance shows precise zero if measurement is stable order if not press key 0 T by means of Units key set measure unit g mg ct and if they are accessible in factor...

Page 19: ...ed to setting the initial unit with which the balance will start after switching on Enter to submenu P5 Unit press several times UNITS key Display will indicate by turns available units After choosing...

Page 20: ...ary Function enables choice of unit with which mass on the pan will be indicated Unit will be valid until change of unit or switching on and off the balance Each pressing the Units key causes change o...

Page 21: ...from the list chosen and used by operator or all functions unavailable OFF After choosing setting press PRINT key Balance will go back to displaying name of submenu P6 1 FFun If function other than A...

Page 22: ...2 Press key Esc TARA balance will return to weighing 8 3 2 Setting contents of P6 1 FFun ALL parameters Function enables switching off modes not used by operator This causes faster access to used mode...

Page 23: ...weighing 9 MAIN SETTING PARAMETERS User can adjust balance to external conditions filter range or own needs autozero working memory of tare value These parameters are in group P3 rEAd These functions...

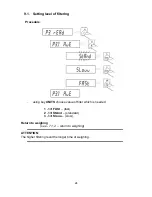
Page 24: ...ocedure using key UNITS choose value of filter which is needed 1 filtr FASt fast 2 filtr StAnd standard 3 filtr Slouu slow Return to weighing see 7 1 2 return to weighing ATTENTION The higher filterin...

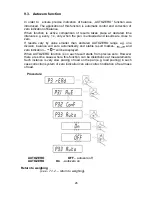
Page 25: ...it is advisable to adjust the balance by selecting method of result confirmation as FAST_rEL Fast or rEL Depending on selected option time of weighing will be shorter or longer Fast_rEL fast release...

Page 26: ...value smaller than declared AUTOZERO range e g one division balance will zero automatically and stable result marker and zero indication will be displayed When AUTOZERO function is on each result sta...

Page 27: ...27 9 4 Light off the last display digit Function enables light off the last digit on the display ALuuAYS always nEuEr never uu_StAb when is stable Return to weighing see 7 1 2 return to weighing...

Page 28: ...according to point 6 1 10 1 Backlight of weighing result bl OFF backlight off bl On backlight on bl Aut If result of weighing doesn t change for 10 seconds backlight will turn off automatically Return...

Page 29: ...key off bEEP On signal of pressing key on Return to weighing see 7 1 2 return to weighing 10 3 Printout of all balance parameters through RS 232 port After pressing F key balance parameters will be s...

Page 30: ...e balance calibration Calibration should be performed Before the weighing When long breaks are between following measure series When temperature inside the balance changes more than 0 8 C Kind of cali...

Page 31: ...bility of finishing series of measurements in 5 minutes balance will indicate CAL_30 message again process of calibration can be postponed frequently but fact that long postponing of calibration can b...

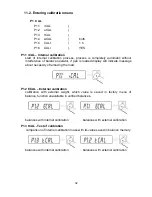
Page 32: ...d display will indicate message about necessity of removing the load P1 2 ECAL External calibration calibration with external weight which value is saved in factory menu of balance function unavailabl...

Page 33: ...ctor which should decide about starting the automatic internal calibration nonE none of factors will cause start of calibration tEmP calibration with regard to change of temperature timE calibration w...

Page 34: ...ermining the time after which automatic calibration will start P1 6 CALr printout from calibration report Setting printout of report after finished calibration no printout of report off YES printout o...

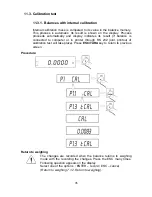
Page 35: ...result if balance is connected to computer or to printer through RS 232 joint printout of calibration test will take place Press ESC TARA key to return to previous screen Procedure Return to weighing...

Page 36: ...alance memory during the calibration Process proceeds automatically and display indicates its result if balance is connected to computer or to printer through RS 232 joint printout of calibration test...

Page 37: ...do not load the pan 3 After this process the balance records results of the calibration in the memory and returns to weighing mode ATTENTION Pressing the ESC key stops the calibration process If durin...

Page 38: ...er the calibration the balance returns to submenu P1 2 uCAL 6 Return to weighing as in the point 5 1 2 If balance is verified user does not have the possibility to perform external calibration process...

Page 39: ...e between calibration mass remembered by balance after last calibration and calibration mass determined during actual calibration and other information 12 SETTING PRINTOUTS FOR GLP PROCEDURES P2 GLP i...

Page 40: ...o not print during report yes print during report 12 1 Setting the contents of printouts for GLP procedures P2 GLP group of parameters enabling to declare variables which will appear on calibration pr...

Page 41: ...introduce name of user who operates the scale User has possibility to introduce the name consisting of max 8 alphanumeric characters Introduction the name is possible by the means of scale keyboard wi...

Page 42: ...equivalents displayed by scale are shown on the drawing below Exemplary user name introduced to scale with capital letters OP1_WILK operator 1 WILK Exemplary user name introduced to scale with small...

Page 43: ...abling to print time of performed measurement P2 4 PdAt Option enabling to print data of performed measurement P2 5 PUSr Option enabling to print user name P2 6 PPrJ Option enabling to print project n...

Page 44: ...44 13 BALANCE OPERATING MODES Counting pieces control referring mass of set standard Control of deviation referring mass of standard Definition thickness of solids and liquids Press MODE key...

Page 45: ...the functions is described in further part of this manual 13 1 Counting details of the same mass Balance in standard execution is equipped with option of counting small pieces of the same mass Counti...

Page 46: ...46 pressing UNITS key to choose of value 10 20 50pcs or free if you want to choose one them e g 20pcs press PRINT and proceed as shown on picture...

Page 47: ...ed Pressing UNITS changes value of digit Confirm entered value by pressing PRINT key Display will indicate LoAd message place on the pan as many details as entered during option Press PRINT key balanc...

Page 48: ...48 ATTENTION If user presses F key when details are not placed on the pan message Er8 outr will be indicated for few second and balance will automatically return to weighing...

Page 49: ...49 13 2 control referring mass of set standard Procedure of operating Enter to function During setting threshold values following dependences take place...

Page 50: ...R THRESHOLD F choice of set digit Units choice of value of digit PRINT confirmation of entered values SET UPPER THRESHOLD F choice of set digit Units choice of value of digit PRINT confirmation of ent...

Page 51: ...n to weighing Return to weighing see 7 1 2 return to weighing 13 3 Control of deviation referring mass of standard Balance software enables control of deviation in of weighed loads mass referring mass...

Page 52: ...the pan load which mass will be accepted as standard press PRINT to confirm this operating mode after few seconds indication 100 00 will be displayed From this moment display will not indicate mass o...

Page 53: ...e memory by user Procedure Enter to function Display will show indication as above Using keys F choice of set digit Units choice of digit value set value of mass of standard enter it to balance memory...

Page 54: ...g see 7 1 2 return to weighing 13 4 Defining thickness of solids and liquids There is equipment to defining thickness of solids and liquids in additional equipment For user request RADWAG service can...

Page 55: ...fter replacing sample in liquid 13 4 2 Testing thickness of liquid Basic element for measuring thickness of liquid is glass plunger It has precise capacity shown on hook Before final measurements this...

Page 56: ...5 C Set P set pressure of room where pipettes calibration is performed 800 1050 hPa Set h set humidity of room where pipettes calibration is performed 10 95 V0 initial volume of pipette introduced by...

Page 57: ...ments After introduction data necessary for pipettes calibration press ESC TARA key when balance displays stability mark balance will start first series of measurements P1 Vo Quantity of repetitions p...

Page 58: ...58 13 5 3 Performing second series of measurements Second series of measurements is continuation of first series and procedure proceeds in the same way...

Page 59: ...f second series procedure does not change When third series is completed message will be displayed about finish of calibration test End after which report from pipette calibration will be sent through...

Page 60: ...is show on the drawing below Vmin V1 2 Vmax respectively initial volume 50 of pipette volume and nominal pipette volume Va arithmetic mean from measurement series Es value of systematic error Sr value...

Page 61: ...data as additional element of parameter in printouts Turn on off sign of last digit in printout automatic operating for RS 232 14 1 Speed of transmission Method of setting speed of transmission choose...

Page 62: ...Continuous transmission 14 2 1 Continuous transmission off in basic interval Procedure CntA no continuous transmission off CntA YES continuous transmission on Return to weighing see 7 1 2 return to w...

Page 63: ...63 14 2 2 Continuous transmission off in actual interval Procedure Cntb no continuous transmission off Cntb YES continuous transmission on Return to weighing see 7 1 2 return to weighing...

Page 64: ...to weighing Automatic operating takes place according to following scheme press TARE key to zero the balance display will indicate marker of stable measurement and marker of zero place the load balanc...

Page 65: ...data type sent through RS 232 joint only for non verified balances Procedure PStb no sending stable or temporary result of weighing PStb YES sending stable result of weighing Return to weighing see 7...

Page 66: ...functions Software enables setting operating of function automatic operating for automatic operating result will not be sent to computer or printer until indication of mass goes below set Lo net value...

Page 67: ...67 14 6 Printout to printer or computer Procedure P_PC no printout to printer P_PC YES printout to computer Return to weighing see 7 1 2 return to weighing...

Page 68: ...s 8 Stop bit 1 Parity control none Sending weighing results to computer can take place manually after pressing PRINT key continuously after function activating or sending steering commend automaticall...

Page 69: ...69 15 1 Schedules of connecting conductors WEIGHT COMPUTER 2 RxD 3 TxD 3 TxD 2 RxD 4 DTR 6 DSR 5 GND 5 GND 6 DSR 6 DTR 7 RTS 8 CTS 8 CTS 7 RTS...

Page 70: ...ics from series of measurement 1 9 02 15 7 0016 g 2 9 02 39 5 0152 g 3 9 02 58 12 0171 g 4 9 03 15 9 9937 g 5 9 03 34 12 0169 g 6 9 03 48 22 0111 g Data 13 09 2001 Godz 9 04 n 6 batch quantity sum x 6...

Page 71: ...ive values or for negative values mass 9 marks alignment to the right units 3 marks alignment to the left 15 4 2 Format of sent data for orders generated from the computer Balance after receiving the...

Page 72: ...this function Remove plastic plug in basic of balance There is suspension in the basic of balance It s installed for good Install hook to hang load hook isn t standard equipment for balance weigh loa...

Page 73: ...y Function SEND RESULT IN ACTUAL INTERVAL IMMEDIATELY result in actual unit sending results now Command SUI CR LF If command which is not included in the register or is an error and ends with CR LF is...

Page 74: ...teel Rack is 330mm high 19 3 Set for defining thickness of solids and liquids It s appropriate for weighing with precision 1mg It enables to define thickness solids and liquids This procedure is fully...

Page 75: ...75 MANUFACTURER OF ELECTRONIC WEIGHING INSTRUMENTS RADWAG 26 600 Radom Bracka 28 Street POLAND Central phone 48 48 38 48 800 phone fax 48 48 385 00 10 Sales Department 48 48 366 80 06 www radwag com...

Reviews: