background image


- 58 - 


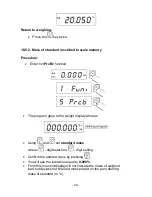
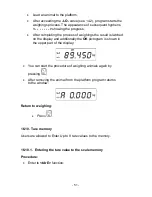
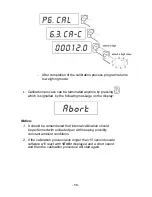
  After completion of the calibration process program returns  

to weighing mode. 


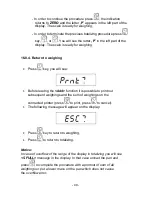
  Calibration process can be terminated anytime by pressing 


which is signalled  by the following message on the display: 


Notice: 


1.  It should be remembered that internal calibration should  

be performed with unloaded pan with keeping possibly  
constant ambient conditions. 


2.  If the calibration process lasts longer than 15 seconds scale  

software will react with 

<Err8>

 displayed and a short sound  

and then the calibration procedure will start again.  

Summary of Contents for ITKU-22-02-01-12-A

Page 1: ...22 02 01 12 A M AN U F AC T U R E R O F E L E C T R O N I C W E I G H I N G I N S T R U M E N T S RADWAG Wagi Elektroniczne 26 600 Radom Bracka 28 Street POLAND Phone 48 48 384 88 00 phone fax 48 48 3...

Page 2: ...2 JANUARY 2012...

Page 3: ...tion of basic weight unit 21 12 6 Temporarily selected unit 22 13 MAIN PARAMETERS 23 13 1 Setting a filtering level 23 13 2 Median filter 24 13 3 Autozero function 25 13 4 Tare function 26 14 RS 232 P...

Page 4: ...art mass adjustment 61 18 COOPERATION WITH PRINTER 63 19 COOPERATION WITH COMPUTER 64 20 COMMUNICATION PROTOCOL 65 20 1 General information 65 20 2 A set of commands for RS interfaces 65 20 3 Respond...

Page 5: ...signed printouts designation minimum mass for function operating counting pieces mass control percentage deviation from standard mass latch of maximum scale indication automatic tare memory of tare in...

Page 6: ...tal hydrogen with rated voltage of 1 2V size R6 and capacities from 1800 to 2800mAh charged while connected to mains without stopping operation WLC A2 and WLC C 2 scales are devices designed to be sup...

Page 7: ...batteries instead of rechargeable ones proceed as follows Before installing non rechargeable batteries turn on the device and set 5 5 CHr6 to no to switch off charging Then install the batteries Insta...

Page 8: ...se elements that appears to be faulty because of production and construction reason B Defining defects of unclear origin and outlining methods of elimination can be settled only in participation of a...

Page 9: ...oying protection stickers F Warranty conditions outline the warranty period for rechargeable batteries attached to the device for 12 months G The detailed warranty conditions one can find in warranty...

Page 10: ...10 Scales WLC C1 R Scales WLC C2 R Scales WLC C1 K Scales WLC C2 K...

Page 11: ...scale on a flat even stable surface far away from sources of heat Remove the transport protection Scales WLC C 2 Scales WLC B1 Scales WLC C K WLC C R Install the weight pan according to the drawings b...

Page 12: ...levelling legs and the level condition indicator installed in the basis of the scale Turn the device on using the key keep pressing the key for about 0 5 sec Wait for the test completion Then you wil...

Page 13: ...or this device is outlined as 15 C 30 C After powering up this device requires 30 minute worming up During the worm up time the indication can change User calibration should be performed after the war...

Page 14: ...internal calibration Because the functionality and operation of the rest of the keys is the same the further part of this manual describes the keypad of WLC C1 C2 series 9 KEYS FUNCTIONS Switching on...

Page 15: ...16 kg g Operation mode weighing 17 Rechargeable battery pack or battery discharged BAT LO 18 Net Tare function has been used 19 Min control with reference to the standard mass setting the lower thres...

Page 16: ...A no P 1 4 Fnnd YES P2 Prnt P2 1 Pr_n StAb P2 2 S_Lo P2 3 bAud 9600 P2 4 S_rS 8d1SnP P3 Unit P3 1 StUn kg P4 Func P4 1 FFun ALL P4 2 Funi no P4 3 PcS no P4 4 HiLo no P4 5 PrcA no P4 6 Prcb no P4 7 AtA...

Page 17: ...eter or changing the value of a selected parameter Entering the selected submenu or activating a parameter for changes Confirmation enter Leaving without changes or reaching a higher level of the menu...

Page 18: ...ts of weighted loads following precautions should be taken into consideration Loads should be placed on the pan delicately and carefully in order to avoid mechanical shocks Loads should be placed cent...

Page 19: ...ll be shown Tarring is possible within the whole range of the scale After unloading the pan the display shows the tarred value with minus sign Notice Tarring cannot be performer when a negative or zer...

Page 20: ...and following pictograms and Zeroing is only possible within the scope of 2 of full scale While zeroing outside the scope of 2 you will see Err2 Zeroing is possible only in stable state Notice Zeroing...

Page 21: ...Procedure Enter the submenu P3 Unit and then press until the expected unit appears on the display Options A When the basic unit is kg users can toggle between kg lb N for verified scales lb is not acc...

Page 22: ...2 Notice After turning on the scale always sets the basic unit 12 6 Temporarily selected unit This function is used to set weight unit the scale will use temporarily until the next power off or next...

Page 23: ...lb lb is not accessible for verified scales 13 MAIN PARAMETERS Users can adjust the scale to external ambient conditions filtering level or particular needs autozero operation tare memory This parame...

Page 24: ...el is the longer stabilization time is needed Return to weighing See 11 2 2 13 2 Median filter This filter eliminates short changes impulses of measure signal e g shocks Procedure Enter the submenu P1...

Page 25: ...declared value of autozero range so the scale will be automatically zeroed and the pictograms and will be displayed When AUTOZERO is disabled zero is not corrected automatically However in particular...

Page 26: ...c tare tArA no automatic tare function off user can turn on operating of automatic tare F6 AtAr till unplugging the balance from mains tArA tArF tare memory function stores last value of tare in balan...

Page 27: ...even odd There are four ways of sending data via RS232 interface Manually after pressing Automatically after stabilizing the indication over LO threshold Continuously after it is activated in paramet...

Page 28: ...necessary while working with automatic tare or automatic operation or weighing animals Automatic tarring will not be applied until the indication gross is lower than the value inscribed in S_Lo parame...

Page 29: ...29 Return to weighing see 11 2 2 14 3 Baud rate Procedure Enter the submenu P2 Prnt and then...

Page 30: ...s no parity control 7d1SEP 7 data bits 1 stop bit EVEN parity control 7d1SoP 7 data bits 1 stop bit ODD parity control 8d1SnP 8 data bits 1 stop bit no parity control 8d2SnP 8 data bits 2 stop bits no...

Page 31: ...unction Program recognises the way the scale is supplied mains battery and automatically selects the way of operating on the backlight bl for mains blbt for batteries or rechargeable battery pack 15 1...

Page 32: ...light for supplying from batteries The user can change the intensity of backlight from 0 to 100 The lower the intensity is the longer the scale operates without recharging or exchanging batteries When...

Page 33: ...ower The scale is switched off automatically when function t1 YES no weighing appears in 5 minutes no changes on the display In case when this function disrupts the operation e g long time weighing pr...

Page 34: ...tery voltage level check While supplying from batteries too low level of voltage is measured by software the pictogram is displayed It means that charging or exchanging batteries is required 15 4 1 Ch...

Page 35: ...matically switch off to protect the batteries from destructible discharging Charging is signalled by blinking period about 2 seconds on the display 15 4 3 Accumulator charging option This function all...

Page 36: ...d Power adapters for supplying from mines Procedure Enter the submenu P5 othr and then CHr6 YES enabled CHr6 no disabled Return to weighing See 11 2 2 15 4 4 Formatting rechargeable battery packs WLC...

Page 37: ...g down 5 Repeat the process of charging starting from point 1 Notice They reach their optima capacity after three cycles of full charging and discharging 16 OPERATION MODES 16 1 Setting accessibility...

Page 38: ...er to set if after pressing key all operating modes will be accessible ALL or only one from the list chosen and used by operator Procedure Enter the submenu P4 Func and then After choosing setting pre...

Page 39: ...e in order to tare a container value Notice 1 Counting pieces does not work together with other scale functions 2 The counting pieces function is not saved as a default start function so it is not rem...

Page 40: ...er the required sample quantity where selection of digit position setting the digit Confirm the value by pressing You will see LoAd on the display and then If weighing is performed in a container put...

Page 41: ...ng unit mass adjustment Single piece mass should not be less than 5 divisions 3 If a single piece mass is lower than a reading interval d the display will show the Err5 message see ch 21 Error message...

Page 42: ...x The inscribed value confirm by pressing the program will automatically go to the main window During setting threshold values following cases take place Notice If a user erroneously enters a value of...

Page 43: ...or entered to the scale memory by an user PrcB function 16 5 1 Standard mass determined by its weighing Procedure Enter to PrcA function You will see LoAd on the display and then place an load on the...

Page 44: ...ogram goes to the weight display window Using and set standard mass where digit selection digit setting Confirm the entered value by pressing You will see the indication equal to 0 000 From this momen...

Page 45: ...hen indication is stable automatic tarring of the container mass will be performed Net marker will appear in the upper part of the display place a sample into the package display will indicate net mas...

Page 46: ...force to the weighing pan The display of scale will latch the maximum value of the force Remove loads from the pan Before the next measurement press the key Return to weighing Press the key twice 16 8...

Page 47: ...g to ch 16 8 1 Put the first load on the pan If the weighing procedure is performed in a container put the container on the pan first and tare it Then put the first load on the pan and confirm it by p...

Page 48: ...ing one more time with loaded pan you will see the unLoAd message Unload the pan the scale will return to ZERO and the letter P in the left part of the display will appear The scale is ready for the n...

Page 49: ...ll see Before leaving the Add function it is possible to print out subsequent weighings and the sum of weighings on the connected printer press to print press to cancel The following message will appe...

Page 50: ...AnLS function The tinnE message appears on the display for 1s and then the program goes to the window of setting the duration time in seconds of the animal weighing process Confirm the selected value...

Page 51: ...tched on the display and additionally the OK pictogram is shown in the upper part of the display You can start the procedure of weighing animals again by pressing After removing the animal from the pl...

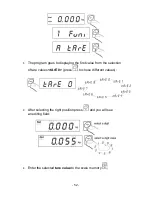
Page 52: ...displaying the first value from the selection of tare values tArE 0 press to chose different values After selecting the right position press and you will see an editing field Enter the selected tare v...

Page 53: ...ch 16 10 1 of the manual The program goes to displaying the first value from the selection of tare values tArE 0 press to chose different values To use an entered tare value press you will see the tar...

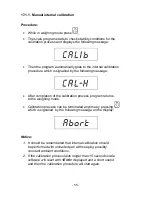
Page 54: ...rnal calibration Started by adequate temperature change Started after adjusted time period Started after powering up the device Manual internal calibration started from the keyboard Calibration with a...

Page 55: ...ter completion of the calibration process program returns to the weighing mode Calibration process can be terminated anytime by pressing which is signalled by the following message on the display Noti...

Page 56: ...ly goes to the internal calibration procedure which is signalled by the following message After completion of the calibration process program returns to weighing mode Calibration triggered off by temp...

Page 57: ...means that when no other triggering factor appear the calibration will appear every 3 hours The calibration procedure triggered off by the time change starts with checking which is signalled by the f...

Page 58: ...y the following message on the display Notice 1 It should be remembered that internal calibration should be performed with unloaded pan with keeping possibly constant ambient conditions 2 If the calib...

Page 59: ...6 4 CA r can enable a function of automatic printout of report form calibration process on a connected printer Procedure Enter the submenu P6 CAL and then Powr t do wa enia Patrz punkt 11 2 2 powr t d...

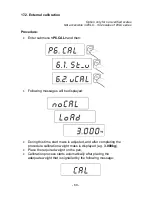
Page 60: ...nu P6 CAL and then Following messages will be displayed During this time start mass is adjusted and after completing the procedure calibration weight mass is displayed e g 3 000kg Place the required w...

Page 61: ...ighing with saving changes that have been made Caution If the calibration process span adjustment lasts longer than 15 the Err8 message will be displayed and short audible signal will be emitted Press...

Page 62: ...f start mass adjustment can be terminated by pressing which is signalled on the display Return to weighing with saving changes that have been made Caution If the start mass adjustment lasts longer tha...

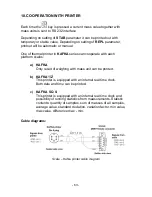
Page 63: ...s can cooperate with each platform scales a KAFKA Only result of weighing with mass unit can be printed b KAFKA 1 Z This printer is equipped with an internal real time clock Both date and time can be...

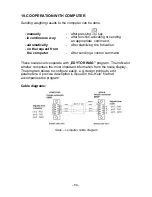
Page 64: ...zing the indication on the request from the computer After sending a control command These scales can cooperate with EDYTOR WAG program The indicator window comprises the most important information fr...

Page 65: ...results Display control 20 2 A set of commands for RS interfaces Commands Description of commands Z Zeroing T Tarring TO Get tare S Send the stable result in basic unit SI Send the result immediately...

Page 66: ...nded XX _ E CR LF error while executing command time limit for stable result exceeded limit time is a descriptive parameter of the scale XX command name _ substitutes spaces 20 4 Command s description...

Page 67: ...R LF Possible answers TO_TARA CR LF command executed Frame format 1 2 3 4 5 6 7 15 16 17 18 19 20 21 T O space stability space tare space unit CR LF Tare 9 characters with decimal point justified to t...

Page 68: ...immediately in basic unit Syntax SI CR LF Possible answers SI_I CR LF command comprehended but cannot be executed at the moment MASS FRAME mass value in basic unit is returned Frame format 1 2 3 4 5...

Page 69: ...computer command S U _ A CR LF command accepted and in progress S U _ _ _ _ _ 1 7 2 1 3 5 _ N _ _ CR LF command done mass value in current unit is returned 20 4 7 Send the result immediately in curre...

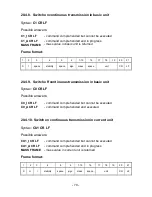
Page 70: ...CR LF 20 4 9 Switch off continuous transmission in basic unit Syntax C0 CR LF Possible answers C0_I CR LF command comprehended but cannot be executed C0_A CR LF command comprehended and executed 20 4...

Page 71: ...ommands 20 5 Manual printouts automatic printouts Users can general manual or automatic printouts from the scale Manual printouts can be performed after loading the pan and stabilizing indication by p...

Page 72: ...erated from the scale after pressing ENTER PRINT 20 6 Continuous transmission The indicator can work in a continuous transmission mode It can be switched on or off in parameters or using RS232 command...

Page 73: ...DS Err2 Value beyond the zero range Err3 Value beyond the tare range Err4 Calibration mass or start mass beyond the acceptable range 1 for weight 10 for start mass Err5 Mass of a single piece lower th...

Page 74: ...uring powering up Unload the pan Then the scale will indicator zero 23 TECHNICAL PARAMETERS 23 1 Precisions scales of WLC series Scale type WLC 0 6 B1 WLC 1 A2 WLC 2 A2 Max capacity 0 6kg 1kg 2kg Min...

Page 75: ...440x280x190mm Scale type WLC 6 C1 R WLC 6 12 C1 R WLC 12 C1 R WLC 12 30 C1 R WLC 30 C1 R WLC 6 C1 K WLC6 12 C1 K WLC12 C1 K WLC 12 30 C1 K WLC 30 C1 K Max capacity 6kg 6 12kg 12kg 12 30kg 30kg Min cap...

Page 76: ...t 15 5 17 8kg Package dimensions 720 x 580 x 220mm 23 2 Precise scales of WLC C 2 series Scale type WLC 0 6 A1 C 2 WLC 1 A2 C 2 WLC 1 2 A2 C 2 WLC 3 A2 C 2 WLC 6 A2 C 2 Max capacity 0 6kg 1kg 1 2kg 3k...

Page 77: ...p in plastic casing AP2 1 RS232 RS485 converter for PUE C 31 KR 01 RS232 Ethernet converter for PUE C 31 KR 04 Stainless steel vibration damping table SAL N Milded steel vibration damping table SAL M...

Page 78: ...E L E C T R O N I C W E I G H I N G I N S T R U M E N T S RADWAG WAGI ELEKTRONICZNE 26 600 Radom Bracka 28 Street POLAND Phone 48 48 384 88 00 phone fax 48 48 385 00 10 Selling department 48 48 366 8...

Reviews: