background image

1

2

Product:

Drying mode:

Products

0

3

4

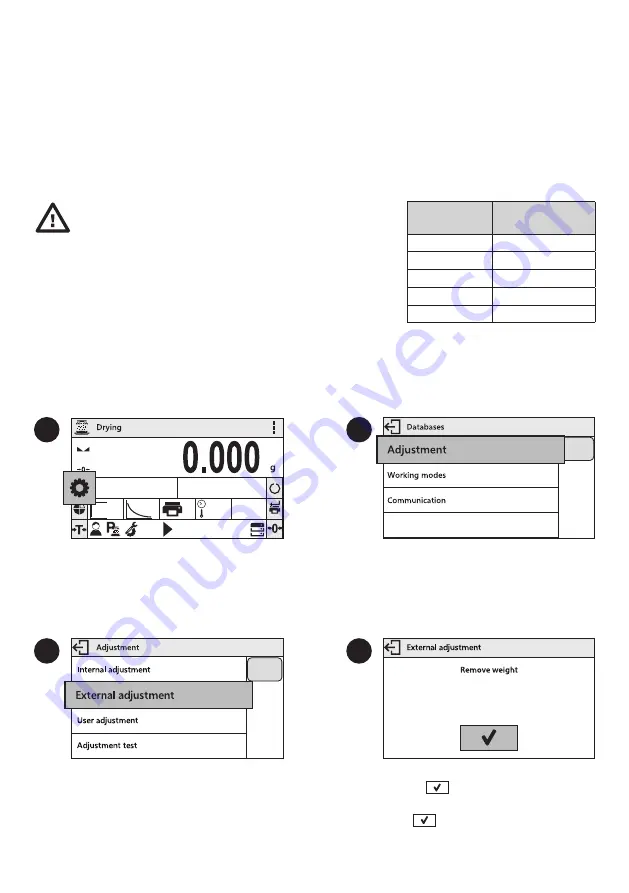
Naciśnij przycisk “Parametry”.

Na wyświetlonej liście wybierz parametr
„Adiustacja”.

Na wyświetlonej liście wybierz parametr
„Zewnętrzna adiustacja”.

Upewnij się, że szalka jest pusta i naciśnij
przycisk          by zatwierdzić adiustacje.

Przed korzystaniem z trybu WAŻENIA, wskazane jest wykonanie adiustacji urządzenia (dla procesu SUSZENIA
adiustacja nie jest wymagana). Adiustacja zewnętrzna wykonywana jest za pomocą wzorca o odpowiedniej dokładności
i masie zależnej od typu i udźwigu wagi.

Przed rozpoczęciem procesu adiustacji musisz zaopatrzyć się w 
odpowiedni wzorzec masy. Zaleca się użycie wzorca klasy F1 lub 
F2. Z tabeli obok wybierz wzorzec odpowiedni dla Twojej wagi.  
Uwaga! Upewnij się, że szalka jednorazowa została zamontowana 
(patrz punkt 5.5.). Podczas adiustacji nie zamykaj komory suszenia.

Press “External Adjustment” parameter.

Make sure that the weighing pan is empty  
and press            button for confirmation.

Press “Parameters” button.

Respective parameters list is displayed, select 
Adjustment option.

It is recommended to carry out adjustment operation prior to running the WEIGHING mode (adjustment is not 
required for DRYING). External adjustment is carried out using an external mass standard of the right accuracy and 
weight value, which value depends on device type and capacity.

The adjustment mass standard does not come with the mois-
ture analyzer. Prior to adjustment prepare the right mass stand-
ard. You are recommended to use mass standard of class F1 or 
F2. View the table and select the mass standard you need.  
Caution! Make sure that the disposable weighing pan has been 
installed (read point 5.5.). Do not close the drying chamber in 
the course of adjustment.

8.1.2. Adjustment 

(for models with an external adjustment only)

Adiustacja


(tylko dla modeli z zewnętrzną adiustacją)

Balance model

Model wagi

Mass standard [g]

Wzorzec masy [g]

MA 50/1.X7.A

50

MA 50.X7.A

50

MA 110.X7.A

100

MA 210.X7.A

200

MA 210/1.X7.A

200

Summary of Contents for MA X7.A

Page 1: ...Szybki start Wagosuszarki Start up Guide MA X7 A MA X7 IC A Moisture Analyzer IMMB 22 01 02 24 EN PL...

Page 2: ...Aby wy wietli pe n instrukcj obs ugi przejd do strony internetowej lub zeskanuj kod QR To view a complete User Manual go to the website or scan QR code radwag com en manuals...

Page 3: ...should a warranty claim or service be required The plug type may vary by country 1 CONTENT ZAWARTO 2 UNPACKING ROZPAKOWANIE Moisture analyzer Disposable pan Cross shaped holder Drying pan handle Dryi...

Page 4: ...hu powietrza w miejscu eksploatacji wagi Nie u ywaj wagi na nier wnym lub niewypoziomowanym pod o u Nie u ywaj w miejscach niestabilnych nara onych na wstrz sy i wibracje Operate the device in a room...

Page 5: ...y urz dzenia mog by gor ce Check whether the grounding spring takes its intended location Make sure that the grounding spring juts slightly out of the hole Remove the base insert Install the base inse...

Page 6: ...ralnej Pod cz zasilacz do gniazda elektrycznego Prior to switching the device on let it reach room temperature estimated stabilisation time up to 4 hours Connect the power cord to the AC socket locate...

Page 7: ...ustacji urz dzenia patrz punkt 8 1 dla procesu SUSZENIA adiustacja nie jest wymagana Proximity sensor Proximity sensor Switching ON OFF Parameters Profiles Confirming an operation or printing a report...

Page 8: ...ch funkcji mod w pracy Editable tool bar with quick access keys Enabled for editing info fields Weighing result window Status bar Users Database Drying mode Open Close the chamber Working mode paramet...

Page 9: ...at the weighing pan is empty and press button for confirmation Press Parameters button Respective parameters list is displayed select Adjustment option It is recommended to carry out adjustment operat...

Page 10: ...rzec masy na szalce i naci nij przycisk by zatwierdzi Poczekaj na zako czenie procesu ustalania masy pocz tkowej The moisture analyzer has been zeroed Make sure that the weighing pan is empty and pres...

Page 11: ...nawil enie Step Schodkowy for substances with moisture content higher than 15 dla substancji o wy szej zawarto ci wilgoci ni 15 Automatic Automatyczne triggered in accordance with automatic settings u...

Page 12: ...zy zamkn komor suszenia nale y nacisn przycisk na ekranie Otw rz Zamknij komor Press Operators button Users list is displayed select Admin option Some balance settings are accessible for Administrator...

Page 13: ...t 9 1 Naci nij przycisk Wybierz parametr Nazwa Naci nij przycisk Bazy danych Wybierz baz danych U ytkownicy Wprowad nazw u ytkownika i naci nij przycisk aby potwierdzi Nazwa u ytkownika zosta a wprowa...

Page 14: ...u ytkownik w wybierz Mody pracy Press Parameters button Parameters list is displayed select Work ing Modes parameter Select Weighing parameter Select Proximity Sensors parameter Prior to balance users...

Page 15: ...wa nymi czynnikami wp ywaj cymi na szybko dok adno i powtarzalno pomiar w Select the appropriate sensor right or left Select function that is to be assigned to the choosen sensor Following the above...

Page 16: ...et mierci pr bki takie mo na suszy wy cznie w dygestorium Substances that in the course of heating may emit vapours causing corrosion e g acids Apply small amount of samples this helps to prevent risk...

Page 17: ...er Komputer Drukarka Printer Printer Drukarka Keyboard Klawiatura Printer Printer Drukarka Drukarka Skaner kod w kreskowych Barcode scaner Barcode scaner Skaner kod w kreskowych Kabel zasilajcy Power...

Page 18: ...trukturze oraz preparat w przezna czonych do szorowania Uwa aj eby do uk adu wagowego do wn trza urz dzenia nie dosta si aden py ani ciecz Prior to cleaning it is necessary to disconnect the device fr...

Page 19: ...zosta wilgo Zamontuj wszystkie elementy urz dzenia dopiero po ich ca kowitym wysuszeniu GLASS PANES AND COMPONENTS can be cleaned using window cleaner WEIGHING PANS AND STAINLESS STEEL OR ALUMINIUM CO...

Page 20: ...www radwag com...

Reviews: