RADWIN
5000
HPMP
User
Manual
Release
3.5.70
14
‐
3
Using
a
Single
HSS
Unit
Using
a
Single
HSS
Unit
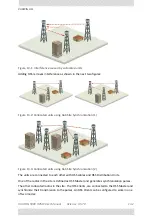
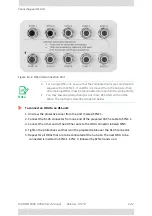
Figure
14
‐
2:
HSS
Wiring
schematic
The
wiring,
as
shown
in
is
self
explanatory.
The
Sync
signal
path
is
less
self
evident.
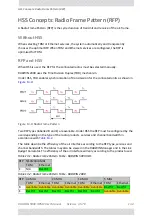
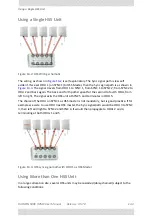
If
we
set
ODU
1
(on
SYNC
1)
to
HSS
Master,
then
the
Sync
signal
path
is
as
shown
in
.
The
signal
travels
from
ODU
1
to
SYNC
1,
from
SYNC
1
to
SYNC
2,
from
SYNC
2
to
ODU
2
and
back
again.
The
back
and
forth
paths
repeat
for
the
second
to
fourth
ODU,
from
left
to
right.
The
signal
exits
the
HSS
unit
at
SYNC
5
and
terminates
in
ODU
5.
The
choice
of
the
ODU
on
SYNC
1
as
HSS
master
is
not
mandatory,
but
is
good
practice.
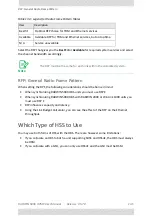
If
for
example
we
were
to
use
ODU
3
as
HSS
master,
the
Sync
signal
path
would
be
ODU
3
to
SYNC
3,
then
left
and
right
to
SYNC
2
and
SYNC
4.
It
would
then
propagate
to
ODUs
2
and
4,
terminating
at
both
ODUs
1
and
5.
Figure
14
‐
3:
HSS
sync
signal
path
with
ODU
1
as
HSS
Master
Using
More
than
One
HSS
Unit
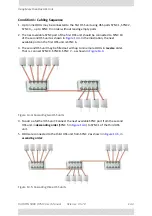
In
a
large
collocation
site,
several
HSS
units
may
be
cascaded
(daisy
‐
chained)
subject
to
the
following
conditions:
Summary of Contents for 5000 HPMP
Page 1: ...USER MANUAL RADWIN 5000 POINT TO MULTIPOINT BROADBAND WIRELESS Release 3 5 70...
Page 21: ...Part 1 Basic Installation Release 3 5 70...
Page 69: ...Part 2 Sector Installation Release 3 5 70...
Page 155: ...Part 3 Sector Management Release 3 5 70...
Page 197: ...RADWIN 5000 HPMP User Manual Release 3 5 70 8 42 Nomadic...
Page 252: ...RADWIN 5000 HPMP User Manual Release 3 5 70 11 8 Registering HMUs 3 Open the Air Interface tab...
Page 290: ...Part 4 Site Synchronization Release 3 5 70...
Page 319: ...RADWIN 5000 HPMP User Manual Release 3 5 70 16 7 Configuring the GSU...
Page 320: ...Part 5 Advanced Installation Topics Release 3 5 70...
Page 354: ...Part 6 Field Installation Topics Release 3 5 70...
Page 396: ...Part 7 Product Reference Release 3 5 70...
Page 517: ......

