11
5. STEERING AND STOPPING THE SLIDING MACHINE
Ensure that the electrical voltage circuit is the same as shown on the grinder specifications label and that the machine
is off by the OFF button. Connect the grinding machine to the power grid.
The grinding machine is equipped with a switch. To turn on the grinding machine: press the lower end of the key (ON).
To stop the grinding machine: press the top of the key.
6. TURNOVER REGULATOR
The speed is adjusted by turning the speed controller. Use higher speed settings to quickly remove material. Use lower
speed for more precise grinding control.
7. Working with the Shelfmaschina
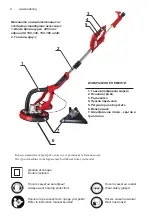
The grinding machine for walls and ceilings has a unique, rotating grinding head that can be rotated in several directions.
This enables the operator to polish the top, middle and bottom of a wall or ceiling without changing its position.
7.1. Push the vacuum cleaner switch to the ON position.
WARNING: Wear a dust mask.
7.2. Press the Wrench and Ceiling Grinder Switch to ON.
7.3. Put the grinding machine on the working surface (the applied pressure on the head must not be larger than
necessary).
Attach a suitable abrasive sheet and select the appropriate speed.
Hold the machine securely and plug it in. Wait until the machine reaches its full operating speed.
Keep the grinding head as parallel as possible to the wall.
Note: If you want to avoid unsatisfactory results when grinding, do not hold the machine for too long.
Lift the grinding head off the surface to be machined before turning off the machine.
After use, disconnect the power tool from the power supply and let it cool down.
Keep the grinding machine in constant motion while the grinding head is in contact with the work surface. Use stable,
fast movements. Stopping the work or unstable machine movement can cause unwanted traces and unevenness on the
work surface.
NOTE: Do not touch the rotating abrasive pads against sharp protrusions. Contact with protruding objects (nails,
screws, electrical boxes, etc.) can seriously damage the sandpaper.
CHANGE OF THE CHURCH
WARNING: Disconnect the machine from the power supply.
Put sandpaper on the sanding head using the Velcro gripping system.
Align the sandpaper and press it steadily. When necessary, pull out the sandpaper and replace it with a new one.
9. STORAGE AND TRANSPORT
When not using the power tool, keep it in a dry, well ventilated place, not accessible to children, in a tall cabinet or in a
closed place.
Store the power tool, instructions for use and parts of the accessories, together in the original packaging, if possible.
This way you have all the information and parts available at any time.
Always keep the power tool on the handle.
Protect the power tool from vibrations and impacts, especially when transporting in vehicles.
Cleaning and maintenance
Keep the air vents and engine housing as far as possible free from dust and dirt. Wipe the machine with a clean cloth
or remove dust and dirt with compressed air at low pressure (max. 3 bar). Clean the machine immediately after each use.
Do not use detergents or solvents, as they can affect the plastic parts of the grinding machine. Avoid water entering the
machine.
Check the power tools and parts of the accessories for wear and damage before and
after each operation. Replace worn exposed or damaged parts if necessary.
Replace the power cordАко захранващият кабел е повреден, той трябва да бъде подменен в оторизиран сервиз,
за да се избегнат рискове.


