12
www.raider.bg
sound power 109 dB (A). Uncertainty K = 3 dB. Work with a silencer! The resultant value of vibration (the vector sum of the three
directions) is determined according to EN 60745: Drilling in metal: the value of the emitted vibrations a
h
= 4,7 m/s
2
, uncertainty K = 1,5
m/s
2
, hammer drilling in concrete: value the emitted vibrations a
h
= 24,2 m/s
2
, uncertainty K = 1,5 m/s
2
, cornering / development: the
value of the emitted vibrations ah <2,5 m/s
2
, uncertainty K = 1,5 m/s
2
. That in this operating manual for the vibration value is measured
by the method specified in EN 60745 and can be used to compare different power. The level of vibration varies depending on the
specific activity carried out and in some cases may exceed that amount in that direction. If power is used for a long time in this mode,
the load caused by vibration, could be underestimated. Directions: For an exact estimate of the burden of vibrations in a working cycle
should be recorded and the intervals in which the power is off or idling. This can significantly reduce the reporting burden of vibrations
throughout the business cycle.
8. Preparing for the job. Installation of accessories and auxiliary tools.
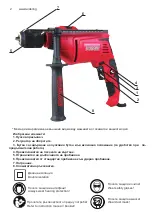
8.1.1. Auxiliary handle.
Use only the impact drill fitted with an auxiliary handle (8). You can insert auxiliary handle (8) in practically any position, to ensure
your comfortable and safe position for the job. Turn the handle itself (8) axis and counterclockwise, thus reducing the firmness of the
loop around the head of the drill and you can rotate the handle vspomagatelnata in the desired position. Then tighten the grip again
(8), such as turning it clockwise.
8.2. Setting the depth of drilling. With deep baffle (5) can be pre-set depth of drilling. Pull the baffle so deep that the distance along
the axis between the tip of the drill and deep baffle is equal to the desired depth of the hole.
8.3. Placing the drill in the chuck. Turn off the power of power. Put the key in one of the open side of the chuck. Dissolving the
jaws to the desired size and place in the drill chuck. With key-locking in three successive drill a hole in the chuck. We must always
remember that the key should be removed from the drill after the completion of operations related to installation and dismantling of the
drill. When mounting a new drill should be checked by the inclusion of a short drill, drill that rotates in an axis without “flicker”. This will
help us make sure that it is not distorted.
8.4. Inclusion and exclusion. Beware of the voltage of supply network! Supply voltage of the network must conform to the details
shown on the plate of power. Appliances marked with 230 V, can be supplied with a voltage of 220 V.
8.5. To turn the drill press and hold the trigger switch (1). For locking of the starting switch pressed (1) press (3). Exclusion relax
power trigger switch (1), respectively, if anchored to the button (3), first press the short term and then release the trigger switch (1).
8.6. Adjust the speed of rotation. Drill allows to work with different speed of spindle. Alignment is done using the position (2). In
the range of each setting a speed can be adjusted smoothly by increasing speed and reducing pressure on the trigger button (1).
Zavarteneto right speed regulator (2) leads to increase their rotation and left to decrease.
8.7. Correct choice of the rate of speed shall be held where drill is included without load. So speed-minded when working with a
load may be lower.
8.8. Hammer drilling.
Place the switch (6) the symbol “hammer drilling.” Switch (6) falls in the correct position with a distinct twinge.
8.9. Tools to develop or cornering.
Turntable working instrument can be bent. After continuous operation with low-speed power to cool as to leave it idling for
approximately 3 minutes with a maximum speed of rotation. When working with terminals must always use a universal extension.
Use only the cores that are suitable for heads of screws. Turning to always place the switch “drilling / hammer drilling» (6) in position
«Drilling».
8.10. Select the direction of rotation. With the switch (4) you can change the direction of rotation of power. Rotate right: For drilling
and turning the screw press to switch the direction of rotation (4) at point blank range left. Rotate left: To develop the screws and nuts,
press switch direction of rotation (4) right to the point blank range. Switch (6) the choice of operation should be in position «Drilling». It
must be done to change the direction of rotation when the spindle rotates a drill!
8.11. Not used in rotation to the left mode of attack.
8.12. When you need to vent large diameter, is recommended first to break a small opening, which will then be drilling to the
desired size. This will prevent overloading the drill. Drilling deep holes should be done gradually, as periodically removed from the drill
hole to remove chips or dust. If during drilling to drill holes in zaklini, you should exclude drill. Use a change of direction of rotation
to remove the drill from the hole. Drill must be kept in alignment with the hole. Ideally, the drill should be placed perpendicular to the
surface of the material being processed. If the condition for perpendicularity is not respected at work can lead to trapped or breakage
in drill hole and injury to the user. Continued drilling at low speed the engine from overheating threatens. Must make periodic breaks
during work or to allow the drill to work on no-load maximum speed for about 3 minutes. Do not obscure the openings in the hull used
for ventilation of the engine.
8.13. Outdoor use.
Switch the machine only in installations equipped with electric switch “Fi” RCD (Residual Current Device). RCD must be no more
than 30 mA. Use an extension cord suitable for outdoor use. Use of a cord suitable for outdoor use reduces the risk of electric shock.
Summary of Contents for RD-ID40
Page 90: ...90 www raider bg ...
Page 93: ......


