


15
of exposure in the actual conditions of use (taking account of all parts of the operating cycle such
as the times when the tool is switched off and when it is running idle in addition to the trigger time).
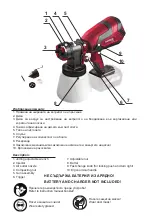
III. Use.
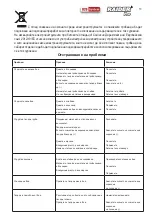
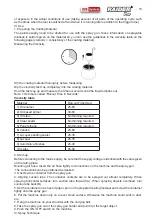
1. Preparing the Coating Material
The paints usually need to be diluted for use with the spray gun. Since information on sprayable
dilutions is seldom given on the material tin, you can use the guidelines in the viscosity table on the
following page (viscosity = consistency of the coating material).
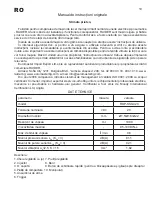
Measuring the Viscosity.
Stir the coating material thoroughly before measuring.
Dip the viscosity test cup completely into the coating material.
Hold the test cup up and measure the time in seconds until the liquid empties out.
Note: This time is called “Runout Time in Seconds”.
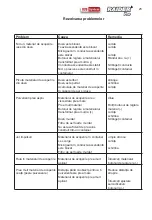
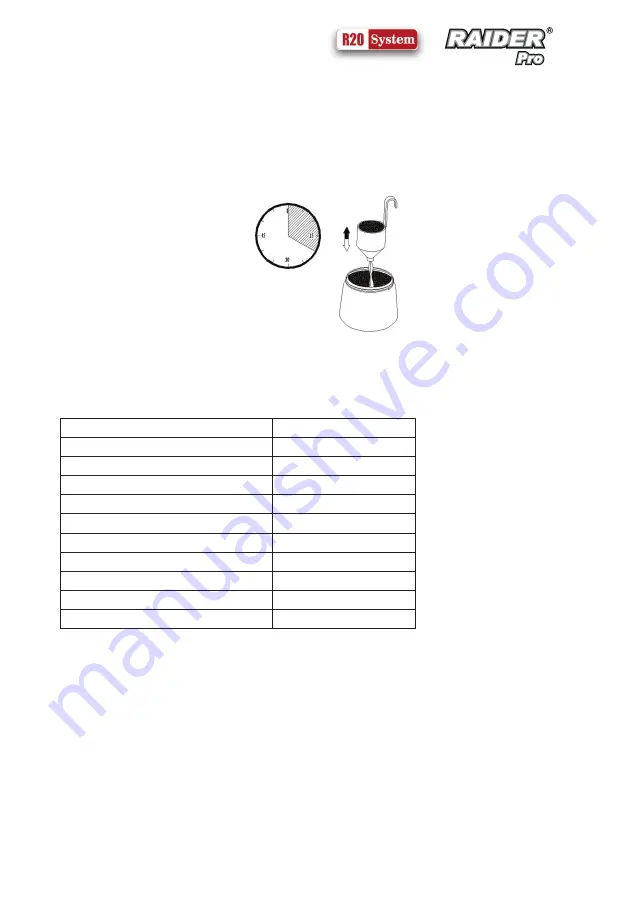
Viscosity table
Material
Run out Time (Sec)
1) Oil enamel
25-60
2) Oil based primer
30-60
3) Oil stain
No thinning required
4) Clear sealer
No thinning required
5) Polyurethane
No thinning required
6) Varnish
20-60
7) Lacquer sanding sealer
25-35
8) Lacquer
25-35
9) Automotive finishes
20-40
10) Latex
45-90
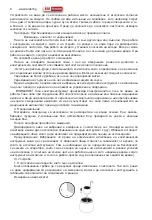
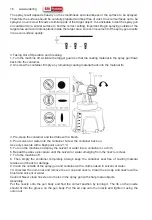
2. Start-up.
Before connecting to the mains supply, be sure that the supply voltage is identical with the value given
on the rating plate.
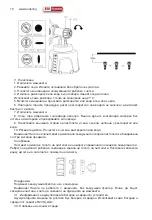
Mounting air hose. Insert the air hose tightly in connections on the machine and the spray gun.
The connections can be positioned as desired.
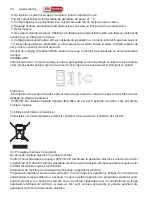
3. Unscrew the container from the spray gun.
4. Aligning suction tube .The container contents are to be sprayed out almost completely. When
spraying horizontal surfaces, turn suction tube forward (A). When spraying objects overhead, turn
suction tube back (B).
5. Set the container on a sheet of paper, pour in the prepared coating material and screw the container
tightly onto the spray gun.
6. Put the machine down only on a level, clean surface. Otherwise the machine could suck in dust,
etc.
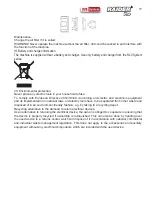
7. Hang the machine on your shoulder with the carrying belt.
8. Take the spray gun out of the spray gun holder and point it at the target object.
9. Push the ON / OFF switch on the machine.
IV. Spray Technique.
Summary of Contents for RDP-SSGC20 SOLO
Page 7: ...7 2 3 4 5 6 7 8 9 10 11 12 13 14 18 p 15 16 17 21 C 21 C 32 II III...
Page 8: ...8 www raider bg II 2 III 1...
Page 9: ...9 e 1 25 60 2 30 60 3 4 5 6 20 60 7 25 35 8 25 35 9 20 40 10 45 90 2 3 4 5 6 7 8 IV...
Page 10: ...10 www raider bg V 1 2 3 4 21 C 5 6 7 8 9 10 VI R20 System VII...
Page 11: ...11 2012 19 EC...
Page 27: ...27 1 p 2 3 4 5 6 7 8 9 10 p x 11 12 13 14 15 p...
Page 28: ...28 www raider bg 16 17 21 C 21 C 32 II III II...
Page 29: ...29 2 III 1 s 1 25 60 2 Primer 30 60 3 4 5 6 20 60 7 25 35 8 25 35 9 20 40 10 45 90...
Page 30: ...30 www raider bg 2 3 4 5 6 7 8 9 3...
Page 31: ...31 V 1 2 3 4 21 C 5 6 7 8 9 10 VI R20 System VII...
Page 32: ...32 www raider bg...
Page 41: ...41 1 2 3 4 I elektoinstrumenti 1 tpudovi 2 3 4 5 6 7 8 9 10 12 13 14 15 16 17 povliayat...
Page 42: ...42 www raider bg 21 C 21 C 32 C 2...
Page 43: ...43 III 1 izteche sec 1 25 60 2 30 60 3 4 5 6 20 60 7 25 35 8 25 35 9 20 40 10 45 90 2 3 4 5...
Page 44: ...44 www raider bg 6 7 8 IV V 1 2 3 4 21 C 5 6 7 8 9 10...
Page 45: ...45 VI R20 System VII 2002 96...
Page 46: ...46 www raider bg...
Page 60: ...60 www raider bg 3 4 5 6 Dc 7 8 9 10 11 12 13 14 15 16 17...
Page 61: ...61 21 C 21 C 32 C A II A III 1...
Page 62: ...62 www raider bg 2 3 II III 1 1 25 60 2 30 60 3 4...
Page 63: ...63 5 6 20 60 7 25 35 8 25 35 9 20 40 10 45 90 2 3 4...
Page 64: ...64 www raider bg 5 6 7 8 9 IV V 1 2 3 4 21 C 5 6 7 8 9 10...
Page 65: ...65 VI R20 System VII 2012 19 EC...
Page 66: ...66 www raider bg...
Page 88: ...88 www raider bg...
Page 96: ...96 www raider bg 246 02 934 99 80 www raider bg...
Page 100: ...100 www raider bg...
Page 101: ...101 45...
Page 102: ...102 www raider bg...


