FAN
Power 1
Power 2
SAS 6G
FAN
Power 1
Power 2
SAS 12G
Front View
Rear View
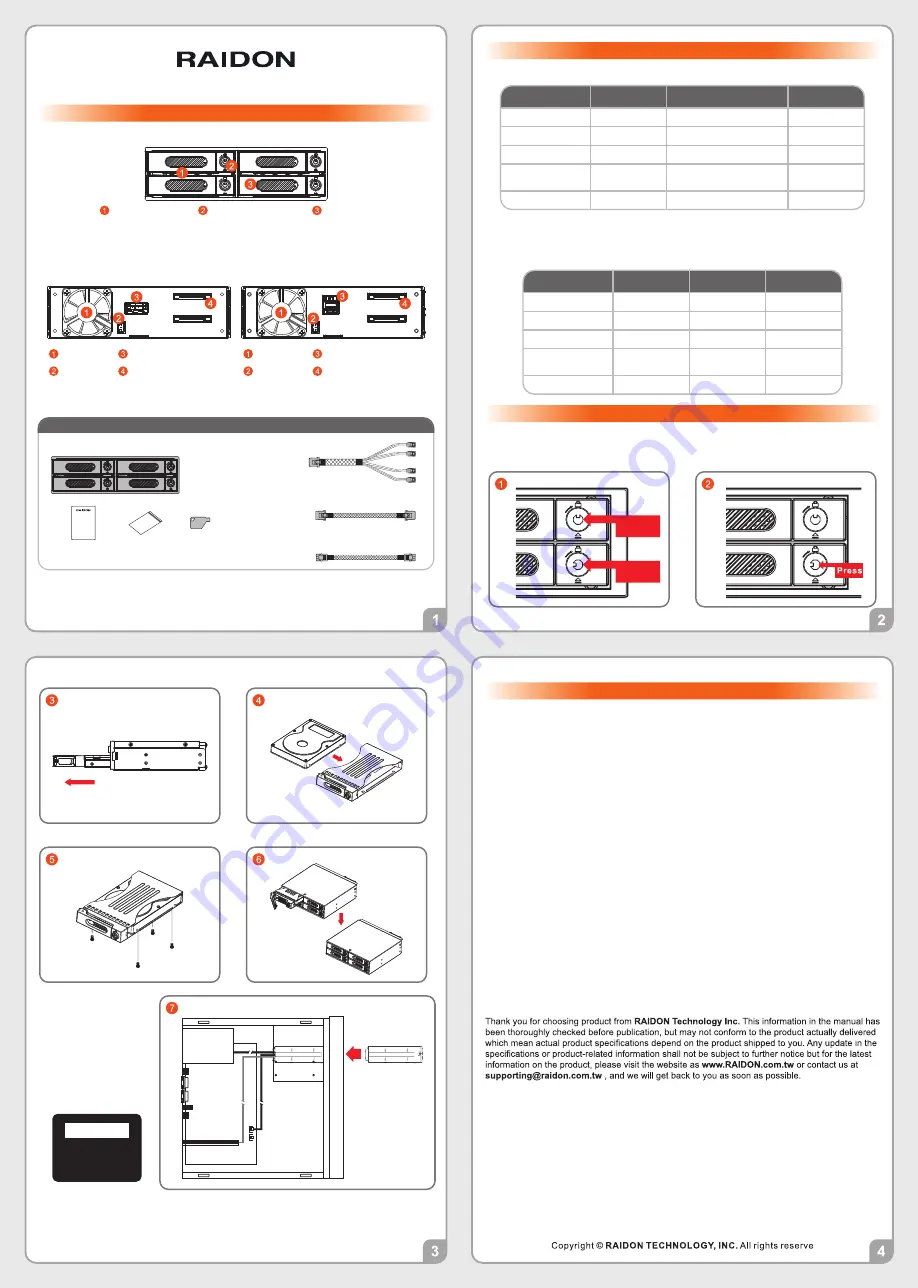
15-pin Power Connector
After you open the outer package, make sure that the following items are contained in the package:
Please make sure that you do not have any damaged or in short parts. For any question, please
contact to local distributor or retailer for further assistance.
Please follow the instructions below to complete the iT4300 series installation.
HDD Access Indicator
SAS Connector
LED Instruction
Hardware Installation
Precautions Before Application
HDD Tray Handle
HDD Tray Key Lock
And Tray Open Button
Cooling Fan
3-pin Fan
Connector
15-pin Power Connector
3-pin Fan
Connector
Cooling Fan
SAS Connector
iT4300-U6
1. The product allows the user to simultaneously utilize two hard drives manufactured by different
companies. However, if the user expects better efficiency, we strongly recommend the users to use
hard drives manufactured by the same manufacturer.
2.
Please ensure that the hard drives are free of bad tracks before using, otherwise, it may cause
system crash in turn resulting in data loss.
3. Although iT4300 Series allows you to install either SAS or SATA drives, it is recommended to check
the whether mini-SAS host adapter you´re using is downward compatible with SATA drives. Also
note that the throughput performance may vary if SAS and SATA drive are installed.
4. Whenever turning off or unplugging the iT4300 Series from your computer system becomes
necessary, always remember to safely remove it from your operating system first.
5. When the iT4300 Series is connected to the computer system, it
’
s prohibited to remove, insert or
swap the harddrive while data transfer is being performed.
6. It is highly recommended for users to back up important data contained within the drives of the iT4300
Series on a regular basis or whenever the user feels necessary to a remote or a separate storage
device. RAIDON will not be responsible for any lost of data caused during the use of the iT4300
Series or the recovery of the data lost.
Unlock
Lock
1. Unlock the hard drive tray lock.
2. Press down the button for hard drive clamp.
3. Pull out the hard drive tray kit.
4. Install a 2.5” hard drive on the hard drive tray.
5. Secure screws from the screw kit in 4 positions.
6. Refit the hard drive tray into the iT4300 series.
7. Install device into one
of the CD-ROM bays
with screws from the
accessory kit. Then
properly connect
SATA/SAS cable and
DC cable from your
system to the device.
Product Diagrams and Contents of Product Package
iT4300 Series Quick Installation Guide
8. Power on your system after hardware installation is completed, and your operating
system will automatically detect the hard drives from booting. Then follow the steps
from your operating system to partition and format the drives when necessary,
device will be ready to use once the format is completed.
HDD Idle
HDD Access
NO HDD
Fan Failure
(Stop Rotating)
Overheat (
≥
50℃)
Light On
Light On
─ ─
─ ─
─ ─
Blue LED
Light Off
Blinking
─ ─
─ ─
─ ─
─ ─
─ ─
─ ─
On
On
Yellow LED
Buzzer
When Using SATA Hard Drives (iT4300-U5/U6/S3)
HDD Idle
HDD Access
NO HDD
Fan Failure
(Stop Rotating)
Overheat (
≥
50℃)
Light On
Light On
─ ─
─ ─
─ ─
Blue LED
Light On/Light Off (
Note)
Blinking
─ ─
─ ─
─ ─
─ ─
─ ─
─ ─
On
On
Yellow LED
Buzzer
When Using SAS Hard Drives (iT4300-U5/U6)
Note
:
While using a different SAS Interface Adapter, the LED
Indication might be with a different light set.
V1.2 (Jun 2017)
iT4300
iT4300
Mini SAS
Internal 6G
TO 4 Port
SATA Cable
SAS
Cable
SATA
Port
SAS Card
Power
Supply
Motherboard
iT4300 Series Device
x1
Mini SAS Internal 6G TO
4 Port SATA Cable
(for iT4300-S3)
x1
Mini SAS 6G Internal Cable
(for iT4300-U5)
x1
Mini SAS 12G Internal Cable
(for iT4300-U6)
x1
Contents of Product Package
Quick Installation
Guide
x1
Accessory
Kit
x3
Key
x2
iT4300-U5/S3
(
iT4300-S3 dosen’t support SAS hard drives
)
Please make sure
your power cable
is well connected.
Warning:


