background image

23

RailKing GS-4 Daylight Steam Engine

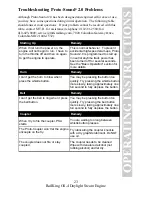
Troubleshooting Proto-Sound

®

 2.0 Problems

Although Proto-Sound 2.0 has been designed and engineered for ease of use,
you may have some questions during initial operation.  The following table
should answer most questions.  If your problem cannot be resolved with this
table, contact M.T.H. for assistance (telephone: 410-381-2580; fax:
410-423-0009; service@mth-railking.com, 7020 Columbia Gateway Drive,
Columbia MD 21046-1532).

Starting Up

Horn

Bell

Coupler

Remedy

Remedy

Remedy

Remedy

Remedy

When I first turn the power on, the 
engine will not begin to run.  I have to 
turn the throttle off and then on again 
to get the engine to operate.

I can’t get the horn to blow when I 
press the whistle button.

I can’t get the bell to ring when I press 
the bell button.

When I try to fire the coupler, PSA 
starts.

The Proto-Coupler won’t let the engine 
uncouple on the fly.

You may be pressing the button too 
quickly. Try pressing the whistle button 
more slowly, taking approximately one 
full second to fully depress the button.

You may be pressing the button too 
quickly. Try pressing the bell button 
more slowly, taking approximately one 
full second to fully depress the button.

You are waiting too long between 
whistle button presses.

This is normal behavior.  To prevent 
accidental high-speed start-ups, Proto-
Sound 2.0 is programmed to start up 
in neutral anytime track power has 
been turned off for several seconds.  
See the "Basic Operation" section for 
more details.

Try lubricating the coupler knuckle 
with a dry graphite lubricant. Do NOT 
use oil.

The coupler does not fire or stay 
coupled.

The coupler needs to be cleaned.  
Wipe with denatured alcohol (not 
rubbing alcohol) and let dry.

Summary of Contents for GS-4 Daylight Steam Engine

Page 1: ... Digital Command System DCS This new system will allow you to operate your locomotive in Command mode when used with the DCS Remote Control System sold separately or Conventional mode Conventional operating features are described in the following pages while the DCS operating features are covered in the set of operating instructions that accompanies the DCS equipment Conventional Mode operation of...

Page 2: ...er Operation 12 Speed Control 12 Lock into a Direction State 12 Reset to Factory Defaults 13 Automatic Sounds 13 Maintenance Care of Remote Control 14 Lubrication and Greasing Instructions 14 Cleaning the Wheels Tires and Track 16 Locomotive Traction Tire Replacement 16 Smoke Unit Maintenance 17 Locomotive Light Bulb Replacement 18 Passenger Car Light Bulb Replacement 19 Self Charging Battery Back...

Page 3: ...ack system The quick connectors and built in roadbed allow you to set up RealTrax anywhere including most carpeted surfaces without the need for track nails or the worry of carpet stains Each RealTrax segment has at least one knock out tab in the roadbed on either end of the segment that can be removed with a pair of pliers to reveal an opening for the lock on that is used to connect the transform...

Page 4: ...low the lubrication points marked L in Fig 9 on Page 14 Do not over oil Use only a drop or two on each pivot point Priming the Smoke Unit You should prime the smoke unit with smoke fluid before operating Add 15 20 drops of smoke fluid from the included pipette through the smokestack see figure 4 then gently blow into the stack to eliminate any air bubbles in the fluid Add Smoke Fluid Through Smoke...

Page 5: ...ess down on the small finger that extends from under the right side of the coupler to open the coupler knuckle and allow the couplers to interlock as shown in Figure 6 Insert the reverse unit plug that extends out of the tender into the receptacle at the back of the engine Connect the draw bar between the engine and tender WARNING DO NOT CONNECT THIS ENGINE TO A TENDER FROM ANOTHER ENGINE IT MAY C...

Page 6: ...ost manufacturer s engines Because the RailKing remote is an infrared line of sight remote you must aim it at the lock on in order to send signals to the track The green LED atop the lock on will come on indicating the track is receiving power Subsequent pushes of any buttons on the remote will cause the LED to blink indicating it is receiving the signal Note The RailKing Remote Control and Remote...

Page 7: ...mly press and release the Bell button To turn the bell off press and release the Bell button again The bell will continue to ring from the time your turn it on until you press and release the button again to turn it off Direction Your train is programmed to start in neutral To put the engine into forward and then to change the direction of the train or to put it into neutral firmly press and relea...

Page 8: ...all sounds made by this engine turn the master volume control knob located under the tender clockwise to increase the volume and counter clockwise to decrease the volume see Fig 8 Proto Sound 2 0 Volume Adjustment Knob Figure 8 Location of Proto Sound 2 0 Volume Adjustment Knob ...

Page 9: ...you should read these instructions thoroughly before using Proto Sound 2 0 features in order to prevent harm to yourself or your equipment Activating Proto Sound 2 0 Conventional Mode Features Proto Sound 2 0 features are activated by sequences of Bell and Whistle button pushes described below Please read the full descriptions of each feature before using it To use these buttons to activate featur...

Page 10: ...equence of PSA The reverse unit is temporarily disabled so that the train will not move as you use the Direction button to trigger the sounds and Proto Sound 2 0 has disabled operator control over the Whistle and Bell buttons until the full PSA sequence is complete 3 After waiting about 30 seconds for that sequence to run press the Direction button again to trigger the second sequence of PSA 4 Aft...

Page 11: ...ed the engine to run the PSA Otherwise the engine without PSA will begin vibrating on the track as its motors strain to move the train since they cannot be automatically disabled during the PSA cycle If the second engine is an original Proto Sound engine equipped with PSA you may choose to disable it when used in double heading operations so you will not experience competing PSA sounds To disable ...

Page 12: ...pt to turn it off This means the engine s speed will fall as it labors up a hill and increase as it travels downward It is also affected by the addition or releasing of cars while on the run To turn speed control on and off put the engine in neutral then press the transformer s Whistle button one time then immediately press the Bell button two times Two horn blasts will indicate that the engine ha...

Page 13: ...assigned to the engine and reset it to its factory defaults while in Neutral press the Whistle button once followed immediately by five quick pushes of the Bell button Two horn blasts will indicate that the engine has made the change Automatic Sounds Certain Proto Sound 2 0 sound effects automatically play in programmed conventional mode conditions Squealing Brakes play any time the engine s speed...

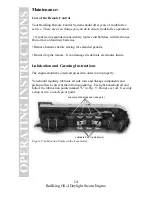
Page 14: ...toring for extended periods Do not drop the remote It can damage the delicate electronics inside Lubrication and Greasing Instructions The engine should be oiled and greased in order to run properly You should regularly lubricate all side rods and linkage components and pickup rollers to prevent them from squeaking Use light household oil and follow the lubrication points marked L in Fig 9 Do not ...

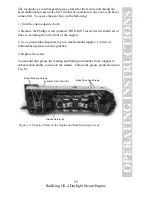
Page 15: ...EASE located at the fourth set of drivers counting from the front of the engine 3 Use a grease tube dispenser to put a small amount approx 1 2 ml of lithium based grease into the gearbox 4 Replace the screw You should also grease the leading and trailing locomotive truck tongues to enhance their ability to slide on the chassis Follow the grease points shown on Fig 10 Grease Screw G Body Mounting S...

Page 16: ...s Traction Tire Replacement Instructions Your locomotive is equipped with two neoprene rubber traction tires on the rear set of flanged drivers While these tires are extremely durable you may need to replace them at some point 1 Remove the side rods the rods that connect each drive wheel to the other from the wheels in order to slip the new tire over the grooved drive wheel These screws can be loo...

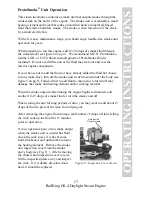
Page 17: ...e free turn off the smoke unit switch located under the body see figure 5 on pg 5 Failure either to add fluid to the unit or to turn it off may damage the smoke unit heating element and or wicking material When the smoke output while running the engine begins to diminish add another 10 15 drops of smoke fluid or turn the smoke unit off When storing the unit for long periods of time you may want to...

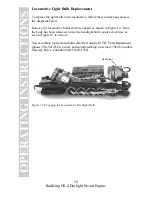
Page 18: ... boiler from its chassis as shown in Figure 10 Once the body has been removed rotate the headlight bulb counter clockwise as seen in Figure 12 to remove You can obtain replacement bulbs directly from the M T H Parts Department phone 410 381 2580 e mail parts mth railking com mail 7020 Columbia Gateway Drive Columbia MD 21046 1532 HeadLight Figure 12 Changing the Locomotive s Headlight Bulb ...

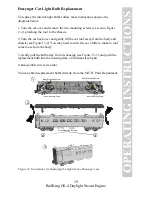
Page 19: ... the body and chassis see Figure 13 2 You may need to twist the car a little to make to roof come loose from the body 3 Gently pull the bulb away from its housing see Figure 13 3 and push the replacement bulb into the housing like a Christmas tree light 4 Reassemble in reverse order You can obtain replacement bulbs directly from the M T H Parts Department Roof Mounting Screw Roof Mounting Screw In...

Page 20: ... the engine in neutral and leave the track voltage at 12 volts for 15 minutes If the garbled or distorted sounds are reduced the battery charge has run down and can be recharged Do this by leaving the engine in neutral with track voltage at 12 volts for 6 7 hours so the battery can fully recharge if your engine has a smoke unit be sure it is turned off Or you can remove the battery as described be...

Page 21: ...to greater than 256 colors The CD will not work on a Mac OS unless you run VirtualPC Running RR Track Software You may run the RR Track software directly off of the CD Rom or you may install the software to your hard drive 1 On the Desktop click on the icon that says My Computer 2 Find your CD Rom drive 3 With the MTH CD Rom in the drive double click on the icon for the CD Rom drive 4 Find the fol...

Page 22: ...con that says My Computer 2 Find your CD Rom drive 3 With the MTH CD Rom in the drive double click on the icon for the CD Rom drive 4 Find the folder on the CD Rom entitled INSTALLATION 5 Choose the folder inside entitled ACROBAT READER If you are running Windows 95 98 or NT choose the folder 32 BIT Run the file AR32E301 EXE and follow the directions it provides If you have problems you cannot res...

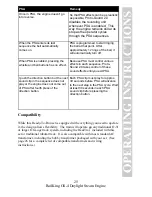
Page 23: ...ll to ring when I press the bell button When I try to fire the coupler PSA starts The Proto Coupler won t let the engine uncouple on the fly You may be pressing the button too quickly Try pressing the whistle button more slowly taking approximately one full second to fully depress the button You may be pressing the button too quickly Try pressing the bell button more slowly taking approximately on...

Page 24: ...s locked into the neutral position Follow the procedure in the Lock into a Direction section Engine speed must be below 10 scale mph approx 10 volts or less in conventional mode Proto Sound 2 0 volume is set too high Turn the volume control knob on the bottom of the chassis counter clockwise to reduce the volume Check to be sure the battery is installed and fully charged See the Self Charging Batt...

Page 25: ...at point After approximately 12 rings of the bell it will automatically turn off Because PSA must control various effects in each sequence Proto Sound 2 0 takes control of these sound effects until you exit PSA Each PSA clip must play for approx 30 seconds before PSA will advance to the next step in the PSA cycle Wait at least 30 seconds in each PSA sound clip before pressing the direction button ...

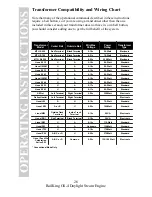
Page 26: ...att Standard Lionel1053 U A 8 17v 60 Watt Standard Lionel1063 U A 8 17v 60 Watt Standard All Trol Left Terminal Right Terminal 0 24v 300 Watt Electronic Dallee Hostler Left Terminal Right Terminal Electronic Lionel LW A U 8 18v 75 Watt Standard Lionel KW A or B U 6 20v 190 Watt Standard LionelMW Outside Track Terminal Inside Track Terminal 5 16v 50V A Electronic LionelRS 1 Red Terminal Black Termi...

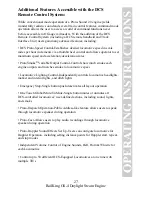
Page 27: ...Controls how much smoke each engine outputs and matches smoke to locomotive speed Locomotive Lighting Control Independently controls locomotive headlights marker and interior lights and ditch lights Emergency Stop Single button push deactivates all layout operation One Touch Global Mute UnMute Single button mutes or unmutes all DCS controlled locomotives user defined actions including sound lights...

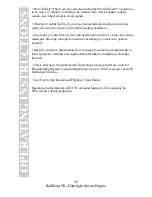
Page 28: ...can determine locomotive values for consist make ups allowing multiple locomotives belonging to a consist to operate together Query Locomotive Information User can query locomotive programming to learn locomotive address and engine data information including scale miles traveled User Can Query Set and Operate Track and Accessory Interface Units for Programming Digital Command Operations for up to ...

Page 29: ...our layout unattended Obstructed accessories or stalled trains may overheat resulting in damage to your layout This train set is intended for indoor use Do not use if water is present Serious injury or fatality may result Do not operate the hobby transformer with damaged cord plug switches buttons or case The transformer was designed to operate on regular US household current 120 volt 50 60 Hertz ...

Page 30: ...__________________________________________ ___________________________________________________ ___________________________________________________ ___________________________________________________ ___________________________________________________ ___________________________________________________ ___________________________________________________ _____________________________________________...

Page 31: ...__________________________________________ ___________________________________________________ ___________________________________________________ ___________________________________________________ ___________________________________________________ ___________________________________________________ ___________________________________________________ _____________________________________________...

Page 32: ...ans when contacting M T H for your Return Authorization number 3 Please make sure you have followed the instructions carefully before returning any merchandise for service Limited One Year Warranty All M T H products purchased from an Authorized M T H Train Merchant are covered by this warranty See our website at www mth railking com or call 1 888 640 3700 to identify an Authorized M T H Train Mer...

Reviews: